Featured Articles by UC Master Gardeners of El Dorado County
UC Master Gardeners in El Dorado County write articles for local publications on home horticulture, vegetable gardening, gardening for pollinators, irrigation, soil health, and seasonal garden chores, among other subjects of interest.
You can find those articles by clicking the link below or scrolling below the archived articles link.
Archived Articles by General Topics:
Find archived articles on a wide variety of gardening topics.
Central Sierra: Master Gardener Articles - El Dorado County
Published in local periodicals, this collection of articles is a treasure trove of advice from UC Master Gardeners of El Dorado County for the residents of this beautiful region.
Central Sierra: Yes, Gardening Is Exercise!
Stay healthy with activity in the garden
If you enjoy gardening, it is great to know that the work you are doing for your plants is helping you to stay healthy. According to Dr. Steven Blair, a noted professor of Kinesiology, just a half hour of gardening, five days a week, lowers risk of heart disease and some forms of cancer, and improves your strength and balance to counter aging changes. Or you can combine your garden work into several hours on the weekend, as long as your total is 150 minutes per week. The calories you burn will help you maintain a healthy weight, and for many of us, the enjoyment of playing in the dirt is a way to keep your mental health in good shape as well.
Many of our garden chores are comparable to biking, hiking, or brisk walking. Someone of average stride length will take about 4,000 steps in an hour while walking about while working in the garden. Typical tasks such as weeding and raking can burn up to 300 calories an hour, while more strenuous activities like hoeing and pushing a wheelbarrow can burn up to 400 calories per hour, the equivalent of jogging at 5 mph or moderate cycling. If you are digging, raking, or pushing a hand mower, you are improving your cardiovascular fitness, and if you are lifting pots or soil, digging with a spade, or spreading mulch, you are building bone and muscle. Even the lighter tasks like pruning can utilize our fine motor skills and keep our arm and hand muscles toned.
It is important to realize that we need to warm up our bodies for gardening, just like with other strenuous activities. Ten minutes of walking or carrying tools out at the beginning of the workday can loosen up the body in preparation for working. And after a lot of leaning or lifting it is especially important to stretch out our muscles. Make sure to stretch again at the end of your chores. Tips on avoiding strain include rotating tasks every 15 minutes, monitoring your posture, and lifting with your legs rather than your back.
The University of Arkansas Extension offers suggested stretches as part of their AgrAbility program that include shoulder shrugs, wrist and forearm stretches, back and hip stretches, and other exercises that you can do in just 12 minutes. They note that just 4 minutes of stretching before, during, and after your garden activities will keep you less tight and prevent stiffness.
Seniors in particular should pay attention to good body mechanics while gardening. Make sure to use a garden cart or wheelbarrow to carry heavy items and tools. Use knee pads or a gardening seat to take pressure off of your knees and, to limit back strain, kneel only on one knee with the other foot on the ground in front of you. Work in shorter windows of time with frequent breaks, especially as you get into your 80s, when one to two hours per session should be enough. Set a timer!
Gardening is so rewarding that it’s nice to know that it is good for you, too!
This article by UC Master Gardener of El Dorado County Kitty Stewart originally appeared in the summer issue of Around Here magazine.
Bring any of your gardening questions to the UC Master Gardeners of El Dorado County. Submit a survey and the Master Gardener volunteers will get back to you during their office hours!
Central Sierra: The Enduring Appeal of Lavender
Tips and tricks for dealing with the wide variety of lavender
There is a plant that could be in your garden right now that has endured the test of time -- the lovely Lavender, Lavandula spp. It dates back 2500 years to the time of the ancient Egyptians and has been celebrated for its healing and relaxing properties, its contributions to the cosmetic and perfume industries, and its many culinary uses. It is a standout in the garden that does well in our area, with beautiful grey-green foliage displayed on a compact plant covered with stunning spikes of aromatic flowers. Lavender has a long bloom time from spring through fall and is a favorite of pollinators. It is pest free, drought tolerant, deer resistant, and very easy to grow. What’s not to love?
Growing conditions for lavender
While lavenders need relatively little care after planting, the right growing conditions are very important. Select a planting spot with six or more hours of sun per day; too little sun limits flower production and causes leggy growth. Soil should be gritty and drain well to avoid fungal root and crown rot problems. Amend soil used for backfilling with sand or organic matter to improve drainage. Planting high, one inch above the soil line, will help water drain away from the plant’s center. In areas with heavy soil, consider creating planting mounds above the soil line.
Lavender also grows well in raised planters and containers. Proper spacing based on plant size allows good air circulation and helps prevent fungal problems. Always consult plant tags for best recommendations. Apply two-three inches of mulch such as pea gravel or decomposed granite, leaving several inches of bare ground around the plant’s stems.
Take care not to overwater. Use drip irrigation to keep foliage dry and allow the soil to dry before watering. Lavender is very drought tolerant once established, but new plants need regular watering during the first year. Apply a balanced fertilizer to new plantings at half strength; established plants do not need fertilizing.
Pruning lavender is required to help maintain a compact plant shape and discourage woody growth. Remove faded flowers as the bloom cycle ends to encourage reblooming and pinch foliage to encourage branching. In the fall, cut the green plant material back one-third to two-thirds, depending on variety, leaving a tidy mound of foliage to overwinter. Do not prune into the wood below the green plant material. This dry wood will not generate new growth.
Lavenders vary greatly in plant size, flower color and shape, foliage color and leaf shape/texture. English lavenders, Lavandula angustifolia, are generally under two feet tall and known for their beautiful flowers, sweet fragrance, and narrow leaf shape. The newer lavender hybrids, Lavandula x. intermedia, are crosses between English lavender and broader leafed varieties, with large highly fragrant flowers on plants that are up to three feet tall. Spanish lavender, Lavandula stoechas, blooms early on plants 18-24’ tall and is known for its showy flower bracts.
The biggest problem may be which beauties to plant in your garden. Lavender has enduring appeal and is worthy of your time, effort, and affection.
This article by UC Master Gardener of El Dorado County Donna Marshall originally appeared in the Mountain Democrat in May 2026.
Trying to decide which lavender to plant in your garden? Direct any El Dorado County garden question to the UC Master Gardeners of El Dorado County!
Central Sierra: Benefits of Gardening with California Native Plants | El Dorado County
Native plants are adapted to the dry climate, support ecosystem's biodiversity.
Spring is a good time to evaluate your landscape and make potential changes to decrease your water use in 2026. A good starting point is to incorporate a California native plant or two into the garden. Many native plants can survive with minimal supplemental water once they have become established.
California includes many different native plant communities.
Native plants come from across the state and are adapted to varying habitat conditions that include coastal, inland, foothill, and desert. The natives for ornamental plantings in El Dorado County are best if of local origin that have adapted to our soil and microclimate conditions.
Native plants from appropriate plant communities can mix with other plants from similar climates with like water requirements. Natives should not be planted near a lawn, or with plants that have high water needs. Very good drainage and careful watering the first year, along with planting a bit above grade so water percolates away from the crown of the plant help ensure success. Native plants should go in native soil, be watered deeply and infrequently once they are established.
Using natives that are adapted to our area will also attract local wildlife.
The local native plants are food sources for wildlife as well as shelter from weather and predators and offer nesting sites. At the UC Master Gardeners of El Dorado County's Sherwood Demonstration Garden, home to sixteen different types of gardens, the winter native garden is home to a variety of resident and migrating bird species. Winter blooming plants provide nectar and pollen for residents like hummingbirds and native bees. Two native shrubs that offer berries for birds are Toyon, Heteromeles arbutifolia, and Oregon Grape, Berberis aquifolium. Western Redbud, Cercis occidentalis, offers seeds and spectacular spring flowers. Native oaks provide acorns and host a wide variety of insects eaten by birds. Hummingbirds are drawn to the red flowers of California Fuchsia, Epilobium canum, and the lovely blooms of the Red Flowering Currant, Ribes sanguineum.
Another excellent Natives Garden can be found within the U.C. Davis Arboretum. The Mary Wattis Brown Garden of California Natives features an extensive collection of native plants, a natives meadow and native grass landscapes.
Look for inspiration in native gardens around you, and then make some additions to your own landscape.
This article, by UC Master Gardener of El Dorado County Debbie Hagar, originally appeared in the Mountain Democrat in April, 2026
Visit the Natives Garden at the Sherwood Demonstration Garden, 6699 Campus Dr. Placerville, CA. Open hours are season-dependent, and can be found on this page of our website.
If you would like to speak with a UC Master Gardener of El Dorado County, please reach out!
Central Sierra: Best Plants for Imagination Gardens | El Dorado County
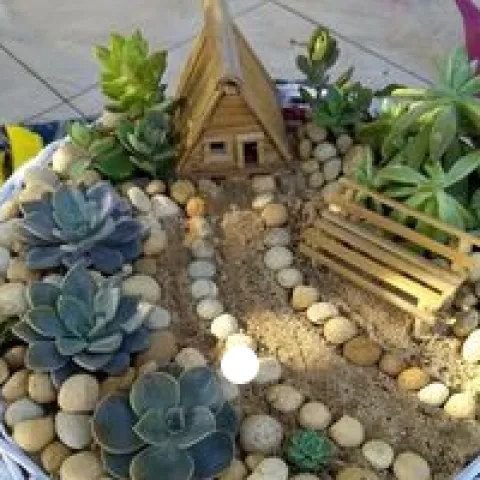
Imagination gardens are a fun way to plant container gardens
Almost all these tiny plants do best in indirect light and in moderate temperatures; in other words, indoors in the summer and winter. They may outgrow a small container but can be divided or pinched back to stay in scale. Do keep their feet damp but not wet, except the air plants, which prefer only misting or a weekly rinse. Most of these plants will live 3-4 years, the exception is the gloxinia which last only one season but may regrow after dying back. Most will need to be divided after a while, so you can use the cuttings for new plantings, or change out the look in your garden for variety.
Most of these will do well in shallow soil, 3-8 inches deep. It should be well-drained, in a saucer, so you can water frequently in warm weather but not allow the roots to be waterlogged. Use indoor potting soil, or a succulent potting mix if you will be planting echeveria and aloes.
Do not use “planting mix,” “garden soil,” or “top soil” as your primary soil component. These are too heavy or otherwise unsuited as a container medium. You can mix these with vermiculite or other soil amendments, but it is easier just to buy the "potting mix." Do not use gravel in the bottom- it aggravates drainage issues.
Consistent, sufficient watering is important for containers because they can dry out quickly. Check containers daily. Stick your finger into the top inch of soil. If it feels damp there is no immediate need for water. If it feels dry, water until some runs out the bottom of the container. Note: If a container dries out completely and the soil becomes hydrophobic, water may run through the container without actually moistening the soil. You may need to soak the entire pot.
Succulents
- Echeveria minima, echeveria elegans – white, or echeveria elora – pink
- Small aloes – some stay quite tiny
- Kalanchoe, stays small for months, can be pinched back
Mosses
- Pillow, mood, java, and feather moss are smaller varieties
- Scotch moss Sagina Subulata Aurea, has tiny white flowers
Ferns
- Button ferns or asplenium (spleenwort ferns)
- Maidenhair is slow growing but will outgrow a small container
- Nephrolepis exaltata ‘Fluffy Ruffles’
Air plants
- Tillandsia spp. - silver or gray-leaved varieties tolerate drier conditions than green varieties, and some are colorful-such as Tillandsia maxima with red leaves
Small shade-plants
- Hostas
- Oregano, and Cuban oregano -Plectranthus amboinicusis
- Small leaf varieties of mint
- Miniature ivy
Tiny flowers
- Sinningia pusilla (and other miniature gloxinias) grow just 3 inches tall. Will die back before they regrow and bloom again.
- Ageratum has small species that top out at 6-8 inches, with blue fluffy flowers
Have questions about building your imagination garden or anything else home garden related? Reach out to the UC Master Gardeners of El Dorado County by phone, 530-621-5512, or with the link to our Ask a Master Gardener survey.
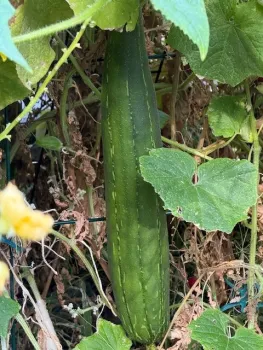
Central Sierra: Grow a Loofah from a Seed
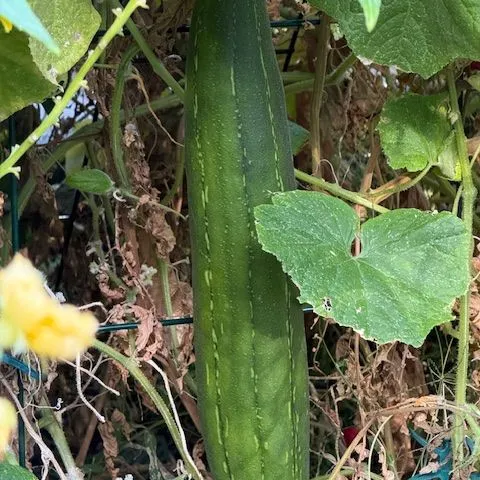
The versatile loofah (or luffa) is edible, but famous as a natural sponge
Luffa, often spelled loofah, Luffa aegyptiaca, is a vining gourd in the cucumber family. It can be used as a vegetable when it is young and the cucumber-like fruit is only six inches or less. It is rich in nutrients and high in fiber, often used in stir-fries and other Asian cuisine. Once it has matured, it dries into a fibrous, stringy interior, and is then used as a biodegradable sponge for the kitchen or bath.
Seeds can be started indoors four to eight weeks prior to last frost. Luffa has a long growing season of 100 to 180 days. For best results, soak seeds for 24 hours to help with germination. Seeds need consistent warmth to germinate, between 75-90 degrees F. A heat mat works well for this. Seeds can also be direct sown in warm soil, usually around mid-May in many areas. You should start your seeds indoors soon for harvest in September.
Once the danger of frost has passed, seedlings can be hardened off by leaving them outdoors for several hours each day.
The tricks for planting and growing luffa
Plant luffa in well drained fertile soil rich in organic matter. Ideal soil is neutral to slightly alkaline with high moisture and good drainage. Keep soil consistently moist but not soggy. Approximately five gallons of water per plant per week is a good guide. Fertilize using balanced fertilizer when flowers appear, as you would with cucumbers.
Small seedlings grow slowly, while the roots become strong, and luffas prefer warm dry climates. Luffa grows best in full sun; plants produce flowers in two months after planting. Flowers are bright yellow.
Pruning is a must to keep the vines healthy. The vines will grow everywhere if not kept under control. If grown in optimal conditions, gardeners may get between 10-40 gourds per plant! Each luffa can produce between 100-300 seeds on average. However, for every three seeds you plant, only two will grow, even for professional growers. You can grow luffa in a 25-to-30-gallon pot or large grow bag with a trellis of some sort to support growth.
Harvesting for sponges is the fun part
Harvesting luffa for sponges is the fun rewarding part of growing this plant. Gourds should be ready to harvest in the fall. To use as kitchen or bath sponges, the luffa should be dried out, be yellow to brown in color, and light weight. If you shake them, you can hear the seeds rattling inside. You can shake out any seeds to keep for your spring planting and share some with friends.
If it is close to fall frosts, you can harvest them and allow them to dry inside your home, just watch for signs of mold. Peel off the outer brittle brown skin, revealing fibrous, spongy material inside. Rinse and wash the luffa then let it dry completely, then cut the luffa into your desired sizes. Use your sponges as cleaning tools, and of course for your relaxing baths. Happy Planting!
This article by UC Master Gardener Judy Hobbs originally appeared in a March 2026 issue of the Mountain Democrat.
If you would like to discuss luffas or any other plant in your home garden, you can Ask a Master Gardener for help. Submit your question through our online survey tool.
Central Sierra: Tech Can Help You Build a Smart Home Garden

Technology for the Home Gardener
Technology can help the home gardener in myriad ways. Technology applies scientific knowledge for practical purposes to solve problems and make life better. Technology is a tool for the garden and gardeners. We can use it to complete routine tasks or tackle more complicated matters, all in an effort to accomplish our gardening goals.
Technology for the garden much of the time comes in the form of an app, short for computer application, which is software designed to perform specific functions. Apps are downloaded to computers and other electronic devices. Many apps use artificial intelligence (AI), a system that performs tasks without significant human effort or oversight.
Smart weather stations give us timely, detailed information about our weather by tracking temperature, barometric pressure, wind strength and direction, rainfall, and UV rays. Originally, SMART stood for Self-Monitoring, Analysis and Reporting Technology, but today SMART is also a broad range of intelligence and advanced technology.
A comprehensive smart garden integrates technology to streamline gardening processes to make them more efficient and sustainable.
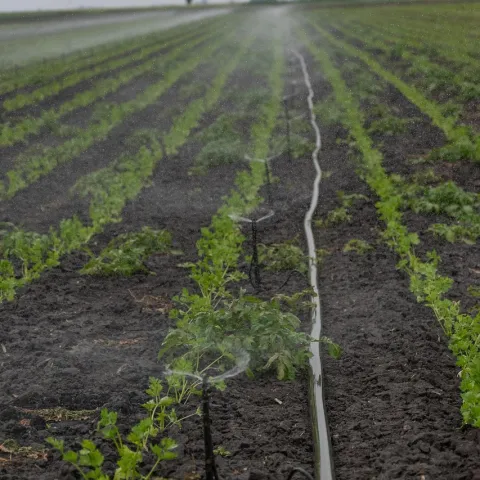
There are solar-powered smart irrigation systems that utilize our garden’s current weather data, using past microclimate temperatures and humidity. There are weather-based sensors that can help us apply proper irrigation to prevent over- and under-watering. The sensors are automated and can be adjusted for a plant’s age, the current weather and the condition of the soil. There is an app that tracks sunlight.
Healthy garden soil is essential and there is technology that can determine soil texture. With that information, we can learn about our soil’s water drainage and retention, workability, and nutrient retention. Also available are soil monitors that can measure soil moisture content, pH, temperature, and natural nutrients.
With a detection app, we can know when a critter visits our garden. Early detection may prevent damage. There are apps to determine whether it is a pest or a beneficial. If it is a pest, we can utilize a pest management app and / or visit the UC Master Gardeners of El Dorado County website to learn about research-based management, control, and treatment for natural solutions to create a more sustainable garden.
There are many plant recognition apps that operate from our photos of a plant’s leaf or flower or a succulent, cactus, or mushroom. Utilizing again our own photos, there are apps to identify and diagnose plant needs, problems, and diseases.
Living in the foothills, we might want to use an app that will alert us of an upcoming temperature drop. We can plan our garden with a planning app to place the right plant in the right place, that will strengthen the likelihood of a thriving garden. There is technology for all facets of composting. Robots can assist in producing and weeding vegetable gardens and can mow our lawn.
We would be wise to use the tools of technology that were developed specifically to help us have beautiful and healthy gardens.
This article, written by UC Master Gardener of El Dorado County Kit Smith, originally appeared in the February, 2026 issue of Around Here Magazine.
Have a Gardening question? Ask a Master Gardener! Call 530-621-5512 or complete the survey linked below
Central Sierra: From Now Til March, It's Time to Prune Your Roses
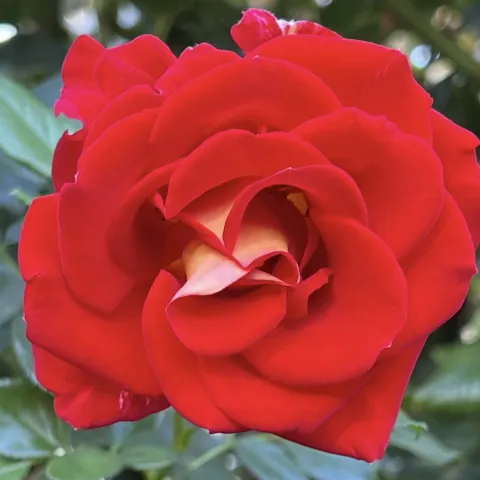
An Invitation to Garden Beauty: A Rose Pruning Primer
It’s that pruning time of year! The period from Christmas until early March (depending on elevation) is the best time to get started. Your bushes will look more attractive and produce larger flowers with good pruning, and you can shape them to the proper size for your garden. The removal of dead and diseased canes also improves rose bush health by stimulating the production of new growth with the emergence of vigorous new canes from its base. Even if your bushes still have leaves and flowers, their removal now is a chance to wipe away last year’s problems and set a new path for the coming season.
The best tools required for rose pruning
Use sharp bypass hand pruners for most cuts, and long-handled bypass loppers for thicker canes and hard-to-reach places. A fine-toothed curved saw will remove the thickest canes. A pair of leather gloves reaching to the elbows protects from thorn pricks.
The parts of the rose that should be pruned away
Completely remove all dead canes (grayish or brown in color and shriveled looking) and canes that have been less productive with a clean cut close to where they emerge from the crown at the base of the bush. Completely remove diseased and damaged canes or cut them back to healthy wood at least one inch below the affected area so the inner wood (pith) is white. Remove all suckers coming from the root stock beneath the bush. Select the strongest three to six outer canes (smooth and green or bronze in color) to become the foundation for next year’s growth. They will ideally be arranged in a vase-like shape around the open center of the bush when pruning is finished.
Remove with a clean cut at the parent stem any growth that is smaller than a pencil and which crosses or rubs other growth. Direct new growth away from the center by making cuts at a 45-degree angle, one-quarter inch above a bud that faces upward and to the outside of the bush. Buds can be found at leaf attachments; some will look like red dots or green smiles, while others might already be pushing leaf growth out. Remove all growth headed toward the plant’s center to discourage fungal diseases by improving sunlight access and air flow. Shorten the remaining canes on established hybrid tea, floribunda, and grandiflora varieties by one-third to one-half in length. Shrub and English roses should be given a lighter pruning, with 6-8 healthy canes left on the bush.
Post-pruning tasks for healthy, beautiful roses
After pruning, remove and dispose of all remaining leaves, along with pruned cuttings, fallen leaves, and debris collected from under the bush – no composting. Make a heavy application of dormant spray or horticultural oil on a day where there is no wind and there will be no wet weather for at least 24 hours. Thoroughly spray the bush and the ground beneath it to suffocate any remaining insect eggs or fungal spores. Apply a layer of mulch 2-3 inches deep, pulled away from the base of the plant. Fertilize about four weeks after pruning; water deeply after application.
Enjoy a wonderful rose year!
Have a rose pruning question? Ask a Master Gardener in El Dorado County by clicking the button to our information survey below or call 530-621-5512 and leave us a message. A volunteer will get back to you during our office hours.
This article, written by Donna Marshall, UC Master Gardener of El Dorado County, originally appeared in the Mountain Democrat in January 2026.