Applications Now Open for 2026 UC Master Food Preserver Training Program! (October 2025)
A Delicious Barbeque Sauce from Tomato Powder (September 2025)
Monica Gross, UC Master Food Preserver Online Program Volunteer
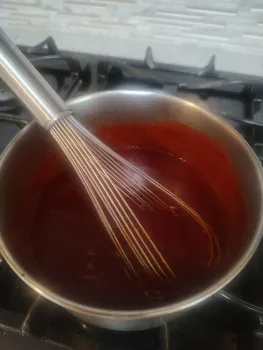
Image Credit: Monica Gross, 2025.
Can you imagine an activity that allows you to experience all of your five senses? Cooking and preparing food are just such activities! Allow me to walk you through an experience that involved seeing, hearing, touching, smelling, and tasting.
Using tomato powder to make a delicious barbeque sauce delighted all of my senses. The process involved reconstituting dehydrated tomato powder and adding a variety of ingredients to transform it into a tasty sauce that can be used for any barbeque entrée or side dish. I added all of the ingredients, except the cornstarch, to a saucepan and mixed them together with a whisk. Initially I saw that that sauce was thin and orangish colored (Fig. 1). Upon completion, the color changed to a darker, deeper reddish color (Fig. 2). The consistency also changed as it cooked. I used my sense of touch to feel that it was thickening. I could “feel” it changing as I stirred with the whisk (Fig. 3). I brought the sauce to a boil, then simmered about 20 minutes. I listened carefully and could hear the gentle “pop-pop” of the simmer alongside the louder drone of the range hood. When the sauce was almost complete, a pleasing aroma filled the air as I smelled its delightful scent. Of course, the ultimate test of the recipe was the tasting of the final product. Licking the spoon after the sauce was placed in its storage container was the highlight of the cooking experience. The satisfying conclusion was that the sauce is delicious and will make my family happy during dinner tomorrow night!
BBQ Sauce Made with Tomato Powder
Ingredients:
½ cup tomato powder
1 ½ cups water
1 cup brown sugar
1/3 cup apple cider vinegar
1 Tablespoon Worcestershire sauce
3 Tablespoons lemon juice
1 Tablespoon ground mustard
½ Tablespoon onion powder
1 Tablespoon smoked paprika
½ Tablespoon salt
1 teaspoon pepper
½ teaspoon garlic powder
1 Tablespoon cornstarch “slurried” in 1-2 Tablespoons cold water
Instructions:
- Mix all ingredients except the cornstarch in a saucepan and stir/whisk together.
- Bring to a boil and simmer for approximately 20 minutes until desired thickness is reached.
- For a thicker sauce, remove the pan from the heat and whisk in the cornstarch slurry. Return the pan to the heat, bring back to a boil, and simmer until the sauce thickens.
- Store sauce in clean container(s) in the refrigerator for up to a week or freeze in freezer-safe containers, leaving appropriate headspace, for up to six months.
For more information see:
- Last month’s Save the Season Newsletter explains how to make tomato powder - Making and Using Dehydrated Tomato Skins (August 2025) | UC Agriculture and Natural Resources
- Reconstituting Tomato Powder 334013.pdf
What’s the buzz? -- Infants and Honey (September 2025)
Kirsten Hansen, UC Master Food Preserver Online Program Volunteer

Image Credit: Kirsten Hansen, 2025.
I recently gave birth to my first child, which means that I left behind the many recommendations about what pregnant people should and should not eat and have entered the world of what infants should and should not eat. One very common recommendation is that infants under a year old should not eat honey, due to the risk of infant botulism. However, I was curious about what this meant: no spoonfuls of honey, of course, but what about baked goods with honey, or preserves that use honey as an alternative sweetener? I decided to do more research.
What is botulism?
Botulism is a serious disease caused by a neurotoxin created by the bacterium Clostridium botulinum. C. botulinum occurs naturally as inactive spores that are ubiquitous in the environment, including soil, water, freshwater and marine sediments, the surfaces of fruits and vegetables, and in seafood. The spores themselves do not make people sick. Under certain conditions, however, the spores can germinate into vegetative bacterial cells and produce botulinum toxins, neurotoxins that attack the body’s nerves, causing muscle paralysis, difficulty breathing, and in severe cases, death (University of California Agriculture and Natural Resources, 2018, p. 5-3). Botulinum toxins (there are several variants) are among the most poisonous biological substances known.
Home food preservers worry most about foodborne botulism, in which the neurotoxin is produced by C. botulinum under the following conditions:
- Anaerobic (low or no-oxygen) environment
- Low acid (above 4.6 pH)
- High moisture
- Temperature between 40° - 120°F
- Low salt (Centers for Disease Control, 2024)
These are exactly the conditions inside a low-acid (i.e., pH < 4.6) food product in storage in a canning jar. If C. botulinum spores are present in a low-acid food product (given their prevalence, we must assume they are) and are not completely destroyed by high-temperature processing (i.e., pressure canning), the spores can germinate into active vegetative cells and generate botulinum toxins. The risk of foodborne botulism is eliminated when safe food preservation techniques are used, which is why the Master Food Preservers program puts so much emphasis on using safe, tested recipes and adhering to the specified processing times for preserving food.
Infant botulism
In the U.S., 200 - 250 cases of botulism are reported annually, of which 60 - 70% involve infant botulism (CDC National Botulism Surveillance System). Infant botulism is completely different from the foodborne botulism that affects adults and older children. Infant botulism typically affects infants under 12 months of age but is most common in those under 2 months of age. It occurs when infants ingest C. botulinum spores that then germinate, colonize, and produce neurotoxin within the infant's intestinal tract. (Clostridium Botulinum & Botulism | Food Safety and Inspection Service, n.d.). It is not definitely known why infants are more susceptible to the germination of C. botulinum spores and subsequent proliferation of the bacterium in the gut than are healthy adults. In the past, the increased susceptibility of infants was thought to be due to the higher pH of infant gastrointestinal (GI) tracts than in adults, but it’s not clear that’s true. The current leading hypothesis is that infants lack the robust microbial community present in the GI tracts of healthy adults. C. botulinum is not a strong competitor for food resources in the presence of an established microbial community, which infants lack. This lack of competitors is thought to allow C. botulinum to proliferate. In short, infants’ gastrointestinal (GI) tracts are not mature enough to fight off the inactive C. botulinum spores and bacteria that adults and older children can handle, and the neurotoxin can develop from the bacteria that emerge as the spores break dormancy. The U.S. Food and Drug Administration, the Centers for Disease Control and Prevention, and the American Academy of Pediatrics all recommend that honey not be fed to infants under one year of age, and that fruits and vegetables should be washed before consumption (which, frankly, is good advice for everyone!) (Clostridium Botulinum & Botulism | Food Safety and Inspection Service, n.d.)
Unfortunately, most cases of infant botulism do not have a clear origin. Recent research has found that most cases of infant botulism occur when infants swallow microscopic dust particles that carry C. botulinum spores. (Harris & Dabritz, 2024, 305). Honey is a known but secondary cause. (California Department of Public Health, 2022). Although, we can’t stop infants from swallowing tiny bits of dust, we can refrain from feeding them honey, so the recommendation to avoid honey under a year old stands.
What about pasteurization?
Raw honey is not safe for infants, but I wondered about pasteurization. Unfortunately, the process used by the honey industry to pasteurize honey is not enough to deactivate the spores that can ultimately result in the production of botulinum neurotoxins. Per Romeo Toledo, a food scientist with the University of Georgia College of Agricultural and Environmental Sciences, honey must be heated to 250°F for a minimum of three minutes to destroy C. botulinum spores. Because this temperature burns honey and changes the flavor, industrial honey is heated to a lower temperature for longer. This destroys molds and common yeasts, but not C. botulinum spores. (Omahen, 2002). I found an article from 2002 that described a new sterilization technique developed by the University of Georgia that destroys C. botulinum spores (Omahen, 2002) but I could not find any information about the degree to which the honey industry has adopted the new procedure. Without further evidence, pasteurized honey must be considered unsafe for infants.
What about home preserved foods and baked goods?
Home preserved foods rely on several methods to make them safe. High-acid foods (below pH 4.6), such as pickles and jams, can be processed in a hot water canner because the acidity, heat, and processing time combine to destroy food spoilage organisms. However, hot water canners only reach temperatures of 212°F (the boiling point of water at sea level, boiling temperatures decrease with increasing elevation), but C. botulinum spores survive to temperatures of 240°F. Although C. botulinum spores can survive the hot water canning process, their growth is inhibited by the acidity and/or low water activity of foods that can be safely processed in a water-bath or atmospheric steam canner (University of California Agriculture and Natural Resources, 2018, p. 4-2). This means they are safe for adults, but not for infants! Items such as jams that use honey as an alternative sweetener should not be fed to infants.
Low-acid foods (above 4.6 pH), such as vegetables, soups, and meats, must be processed in a pressure canner, which uses pressure to heat food above 212°F. In this case, heat and time (but not necessarily acid) combine to make foods safe. At sea level, foods that are processed in a pressure canner at 10 psig reach 240°F, the temperature at which C. botulinum spores are destroyed. (University of California Agriculture and Natural Resources, 2018, 5-2). (Because water boils at a lower temperature at higher elevations, higher pressures are needed to reach spore-inactivating temperatures if one is canning in a location more than 1000’ above sea level.) Nevertheless, as discussed above, such high temperatures burn honey and ruin the flavor, so pressure canning is not a suitable method for honey preservation.
I could not find specific information about honey in baked goods, but most baked goods never reach temperatures above 212°F, so C. botulinum spores can survive. Recommendations from the American Academy of Pediatrics and the Center for Disease Control advise avoiding all forms of honey, including in baked goods and industrial products such as cereals for infants under a year old (Stanford et al., 2013).
In conclusion
Honey is safe (and delicious!) for adults and children over a year old. However, due to the risk of infant botulism it should be avoided in all forms for infants under a year old. All fruits and vegetables should be thoroughly washed before consumption.
References
Abdulla, C., Ayubi, A., Zulfiquer, F., Santhanam, G., Ahmed, M. A. S., & Deeb, J. (2012, July). Infant botulism following honey ingestion. BMJ Case Rep ., 2012(bcr1120115153). PubMed. 10.1136/bcr.11.2011.5153
California Department of Public Health. (2022, March). Frequently Asked Questions (FAQs) About Infant Botulism. California Department of Public Health. Retrieved July 20, 2025, from https://www.cdph.ca.gov/Programs/CID/DCDC/CDPH%20Document%20Library/FAQs_English_Updated_March2022_ADA.pdf
Centers for Disease Control. (2024, April 18). About Botulism | Botulism. CDC. Retrieved July 20, 2025, from https://www.cdc.gov/botulism/about/index.html
Centers for Disease Control, National Botulism Surveillance System. Case Reporting data for 2017 - 2021. https://www.cdc.gov/botulism/php/national-botulism-surveillance/index.html. Retrieved July 27, 2025.
Food Safety and Inspection Service, U.S. Department of Agriculture. (n.d.). Clostridium botulinum & Botulism | Food Safety and Inspection Service. Food Safety and Inspection Service. Retrieved July 20, 2025, from https://www.fsis.usda.gov/food-safety/foodborne-illness-and-disease/illnesses-and-pathogens/botulism
Harris, R. A., & Dabritz, H. A. (2024). Infant Botulism: In Search of Clostridium botulinum Spores. Current Microbiology, 81(10), 306. PubMed. https://doi.org/10.1007/s00284-024-03828-0
Omahen, S. (2002, September 05). New Process Makes Honey Safe For Infants. CAES Newswire. Retrieved July 20, 2024, from https://newswire.caes.uga.edu/story/1460/safer-honey.html
Sanford, M. T, et al. (2013), “Infant Botulism and Honey: ENY-128 AA142, 6 2013. EDIS 2013(6). Gainesville, FL. https://doi.org/10.32473/edis-aa142-2013. Retrieved July 27, 2025.
University of California Agriculture and Natural Resources. (2018). Fundamentals of Consumer Food Safety and Preservation: Master Handbook. UC Master Food Preserver Program. 9781627110211
Spotlight: Jadrian Johnson, Class of 2025 MFP Volunteer (September 2025)
Jadrian Johnson UC Master Food Preserver Online Program Volunteer
County of residence: Los Angeles

Image credit: Jadrian Johnson, 2025.
There is a unique alchemy in food preservation, a practice that feels just as much a form of time travel as it does domestic science. Within a simple jar, we can seal not just the fleeting sweetness of a summer peach, but the echoes of the hands that harvested it, the stories shared over a bubbling pot, and the enduring spirit of a family. For me, this craft is a conversation with my history, and its language was taught to me by two formidable women: my mother-in-law, Patti, and my Grandma Ruth.
My connection to my family’s Nebraska roots is a flavor that collapses time, reaffirmed with every spoonful of the grape jelly Patti sends at Christmastime. It’s a preserve made from an heirloom grapevine her own mother planted generations ago. It’s a taste of heritage, a direct throughline to the matriarchs who kept this tradition thriving. My other North Star was my Grandma Ruth, whose basement was a veritable family museum. Amidst the ghosts of my stylish grandparents’ vintage clothing and a guest room corner that was a perfect time capsule of seventies decor, I found my real treasures. There, in the coolest part of the cellar, stood two floor-to-ceiling cabinets, a library of captured seasons. Jars of home-canned green beans, tomatoes, pears, applesauce, and more stood like jewels on the shelves, a testament to her skill and a vibrant promise of bounty against the monochrome of a Nebraska winter.
With such profound inspiration, it seems inevitable I would find my way to becoming a canner. My own kickstart, however, was fired up in the summer of 2020. As the world rose up to protest profound social injustice, I felt a desperate, visceral pull to join the chorus on the streets. But being immunocompromised, I was warned by my doctors to stay home and not risk COVID-19 infection. Faced with the choice of safety over solidarity, I felt sidelined. Instead of succumbing to helplessness, I resolved to redirect that fire. I traded the pavement for the pantry and brought the protest into my kitchen.
My small Los Angeles backyard, bursting with the striking colors of nectarines, kumquats, and apricots, became my staging ground. I cranked up my kitchen and taught myself to safely harness the wild alchemy of fruit, sugar, and pectin, offering these jars as gifts to folks who made donations to social justice organizations—groups fighting for food security and nutritional education in underserved communities. That summer, this quiet act of creation, fueled by the legacies of Patti and Ruth, helped raise nearly $10,000 for charities.
From a bountiful basement and a legacy grapevine to my own California kitchen, the thread continues. It is a profound reminder that preservation is always an act of love, a way to honor the past while actively building a more just, more equitable, and infinitely more delicious future. I’m proud to be part of the UC Master Food Preserver class of 2025 to help empower others to continue these traditions in safe and sustainable ways!
*Article revised 10/15/2025
Spotlight: Michele Jones, Class of 2025 MFP Volunteer (August 2025)
Michele Jones UC Master Food Preserver Online Program Volunteer
County of residence: Placer

Image credit: Maria Giovanni, 2025
Hi, my name is Michele Jones, and I am proud to be a recent graduate of the UC Master Food Preserver Program, graduating in June 2025. I grew up watching my mother and grandmother preserve fruits and vegetables with skill and pride. Their kitchens were full of love and knowledge.
As much as I admired their ways, I knew I needed to deepen my understanding and gain confidence using today’s trusted, research-based practices. That is exactly what the MFP Program is providing for me – a strong foundation in food safety and modern preservation techniques that align with current science.
Now, I can honor my family’s legacy while confidently sharing safe, up-to-date information on food preservation with others in my community. Whether you are new to preserving or looking to refresh your skills, this Program is an inspiring journey, and you are not alone.
Ice Ice Berry: Freeze Your Fruit Like a Legend (August 2025)
Paige Weisskirch, UC Master Food Preserver Online Program Volunteer
Freezing fruit at home is one of the simplest and most effective ways to preserve your harvest, or that great farmers-market haul, so nothing goes to waste. It gives you the convenience of having high-quality, ready-to-use fruit at your fingertips, whether you're making smoothies, baking, or just grabbing a handful for a snack. Thanks to the innovations of Clarence Birdseye, freezing fruit has become an accessible and reliable way for home preservers to lock in flavor, nutrition, and value year-round.
Clarence Birdseye and the Invention of Quick Freezing
In the early 1900s, Clarence Birdseye was working in the frigid region of Labrador, Canada, where he saw Indigenous Inuit communities preserving freshly caught fish by exposing it to the bitterly cold Arctic air (sometimes as cold as -45°F). This method froze the fish almost instantly, locking in its flavor and texture. When thawed, the fish remained fresh and appetizing, unlike the mushy, watery results commonly achieved with the freezing methods commercially used at the time.
Birdseye realized that the key difference was speed. Fast freezing formed smaller ice crystals that didn’t rupture food cells. Driven by this insight, he returned to the U.S. and began designing mechanical freezing equipment. In 1924, he patented a process that used two refrigerated metal plates to freeze packaged food rapidly. By 1929, Birdseye had sold his patents to what would become General Foods, launching the Birds Eye brand and igniting the commercial frozen food industry.
Frozen Food in the American Home
Birdseye’s innovations made frozen food available in grocery stores by the early 1930s, but it wasn’t until after World War II that American homes began to catch up. Although early adopters purchased standalone chest or upright freezers, the more transformative innovation for everyday households was the development of the combination refrigerator/freezer appliance.
These combination appliances began appearing in U.S. kitchens in the late 1940s and early 1950s, integrating cold food storage and freezing in a single device. By the mid-1950s, more than 80% of American homes had a refrigerator, and a growing percentage included freezers. The convenience of having a freezer section built into the same appliance as the refrigerator made it easier than ever to store frozen vegetables, meats, and yes, berries.
As frozen foods became a staple of American life, so too did home freezing. With Birdseye’s quick-freezing principles built into the very design of modern appliances, freezing fresh fruit became both accessible and practical.
Freezing Berries the Smart Way: Start with Tray Freezing
Berries are a perfect candidate for freezing, but due to their high water content, they need to be frozen correctly to prevent them from turning mushy. The most versatile method is tray freezing, which keeps berries separate and allows for easy portioning later.
Follow these simple steps:
- Select fully ripe, firm berries. Remove leaves, stems, and any bruised or underripe fruit.
- Wash gently in cold water and drain thoroughly. (Tip: Use a salad spinner lined with paper towels – be gentle.)
- Allow the berries to dry thoroughly for an hour on the counter or uncovered in the refrigerator for several hours. (The less surface moisture, the better)
- Spread the berries in a single layer on a rimmed baking sheet and place in your freezer (in the coldest spot, ideally near the back).
- Once frozen solid (usually several hours), quickly transfer the berries into freezer-safe containers or bags. Squeeze out excess air before sealing or use a vacuum sealer.
Learn More About Freezing Options
If you plan to use your berries in desserts or cooked recipes, you may want to consider other methods, such as a syrup or sugar pack. You can learn more about these methods in the UC Master Food Preservers Guide: UC MFP: Fruit, Serve It, Preserve It.
Storage Tips for Success
- Keep your freezer at 0°F (-18°C) or lower.
- Use moisture- and vapor-resistant freezer containers or bags.
- Label foods clearly with the date frozen and contents.
- For best quality, use frozen berries within 8–12 months.
Thawing Tips
Thaw berries in the refrigerator for a slow, safe defrost. If you’re using them in baked goods or smoothies, you might not need to thaw them at all. For immediate use, berries can be thawed under cold running water or in the microwave if they’ll be cooked right away.
A Frozen Legacy
Clarence Birdseye’s innovation brought the convenience of frozen foods to every household. Today, every home cook benefits from his work. Freezing berries with modern home appliances and reliable techniques not only reduce food waste but also allows you to enjoy the taste of summer any time of year.
Making and Using Dehydrated Tomato Skins (August 2025)
Monica Gross, UC Master Food Preserver Online Program Volunteer
There are a surprising number of uses for tomato skin! This article will explain how to make a powder out of tomato skins and what to do with that powder (Fig.1). Prior to canning tomatoes, it’s necessary to remove the tomato skin. This is done by placing a few tomatoes at a time in boiling water for about one minute until their skins split. (For thick-skinned tomatoes, it helps to cut a small “x” in the blossom end of each tomato first.) After an ice water dip, the skin will slip right off. This series of articles will enlighten you on some surprising uses for those tomato skins. This month’s article will explain how to make tomato powder out of the skin and future articles will explore other uses for the lowly skin!

Figure 1. Tomato powder (Image credit: Monica Gross, 2025).
Tomato skins can be dehydrated and ground into tomato powder. The use of a dehydrator (Fig. 2) is recommended because ovens generally do not have a low enough temperature setting and the skins are easily burned at the higher oven temperatures. Place the skins on parchment paper, outer-skin side down, in a dehydrator. Arrange the skins to lay without folding over on themselves as much as possible. The skin should not touch one another. Set the temperature to 135oF and dry for 6 - 12 hours. Check at the 5th hour and remove any that are completely dried. NO moisture should remain. The skin should snap or shatter when bent. Store the dry skins temporarily in a covered container. Continue drying the skins that are not crisp. Check hourly and remove the skin when they have completed the dehydration process.
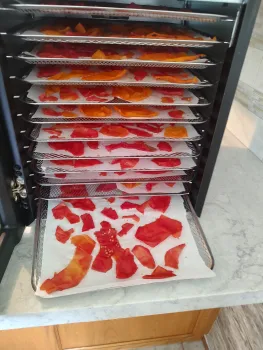
Figure 2. Dehydrator filled with tomato skin (Image credit: Monica Gross, 2025).
Next, pulverize the skins in a food processor, blender, or spice grinder to form tomato powder. Store the powder in a closed container in a cool dark place. If properly prepared and stored the powder can last for a year or more. You can simply use the powder as a seasoning or flavor enhancer in soups, stews, and baked goods. Alternatively, you can reconstitute it to make various tomato products (Fig. 3) as detailed in the table below.
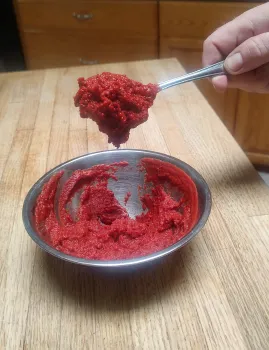
Figure 3. Bowl of fresh tomato paste (Image credit: Monica Gross, 2025).
Tomato Product | Tomato Powder | Water | Product |
Tomato sauce | 1/3 Cup | 1 Cup | 8 oz Tomato sauce |
Tomato paste | 6 Tablespoons | ½ Cup | 6 oz Tomato paste |
Tomato juice | ½ Cup | 4 Cup | 32 oz Tomato juice |
For more information on dehydrating tomatoes and tomato skins, see: