By Isabela Pakbaz
If you are looking for a way to increase your nutrient intake during winter, diversify the greens options in your diet or just get your gardening “fix” during the slow outdoor months, consider growing microgreens indoors!
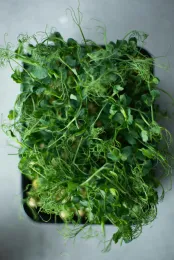
Microgreens are seedlings harvested just after their first one to two true leaves appear (typically 2–3 inches tall) and are ideally suited for indoor cultivation because they require minimal space, no soil (no mess!) and their rapid growth cycle—typically 7 to 14 days - give you fast and delicious results.
And thanks to research from university scientists, we now know these tiny greens pack a surprising nutritional punch. In general, microgreens contain considerably higher levels of vitamins and carotenoids—about five times greater!—than their mature plant counterparts.
Setting Up an Indoor Microgreen System for Winter
Microgreens are easy to grow because they require very little equipment and care.
Here are the supplies you’ll need and some practical guidelines to get started:
1. Trays or Containers
To grow microgreens you will need 3 trays or containers:
- One shallow tray with drainage holes (standard 10×20 seedling trays work well) to hold the growing medium
- A second solid tray to catch excess water as the plants grow.
- A third solid tray to cover the seeds while they germinate.
Recycled produce containers can also be used as long as they are food-safe and have adequate drainage holes.
All trays or containers should be clean and sanitized before use—wipe them with isopropyl alcohol to reduce the risk of disease.
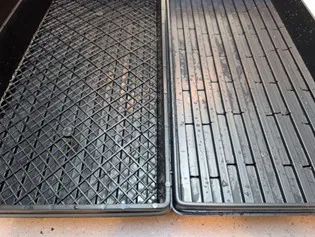
Example of growing trays with drainage inserted into flat trays. Left tray for growing with natural mats; right tray for growing with seed starting mix or mats.
2. Growing Medium
Use soil-less options that have the capacity to hold moisture. Choose a soil-less growing medium with good moisture-holding capacity. Not only are these clean and easy to manage, but they also reduce the risk of disease, and soil containing compost may give your greens an off flavor.
Great options include:
- Sterile Seed-Starting Mix: peat moss, vermiculite, and perlite.
- Coconut Coir (Coco Peat): sustainable, excellent water retention.
- Natural mats like hemp, bamboo, jute (burlap): biodegradable and provide even moisture distribution.
3. Seeds
You may be surprised to find that microgreens seeds are the same seeds used for mature plants! However, keep a few important guidelines in mind:
- Use untreated and certified organic seeds to avoid dyes, fungicides, or insecticides that can linger on the seedlings.
- Choose varieties with similar growth rates if you're growing more than one seed type in the same tray. Some varieties have a very short growth cycle (7-8 days) like those belonging to the broccoli family (Brassicaceae), such as broccoli, radish, cauliflower etc., others are slow growing (10 - 20 days) like amaranth (Garnet Red), arugula, basils, beets, carrots, chards, cilantro, parsley etc..
- Avoid crops like tomatoes, peppers, eggplant, and potatoes, which are not edible at the seedling stage due to toxic alkaloids.
Tip: If you plan to grow microgreens regularly, buy seeds in bulk to save some money.
4. Lighting
Unlike summer months when growing microgreens in direct sunlight in a windowsill will give you great results, winter daylight is rarely enough, even near a bright window. For consistent yields, supplement with LED grow lights. A simple full-spectrum strip light placed 6–12 inches above the trays can mimic spring sunshine. Aim for 12–16 hours of light per day.
5. Temperature
Most microgreens germinate well at 65–75°F (18–24°C). Certain crops are especially dependable on winter conditions so consider growing radishes, broccoli, pea shoots or mustard if the temperature inside is on the lower side.
6. Water & nutrients
Microgreens prefer a slightly acidic water (pH ~6) but tap water or filtered water should work just fine.
You may add a hydroponic nutrient solution, but it’s optional. If you choose to use one, mix according to the label instructions before adding it to your spray bottle or watering tray.
7. Other tools:
- Spray battle for spraying the seeds.
- Sharp scissors or knife for harvest.
- Small fan (optional) to increase airflow and reduce mold.
- Timer (optional) for automatic lighting.
- Thermometer (optional) to monitor room temperature.
The Growing Process
Step 1: Prepare the trays
- Nest the tray with drainage holes inside the solid bottom tray.
- Add the moistened growing medium (if using seed starting mix add 1–1.5 inches of soil and make the soil flat). The medium should be moist but not dripping.
- Sow seeds generously to create an even “carpet” across the surface. Avoid gaps or clumps.
- Press seeds lightly into the medium for good contact.
- Spray with water.
Blackout - stage 1: cover the seeded tray with the solid tray and add a small weight (a book or clean stone). This keeps seeds pressed to the growing medium, helping even germination. Keep covered for 2–3 days.
Notes:
- The bigger seeds can be, optionally, pre-soaked in water overnight for 8-12 hours, which can speed the germination process by one day.
- Do not cover the seeds with soil so the sprouts remain clean and decrease the risk of disease contamination.
- To calculate the exact amount of seeds needed for your tray, you can use this Microgreens Seed Density Calculator developed by Penn State University.
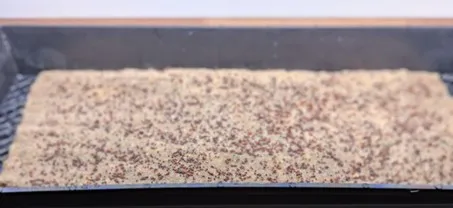
Example of tray with hemp mat. Mat was cut smaller than the tray for air circulation and easy bottom watering.
Step 2: Germinate the seeds in the dark
- Keep the tray covered with weights until all seeds have germinated (usually 2–3 days). Mist daily to keep the surface moist, but never soggy.
Blackout - stage 2: once sprouted, flip the top tray upside down and keep seedlings in the dark for another 1–2 days. This encourages stretching, making harvesting easier later.
Notes:
- If roots appear through the bottom, lightly mist the bottom tray to keep them from drying out.
- Always check moisture levels with your fingers before spraying.
Step 3: Grow Under LED Light
- Once the seedings have germinated, remove the cover and place the tray under your grow lights.
- By this point, roots should be developed enough to begin bottom watering. Add about half a cup of water to the lower tray and refill as needed, usually once or twice daily. Keep the growing medium evenly moist.

Example of a kitchen counter setup for growing microgreens: 1 - four command strips for holding the lights ; 2 - LED lights attach with metal chains; 3 - tray with microgreens stacked into a flat tray; 4 - spray bottle; 5 - automatic timer; 6 - thermometer
Not sure how to tell if the fuzz on your microgreens is mold or roots? Check this article from Quantum Microgreens: White Fuzz on Microgreens: Is It Microgreens Mold?
Step 4: Harvest and storage
Microgreens are ready to harvest when they’re 2–3 inches tall or when the first true leaves appear.
- Cut just above the growing medium with a clean, sharp knife or scissors.
- Microgreens grown on soil-less media often do not require washing.
- Store them wrapped in a paper towel in a plastic bag or airtight container.
- Keep refrigerated for 1–2 days for best quality.
Post Harvest
Enjoy your greens! A quick online search will reveal dozens of ways to use microgreens—from salads and smoothies to soups, omelets, pizzas, and grain bowls.
When you're done harvesting, compost the used growing medium, then wash and sanitize your trays so they’re ready for the next batch.
Tips for Success
Start small. Begin with one or two trays and a single variety while you learn how microgreens respond to your home’s lighting, temperature, and humidity.
Try different varieties. Every type—radish, pea, broccoli, mustard, sunflower—has its own flavor, texture, and growth habit. Experimenting helps you discover your favorites.
Stagger your plantings. Sow a new tray every 3–5 days for continuous harvests. This easy rhythm turns a tiny indoor corner into a year-round mini-garden.
Experiment with recipes. Microgreens add fresh flavor and nutrients to countless dishes. Try them in sandwiches, soups, smoothies, omelets, grain bowls, and even as a colorful garnish.
Adjust lighting and moisture as needed. If seedlings look leggy, move lights closer. If mold appears, improve airflow and switch fully to bottom watering. Small tweaks can make a big difference.
With a little experimentation, microgreens can become one of the easiest and most rewarding crops you grow—especially in winter, when we all need a burst of fresh greens.
References:
United States Department of Agriculture, AgResearch Magazine, Specialty Greens Pack a Nutritional Punch, https://agresearchmag.ars.usda.gov/2014/jan/greens
PennState Extension, The ABCs of Microgreens, https://extension.psu.edu/the-abcs-of-microgreens
PennState Extension, A Step-By-Step Guide for Growing Microgreens at Home, https://extension.psu.edu/a-step-by-step-guide-for-growing-microgreens-at-home
Growing Microgreens Year-Round: A UC Master Gardener Webinar, https://www.youtube.com/watch?v=a5fREz1OB6E&t=1869s
Quantum Microgreens, White Fuzz on Microgreens: Is It Microgreens Mold? https://quantummicrogreens.com/white-fuzz-on-microgreens-is-it-microgreens-mold/
Photo credits: Primary Image from cottonbro studio, Pexels.
All other images courtesy of the author, Izabela Pakbaz, UC Master Gardener of Humboldt and Del Norte Counties.