Paige Weisskirch, Monterey County, Online Delivery Program
Not everyone has, wants, or needs to preserve a bushel of anything.
In my house, that's probably for the best. I have a small family and a garden that prefers to produce a little bit of lots of things instead of a lot of any one thing. I preserve because I want to, not because I'm racing the first frost. Sometimes that means a few jars of jam, one batch of pickles, a bag of frozen herbs, or a quart of sauerkraut. All of it counts. Food preservation is practical in everyday ways: it reduces waste, makes it easier to take advantage of seasonal food when it's actually good and reasonably priced, adds variety to meals later on, and, on a good day, is genuinely fun.
One small tangent: a bushel is a volume measure, not a standard weight. The legal bushel is defined by volume, and the actual weight depends on what you're measuring. So "a bushel of peaches" sounds precise, but it leaves plenty of room for interpretation, which is kind of perfect for a hobby that attracts people who enjoy being precise about things.
Small batch, same safety rules
The nice thing about small-batch preserving is that it fits normal-sized lives. The less convenient part is that the safety rules don't shrink with the batch. Whether you're making four jars or forty, the method is what makes food safe, not the seal. A lid can seal even when the food wasn't processed correctly. Safe preservation depends on using a tested recipe, the correct method for the food, the right jar size, proper headspace, correct processing time or pressure, and altitude adjustments when needed. For reliable, tested recipes, look to trusted sources like university extension programs or the USDA National Center for Home Food Preservation.
Scaling down the amount you're making can work. Changing the formula is a different thing. You can often reduce a tested recipe proportionally. What you shouldn't do is casually adjust the acid, salt, processing time, pressure, or jar size, and assume a smaller batch will make it fine. It doesn't.
Freezing counts too
Freezing is one of the best preservation methods for small households because it's quick, flexible, and very good at reducing waste. Half a bunch of herbs, a few extra peppers, leftover berries, cooked food you know you won't get to, the freezer is your friend. Proper freezing slows the changes that cause food to spoil, helping preserve its quality for later use. Herbs are a perfect example. They freeze well for cooking, even though they usually go limp when thawed. They may not come back looking glamorous, but they're still excellent for soups, sauces, and sautés, all the places herbs actually end up in real life.
For small homes, freezing flat is one of the most useful tricks around. Bags of berries, chopped peppers, pesto, tomato sauce, or broth can be laid flat to freeze, then stacked or filed neatly once solid. It saves space, makes portions easier to grab, and turns your freezer from "mystery avalanche" into something you can actually use. Use freezer-safe packaging so the food is protected from freezer burn and moisture loss.
A note about vegetables. Most vegetables need one more step before freezing: blanching. Brief blanching in boiling water or steam slows enzyme activity that would otherwise damage flavor, color, and texture during frozen storage.
Dehydrating without a giant gadget
Drying is another practical option, especially when storage space is tight. Dried foods take up much less room than canned or frozen foods, which matters when your "pantry" is really one shelf and some optimism.
A dehydrator is handy, but not required. Dehydrators allow for more precise control of temperature and airflow, but other methods can work too. Food can also be dried in an oven set to a low temperature with sufficient airflow to allow moisture to escape. A toaster oven can work too, as long as it reliably stays at a low drying temperature. If yours behaves like a tiny blast furnace, it is better for toast than tomatoes. For herbs and some fruits or vegetables, small-batch drying can be an easy way to preserve a little at a time without committing storage space to another appliance. You can even dehydrate herbs in a paper bag, or by hanging. Low heat, good airflow, and patience are the keys.
High-acid canning: very doable in a regular kitchen
High-acid foods are often the easiest place to start with canning. Jams, jellies, fruits, pickles, and other properly acidified foods can be processed in a boiling-water canner. A dedicated canner is nice, but a large pot works just fine as long as it's deep enough for jars to be covered by at least one to two inches of boiling water, has a lid, and has a rack to keep jars off the bottom. A proper canning rack is easiest, but if you're working with what you have, a heat-safe cake rack works too, and some people just twist-tie extra canning rings together to create a buffer. The important thing is that jars aren't sitting directly on the pot bottom and that water can circulate around them.
One purchase that's worth making if you plan to water-bath can: a jar lifter, or a pair of heatproof silicone gloves. Jar lifters are often under $10 and can often be found in resale shops and garage sales. Getting the jar out of the canner without drama is partly about convenience and mostly about avoiding urgent care.
Jam, jelly, and the pectin question
Jams and jellies are where a lot of small-batch preserving dreams begin, and also where they occasionally turn into very nice fruit syrup.
Jam and jelly recipes can often be scaled down, but they need to be treated with respect. Different pectins behave differently, and the package directions matter. Powdered and liquid pectins are not interchangeable, and they're added at different points in the recipe. For scaling down, powdered pectin is usually easier to work with than liquid pectin; you can measure it in smaller amounts. Liquid pectin often comes in premeasured pouches, which makes odd fractions annoying. The safe approach is to reduce every ingredient by the same proportion: half batch, cut everything in half; one-third batch, divide everything by three. A digital scale helps a lot here.
A few non-negotiable things, batch size notwithstanding:
- Don't switch pectin types unless the recipe says you can.
- Don't reduce sugar unless the recipe or pectin product is specifically designed for that.
- Don't skip or reduce bottled lemon juice or other added acid.
- Don't shorten processing time because the batch or the jar is smaller.
Low- or no-sugar pectins are often more flexible when you want a reduced-sugar spread, but they still need to be used according to the directions for that specific product.
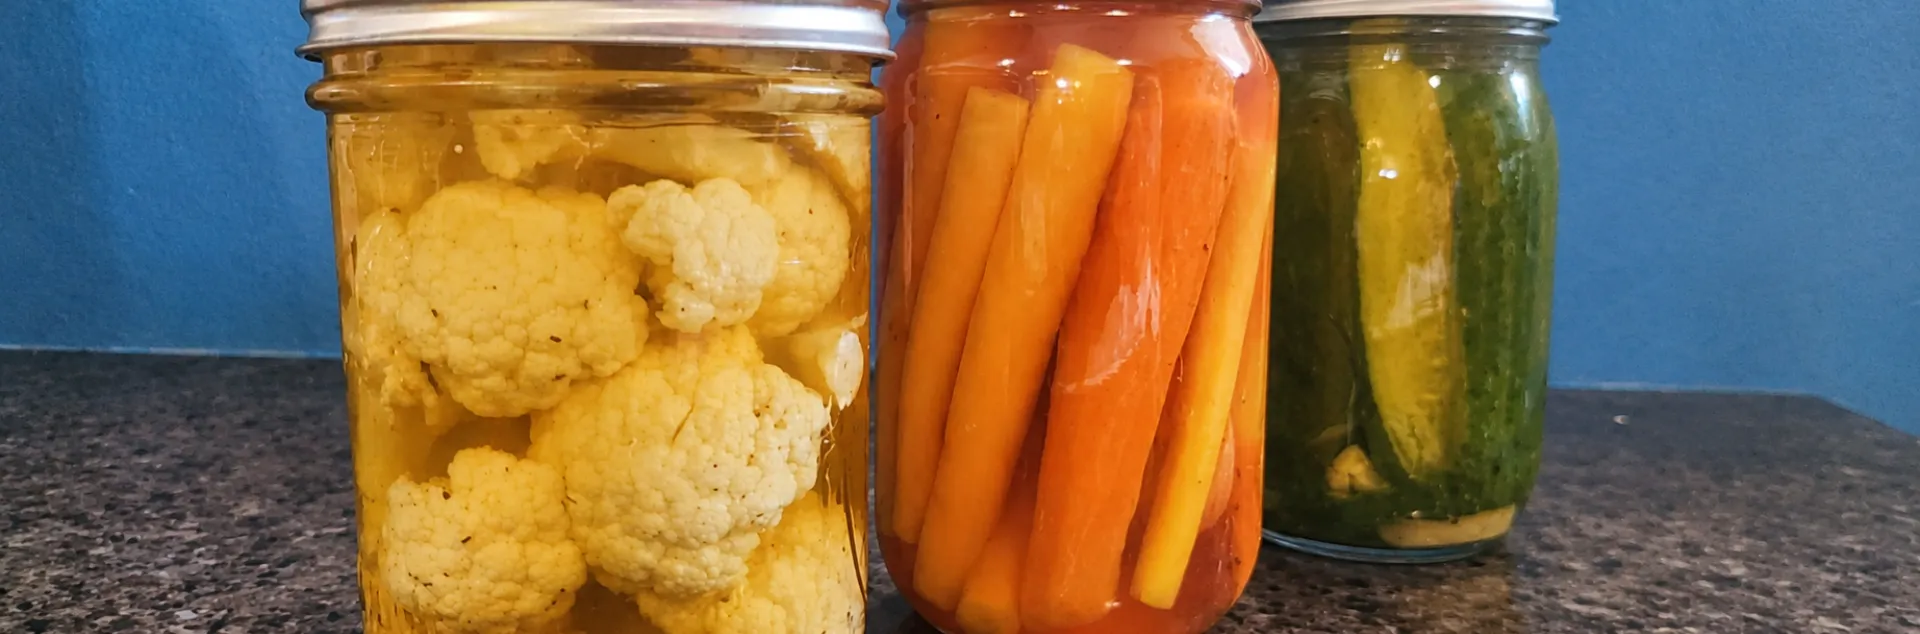
Refrigerator pickles are not cheating.
Refrigeration is food preservation, and it deserves more credit.
You don't need an Instagram-worthy shelf full of shelf-stable pickled carrots to be doing this right. Sometimes the correct answer is one jar of refrigerator pickles. They're quick, practical, and ideal for people who want pickled vegetables in the fridge rather than a lifetime supply in a basement. They're not shelf-stable, which is why they live in the refrigerator. And because they're easy to make, you can just make another jar when the first one is gone. A single jar of pickles may not be useful in a zombie apocalypse, but most of us are not, currently, in one.
Fermenting: small batches are welcome here.
Fermenting is one of the most small-batch-friendly methods going. With foods like sauerkraut and fermented pickles, what matters is the ratio of salt, water, and produce. Keep that ratio correct, and you can scale up or down safely.
Sauerkraut is a good example. The standard tested formula is 3 tablespoons of canning or pickling salt per 5 pounds of shredded cabbage (roughly 2.25% salt by weight), which is one reason metric can make fermentation feel beautifully tidy. If you have 1000 grams of cabbage, you use 22.5 grams of salt. Not going to lie, a good digital scale and the metric system make scaling recipes much easier. In my house, we like sauerkraut, but we don't like like it. A quart at a time is plenty. I cannot envision making 25 pounds of kraut at once unless I'm preparing for winter in 1880.
Fermented pickles follow the same logic: correct salt concentration, vegetables submerged in brine, and a tested recipe. Salt isn't just for flavor; it creates conditions that favor the right microbes and discourage the wrong ones. Keep the salt ratio correct. Keep the food submerged in the brine. "Just making a little" doesn't change either of those rules.
Low-acid foods: no shortcuts allowed
This is where things get serious. Most vegetables, meats, poultry, and seafood are low-acid foods, and they must be pressure-canned for shelf-stable storage. Boiling water canning isn't safe for these because boiling water doesn't reach high enough temperatures to destroy the spores that pose a botulism risk. This isn't one of those "experts disagree" situations; the USDA, the National Center for Home Food Preservation, and university extension offices are completely unified on this. So are food safety authorities in countries where pressure canning has never been a common kitchen tradition. This isn't American overcaution; it's just how the science works in every country where people have looked into it. If you've seen a video or blog post suggesting that water-bath canning green beans is fine, that person is mistaken. Pressure canning with a tested recipe is straightforward, well-documented, and has an excellent track record, which is more than can be said for the alternatives.
There is no workaround for a pressure canner. USDA home-canning processes are designed for pressure canners (not a pressure cooker!) that are large enough to hold at least four quart jars upright on a rack. If your mental image of a pressure canner comes from online videos, it's probably a large one, which makes sense when you're the kind of person who measures produce by the bushel and means it. But pressure canners come in a range of sizes, and smaller ones are widely available and often less expensive than their imposing larger cousins. There are mid-size options too. A few minutes of research will turn up plenty of choices, so you can find the one that's actually sized for your kitchen and your ambitions rather than someone else's harvest.
Storing canned goods in a small home
Home-canned food doesn't require a walk-in pantry or a wall of open shelving.
Sealed jars should be stored in a cool, dark, dry place. After cooling and sealing, rings should be removed for storage. This makes it easier to notice if a seal fails later. A pantry doesn't have to be a pantry. A closet shelf, a spare cupboard, a cool laundry-room corner, under a bed, all of these work. As a general rule, home-canned foods keep their best quality for up to a year, although some items may last longer if stored properly. Always check for signs of spoilage before using: look out for bulging lids, leaks, strange smells, mold, or any change in color or texture. If a jar is unsealed, spurting, or the contents seem off in any way, it’s safest to discard it. The practical reality for small homes is that smaller jars, fewer duplicate batches, and foods you'll actually eat make more sense than stacking jars out of ambition. Four jars you eat are better than fourteen jars you guiltily move around for two years.
The bottom line
I preserve food because I enjoy it. After all, it helps me waste less, because seasonal food is often cheaper and better, and because I like having variety on hand. I'm not stocking a bunker. I'm making good use of what I have.
Small-batch preserving fits ordinary households, small kitchens, mixed-up gardens, grocery store markdowns, farmers market finds, and realistic appetites. You don't need a huge harvest or a farmhouse pantry. You just need the right method, good information, and an honest assessment of how much sauerkraut your household truly needs.