UC Master Food Preserver Newsletter

In November of 2024, the UC Master Food Preserver Program launched a monthly newsletter that delivers recipes, how-tos, and food preservation inspiration straight to a subscriber's inbox. Subscribe to the newsletter here.
Do you have a correction, suggestion, or story to share with the newsletter team? Share corrections, suggestions, or stories here.
Past Newsletter Full Emails
2026
2025
2024
Monthly Articles To-date
Holiday cookies with an unexpected ingredient (December 2024)
Earl Weak, UC Master Food Preserver Volunteer Online Program
The dried zucchini from last summer can once again be transformed for another creative use this holiday season. Zucchini can easily be made into flour.
This flour, also called “Amish flour” because it has long been used in Amish communities, is made by grinding dried zucchini. Zucchini flour was used in past years when there were flour shortages and rationing cards were used.
To make zucchini flour, grind dried zucchini to a flour consistency using a food processor or coffee mill. Simply pulse until your desired consistency is reached. To make it compatible with other recipes, it is recommended to make the consistency similar to wheat flour, which is ground to a particle size that passes through a sifter screen.
However, zucchini, unlike wheat, is low in starch and does not contain gluten proteins. Starch provides structure in bakery products and gluten is needed for making bread. Therefore, zucchini flour can replace up to 1/3 of the regular wheat flour in bakery recipes.
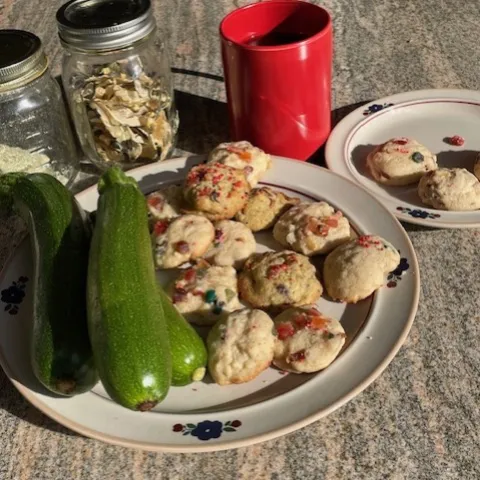
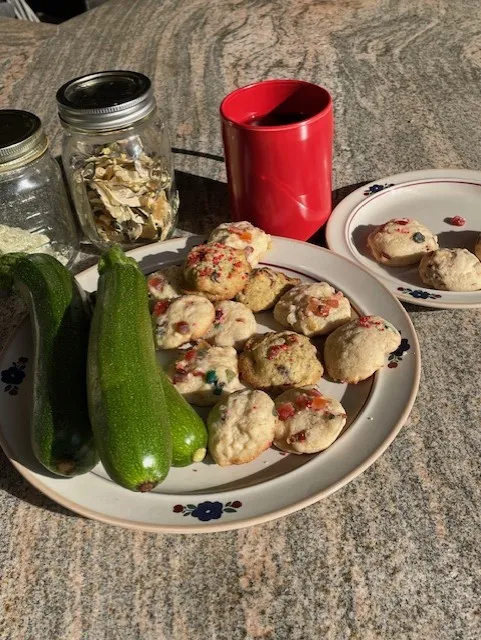
The holiday cookies shown in the picture are made with zucchini flour. Once you taste a zucchini flour cookie, it might open up additional interest in other uses for zucchini flour!
Holiday cookies are made of many different ingredients. Nuts and candied fruit are used in fruitcake style cookies. Raisins and other dried fruit can also be added. The attached picture shows fruitcake cookies made with about 1/3 zucchini flour.
Happy holidays and enjoy baking seasonal cookies, using delicious, unexpected ingredients!
Applesauce for Chanukah (December 2024)
Paige Weisskirch, UC Master Food Preserver Online Program Volunteer
The festival of Chanukah, with its twinkling lights and spinning dreidels, has long been associated with traditional fried foods, like potato latkes and sufganiyot (filled donuts). Applesauce has long stood out as a beloved topping for crispy, golden potato and onion latkes. How did this fruity condiment become so intertwined with Chanukah celebrations, particularly in Eastern European Jewish diaspora communities?
The connection between apples and Chanukah is traced back to Eastern Europe, where apples were one of the few local fruits that kept throughout the winter. Many people, including Jewish families in these regions, would preserve apples in various forms to ensure a supply of fruit and a sweet treat during the cold months when fresh produce was scarce.
Apples also hold symbolic significance in Jewish tradition. In the Song of Songs, the apple tree is often said to be a metaphor for God's love and protection. This association may have contributed to the fruit's popularity during religious celebrations, even though the apple does not hold specific religious significance for Chanukah.
Applesauce gained popularity as a latke topping for several reasons, including availability, dietary laws, and taste. As mentioned earlier, apples were stored in the fall to be available during winter. Families could rely on having a cache of apples available for special meals or for baking. For much of history, people in Europe cooked with animal fat as opposed to vegetable oils. Jewish dietary law (i.e., keeping kosher) does not allow combining meat and dairy products in the same meal. Because of kosher dietary observance, foods fried in animal fat (like potato latkes) could not be served with the more typical of Eastern Europe, dairy-derived sour cream. In order to balance the taste and to be celebratory with a sweet, applesauce was added. Apples, as a fruit, are considered neutral (i.e., pareve), neither meat nor dairy, and can be eaten with either meat or dairy products. Finally, applesauce's sweet and tangy flavors are a delicious accompaniment to the savory latkes, elevating the humble potato pancake into something suitable for a celebration. Once vegetable oils became affordable and available in Europe, families began frying latkes in them, which allowed the use of sour cream as a topping.
While potato latkes are undoubtedly the star of the Chanukah table (along with sufganiyot, a type of jelly-filled donut, or buñuelos, a honey-topped fritter common in Sephardic communities that originated in Spain and is now a popular Mexican dessert), the choice of latke topping has sparked a friendly debate among Jewish families for generations. Now, applesauce and sour cream are the two main contenders, with regional and personal preferences playing a significant role in the selection. Admittedly, using both on one latke is not unheard of.
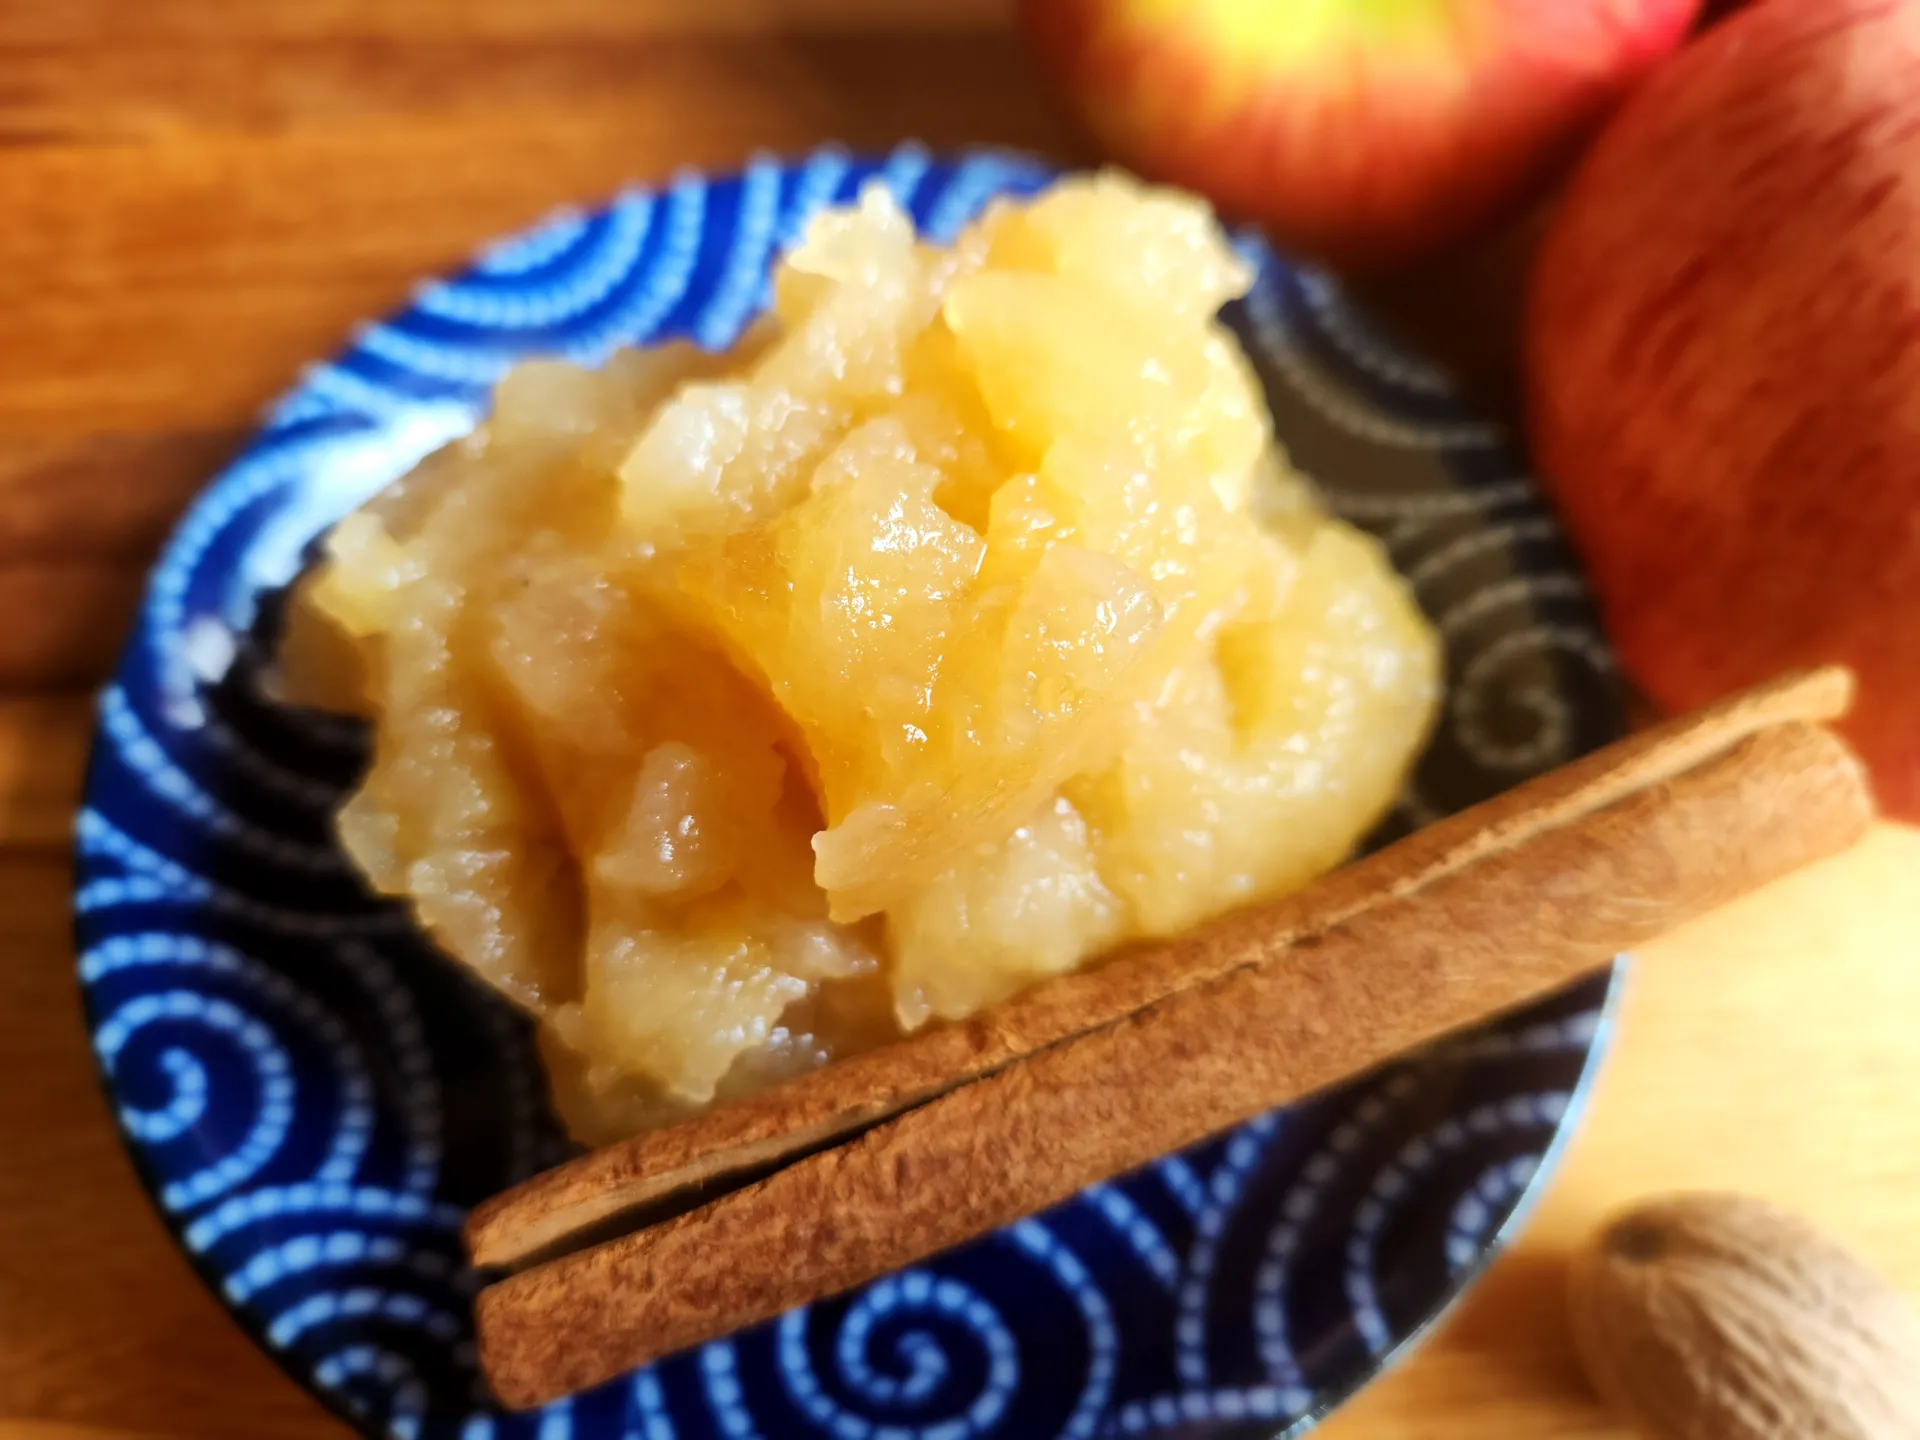
Making homemade applesauce is an ideal project for both beginner and experienced cooks alike. For novices, the process is straightforward and forgiving, allowing for creativity without the pressure of precision. Cooks can enjoy customizing flavors by experimenting with different apple varieties, traditional spices like cinnamon and nutmeg, or more exotic ingredients like citrus zests, cardamom, or rosemary for a unique twist. Homemade applesauce is not only fresher and more flavorful than store-bought versions but also allows you to control the sweetness and avoid artificial ingredients or preservatives. Additionally, homemade applesauce can be used in a variety of ways: served as a side dish with latkes during Chanukah, served alongside meats like pork chops or brisket, incorporated into baked goods like muffins and cakes, or enjoyed as a healthy snack on its own. This versatility makes it a delightful addition to any cook’s repertoire.
Applesauce is a great option for someone new to food preservation. It can be made shelf-stable through a variety of methods, including water bath canning, steam canning, and pressure canning. Choose a recipe developed for your preferred canning method to ensure your product is both delicious and safe. If that sounds intimidating, not to fret – applesauce can be frozen, too!
When making applesauce, selecting suitable apples is crucial. Sweet varieties, like Honeycrisp and Fuji, require little to no added sugar, while less sweet apples, such as Granny Smith or Pink Lady, may need some sweetening but add a welcome tartness to the final sauce. For a well-balanced flavor, consider combining different types of apples. Your local farmer’s market may offer regional varieties (Ludacrisp? or Rubaiyat?) that will add a nuanced flavor that cannot be found in commercial applesauce.
Preserving homemade applesauce has become a cherished tradition for many families. The process of making and preserving applesauce is simple, allowing for customization and the involvement of multiple generations in the kitchen. By making and preserving your own applesauce, you're not only creating a delicious accompaniment to your Chanukah latkes but also participating in a tradition that connects you to generations of Jewish families who have celebrated this festival of lights with the sweet taste of apples.
Here's a simple recipe for chunky applesauce perfect for the freezer from the National Center for Home Food Preservation.
(yields approximately 6 cups)
Ingredients:
- 4 lbs (1800 grams) mixed apples
- 1/2 cup (119 grams) water
- 1/4 cup granulated sugar (50 grams) (optional)
- 1 tsp ground cinnamon (optional)
- 1/4 tsp ground nutmeg (optional)
- ½ tsp of lemon juice (optional)
Instructions:
- Wash, peel, and core the apples. Cut them into 1-inch chunks.
- In a large pot, combine the apple chunks and water.
- Bring to a boil over medium-high heat, then reduce to low and simmer for 15-20 minutes, uncovered, stirring occasionally, until the apples are tender but still hold their shape.
- Remove from heat and mash the apples to the desired consistency using a potato masher or the back of a spoon. For a smoother texture, you can use an immersion blender, but be cautious not to over-blend.
- Stir in sugar* (if using), and spices. Taste and adjust seasonings as needed.
* For this recipe you can substitute the sugar for other sweeteners to taste.
Freezer Preservation Method:
- Allow the applesauce to cool completely.
- Transfer the sauce to freezer-safe containers, leaving 1/2 inch of headspace for expansion. If using a freezer bag, remove as much air as possible before sealing.
- Label the containers with the contents and date.
- Freeze for up to 12 months.
To serve, thaw the applesauce in the refrigerator overnight. It can be enjoyed cold or gently reheated.
References:
Marks, G. (2010). Encyclopedia of jewish food. Wiley.
National Center for Home Food Preservation - National Center for Home Food Preservation. Applesauce - National Center for Home Food Preservation. (2015). https://nchfp.uga.edu/how/can/canning-fruits-and-fruit-products/applesauce/
Steinberg, E. (2011, December 16). Talk of the table: The great topping debate. Moment Magazine. https://momentmag.com/talk-of-the-table-the-great-topping-debate/
Ways with applesauce. Penn State Extension. (2024, July 8). https://extension.psu.edu/ways-with-applesauce
Newsletter naming contest (December 2024)
Travis Alexander, UC Master Food Preserver Coordinator Online Program
We are looking for an *Official* newsletter name!
The UC Master Food Preserver Program is seeking submissions to give the new monthly newsletter an official name. Please enter your ideas here for a chance to win a food preservation booklet collection (up to a $50 value). The winning entry will be announced in the March 2025 newsletter issue.
A few guidelines below:
- Submissions due by January 15, 2025
- Submit only original work
- Newsletter name should be three words or less
- The name should be aligned with food preservation
- The name should not include a city or landmark
- If font style (i.e., type, size, italicizing, bolding) is important for your title submission, please format accordingly
Dehydrating zucchini for soup (November 2024)
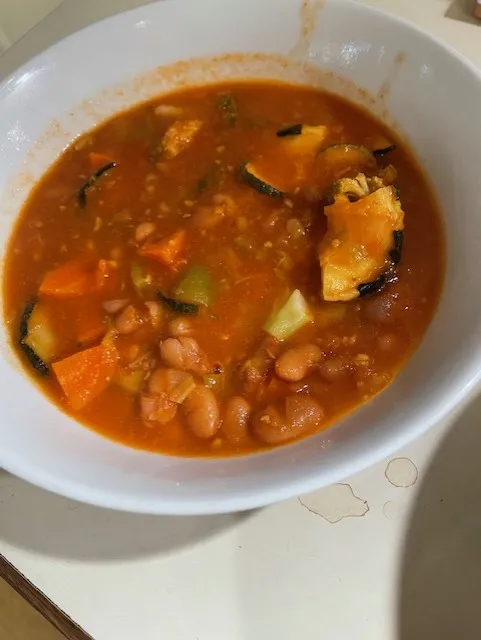
In late October and early November, the weather changes and the cooler temperatures means it’s time for soup. Most soups will contain some root vegetables such as carrots and potatoes. However, one of the most commonly grown backyard vegetables, zucchini, should not be overlooked in the role it can play in soups.
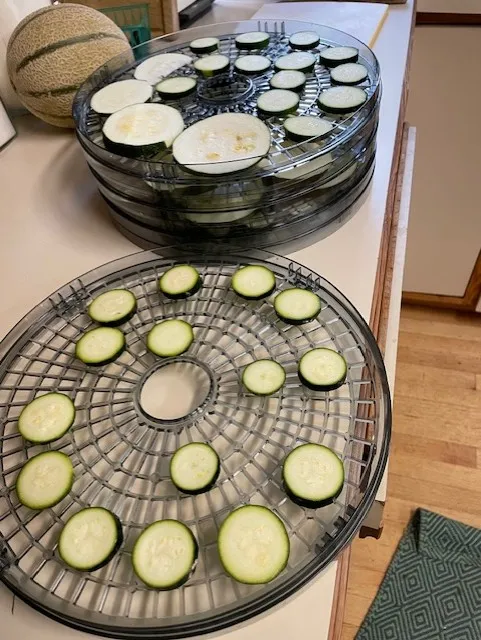
Fresh zucchini doesn’t store well, so a preserved zucchini is needed. Surplus zucchini can be easily frozen or dehydrated. Dehydrating zucchini is simple. Wash and examine the zucchini for defects. Remove defects and cut zucchini into ¼ inch slices. It is also possible to cut thinner slices and season to make zucchini chips. Load your dehydrator with the zucchini slices as shown in the second image. Set the dehydrator temperature at 130-degrees Fahrenheit for 12 hours. After drying, store the zucchini slices in a closed container at room temperature. If drying is not complete, mold will develop. The dry zucchini should crack and break when bent. Fresh zucchini has a moisture of about 93% and the dehydration will reduce the moisture to about 10%. In soup, the dry zucchini will soften as it absorbs water during heating, making it a perfect addition to soups. Cutting or breaking the zucchini into small pieces may also be helpful with hydration. Zucchini can make soups even more nutritious. Try adding dried zucchini into your next batch of tomato soup or any other homemade soup.
Enjoy a bowl of soup and have a great autumn!
It’s persimmon season (November 2024)
One of the treats of autumn and early winter is the arrival of persimmons. Persimmons are highly seasonal, typically only available from September to December in California. The coming months are the time to stock up and preserve some of this beautiful orange fruit for culinary adventures throughout the year.
Most of the persimmons commonly available in the US fall into one of two categories: non-astringent and astringent. The non-astringent cultivars, like the flattened, tomato-shaped Fuyu, can be eaten like an apple when the flesh is still crisp. The astringent cultivars, like the pointed, acorn-shaped Hachiya, are extremely tannic and are not edible unless the fruit is allowed to ripen fully. Although there are alternative methods for reducing the concentration of bitter compounds in astringent persimmons, the simplest is to let them ripen naturally by sitting at room temperature until the flesh is extremely soft, translucent, and jelly-like. Once they reach this stage, they are ready to eat, use in recipes, or be preserved for future use.
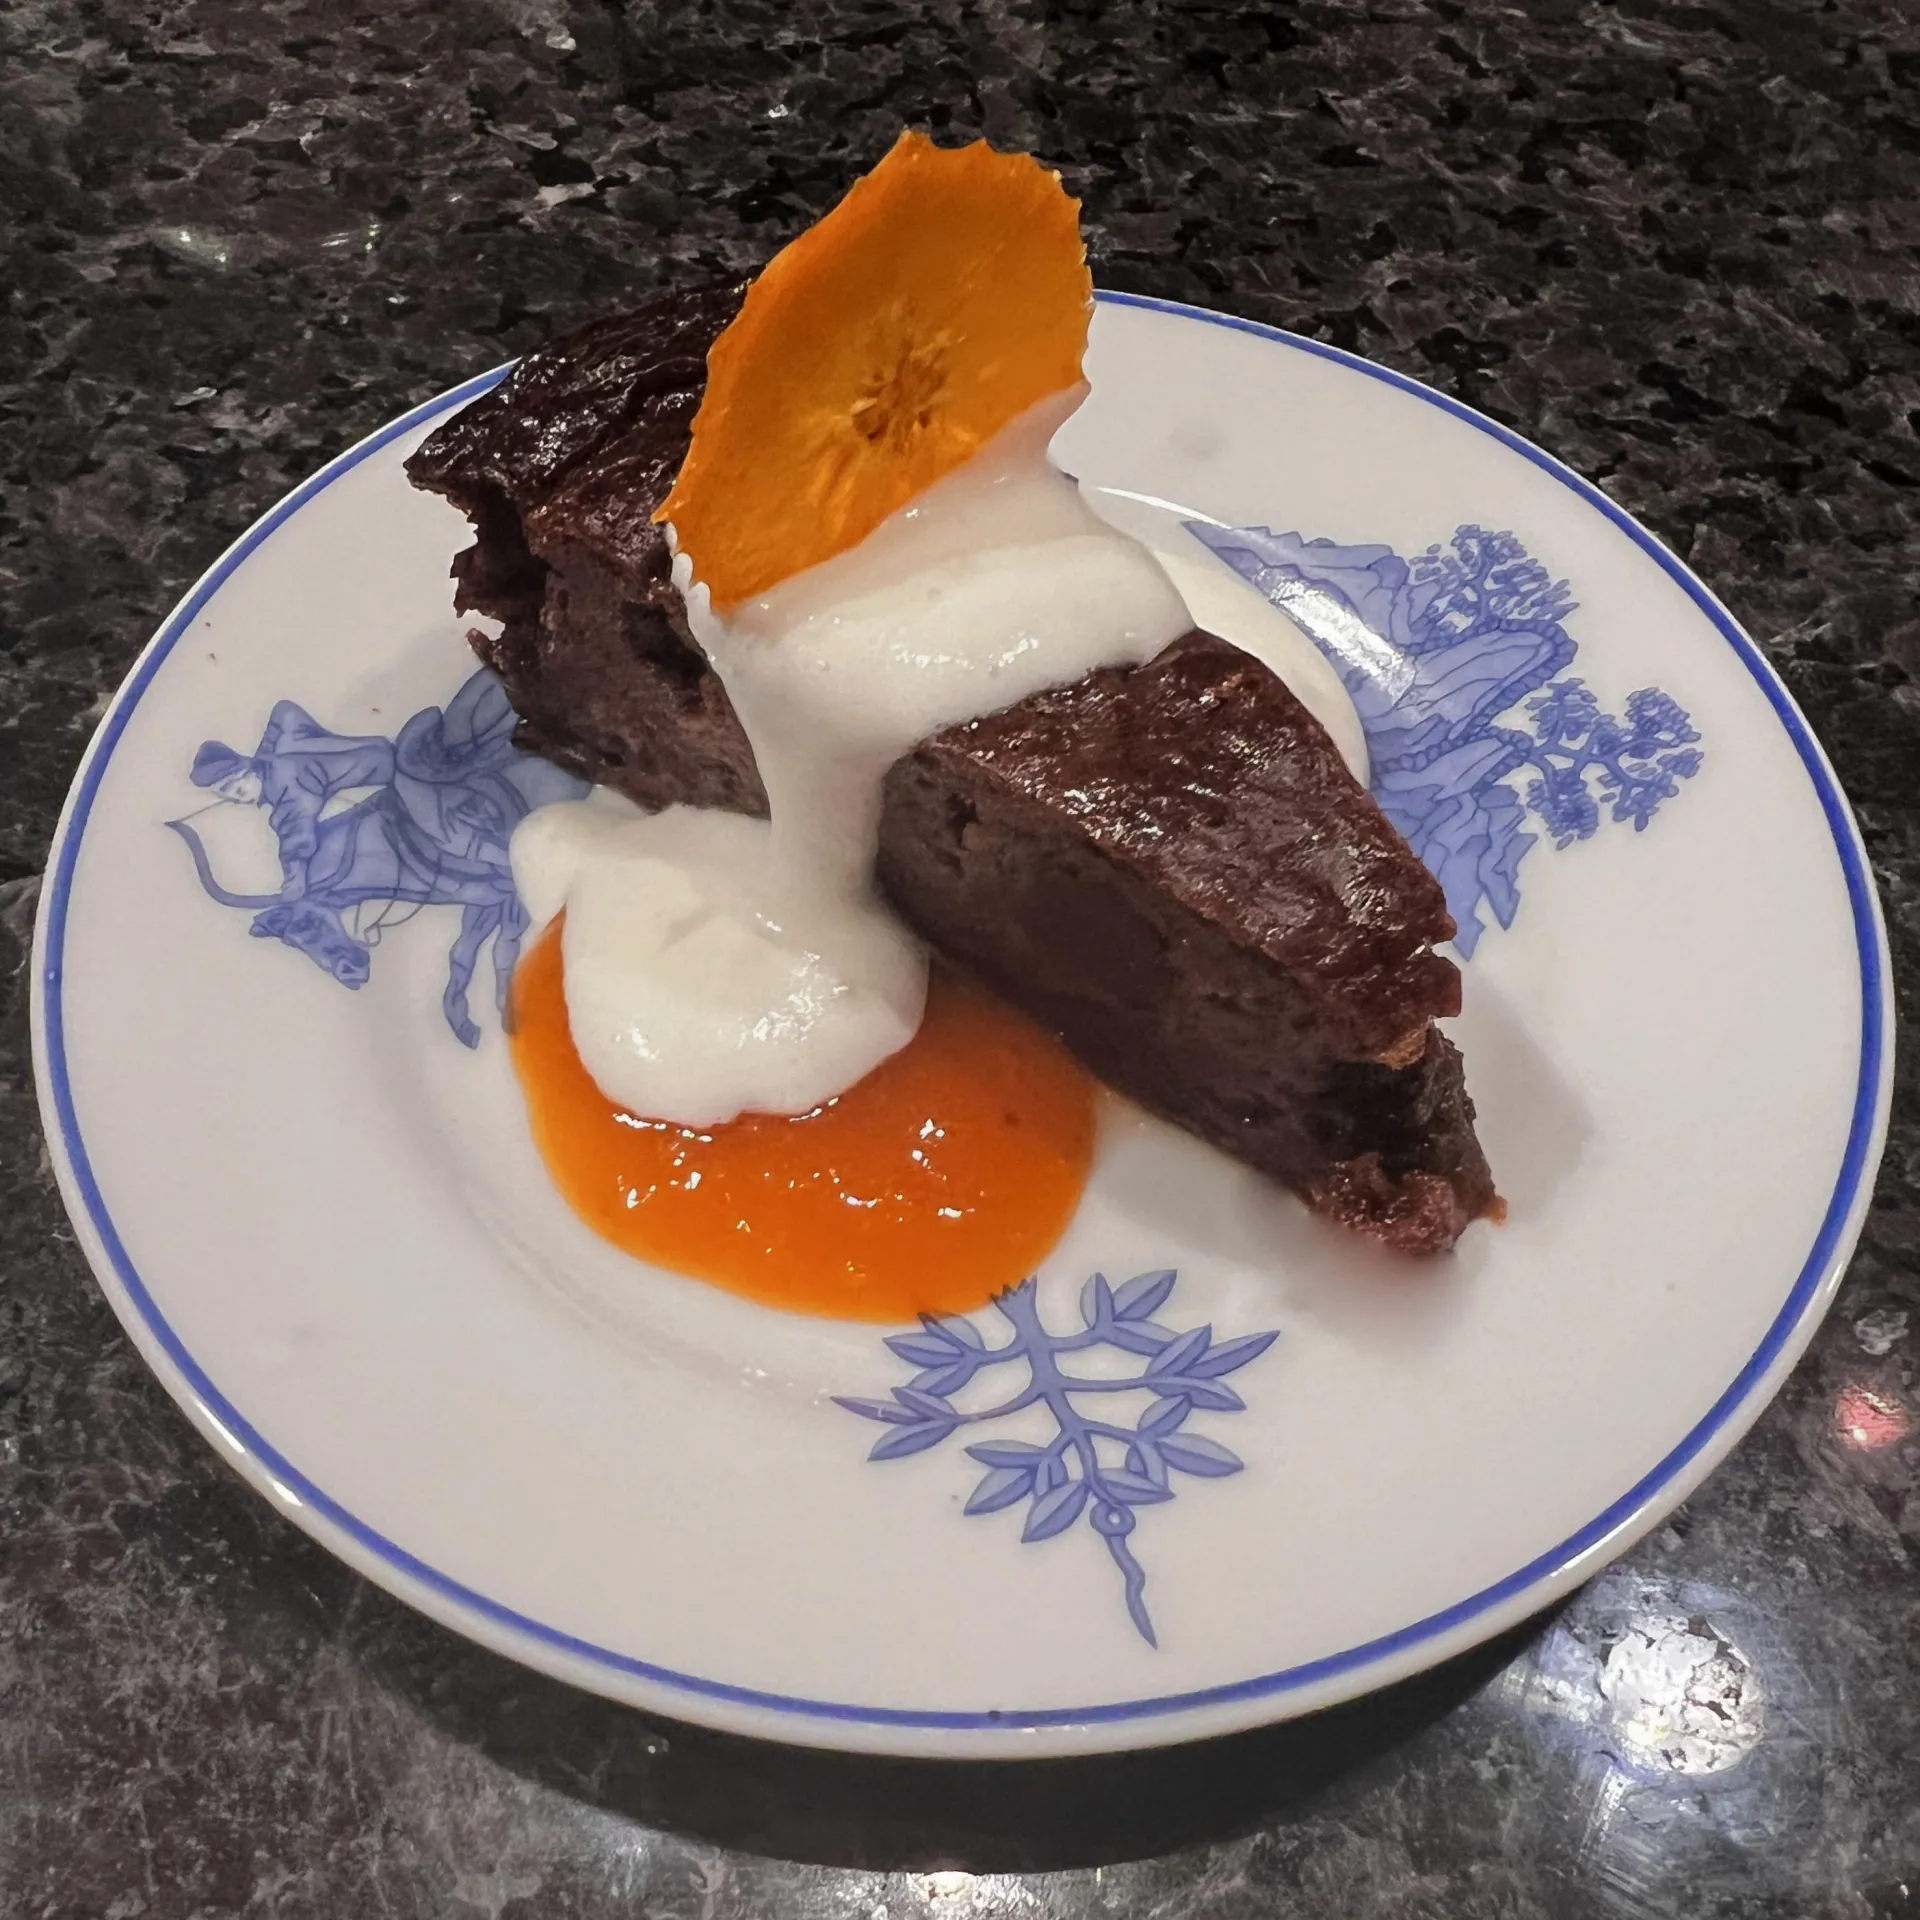
Preserving ripe Hachiya pulp by freezing it is a wonderful way to capture the essence of this delicious fruit. The smooth, custardy texture of the pulp makes it perfect for a variety of recipes, from decadent puddings and baked goods to smoothies and sauces. To freeze persimmons, simply scoop out the pulp from the ripe persimmons, puree it if desired, and pour it into ice cube trays or airtight freezer containers. You can add 1/8th teaspoon of ascorbic acid to each quart of pulp to help retain color. Once frozen, you can easily pop out portions as needed. This simple method reduces food waste and keeps the vibrant taste and nutritional benefits intact, making it an ideal method for anyone looking to savor this rich, honeyed flavor of fall throughout the year.
Now that you have persimmon pulp in the freezer what can you do with it?
There are many recipes available for using persimmon pulp in baked goods, and here is one of our favorites. Based on a recipe for a persimmon pudding (not the persimmon cake) served at the famed Chez Panisse restaurant in Berkeley, California, this pudding celebrates the sweet subtle flavors of ripe ‘Hachiya’ persimmons.
Persimmon Pudding Recipe
Ingredients for an 8” – 9” diameter pudding:
- 1.5 lbs of *ripe* hachiya (not fuyu) persimmons
- 1.25 cups all-purpose flour
- 1/8 tsp salt
- 3/4 tsp baking soda
- 3/4 tsp baking powder
- 1 tsp ground cinnamon
- 3/4 cup sugar
- 3 eggs
- 1.5 cups milk
- 1/4 cup whipping cream
- 1 tbs honey
- 1 cup walnuts
- 6 tbs unsalted butter plus additional butter for greasing the pan
Instructions:
- Preheat oven to 350°F
- Butter an 8” or 9” springform pan. Line the bottom with parchment paper or wax paper.
- Lightly toast the nuts (about 5 - 6 minutes in a 350° F oven); then let them cool. When cool, chop them coarsely.
- The persimmons must be completely ripe – they should be soft, with translucent, jelly-like flesh. Scoop or scrape the interior of the fruit off the peel and pass the pulp through a strainer or food mill. Alternatively, puree the skinless pulp in a food processor or blender until no lumps remain.
- Transfer the persimmon pulp to a large mixing bowl and combine it with the sugar, eggs, milk, cream, and honey. Beat or whisk the mixture until well blended.
- In a separate large mixing bowl, sift together the flour, salt, baking soda, baking powder, and cinnamon.
- Gradually combine the pulp and flour mixtures. The batter will start out thin but will thicken dramatically as you mix it. Let the batter stand for 20 - 30 minutes to thicken to a very soft gel stage.
- Melt the butter then let it cool slightly. Once cooled, gently stir both butter and nuts into the batter.
- Pour the batter into the prepared pan, leaving at least 1/2” headspace. Place the pan on a cookie sheet (to catch any overflow) and bake in the 350° oven for 2 to 3 hours, or until the pudding has set and the top is a shiny brown. A toothpick inserted in the middle should come out clean but moist. Expect the pudding to collapse as it cools.
- Serve warm with crème Chantilly or vanilla ice cream.
To learn more about preserving persimmons, the UC Master Food Preserver Online Program will be offering a free, online two-part series on November 14th and December 5th from 6:30-7:30PM PST. Register for the events via the statewide website: https://mfp.ucanr.edu/Events/.
Choose your peaches wisely for preservation (November 2024)
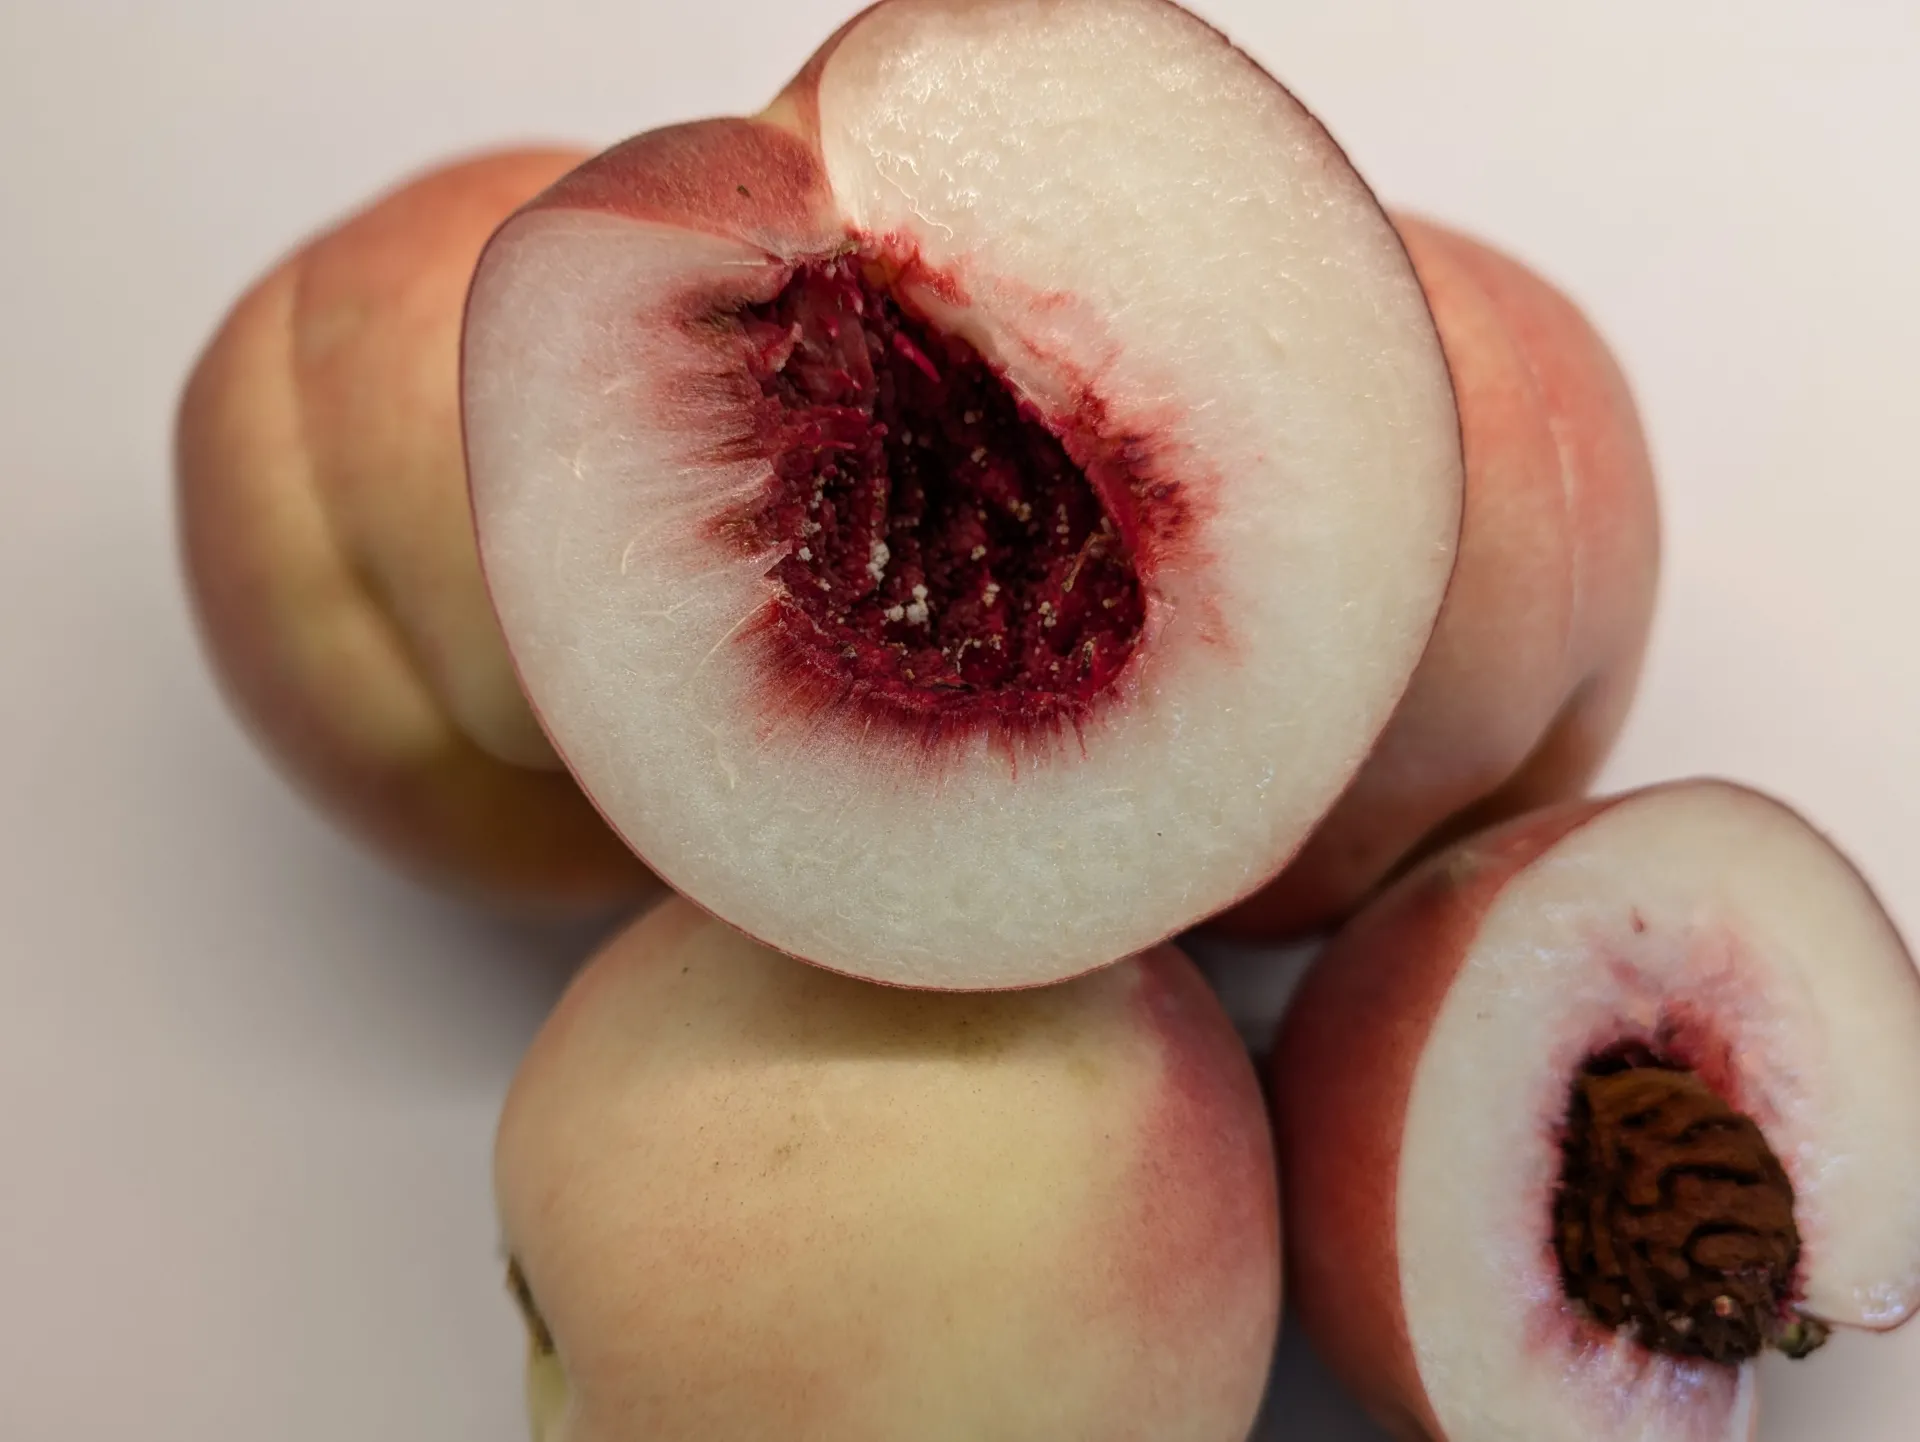
There are two major types of peaches: freestone and clingstone. Freestone can be split open, and the pit is easily removed. These are a favorite for eating fresh, but also great for preserving. Clingstone peaches have a pit that “clings” to the flesh, making it harder to process at home. These are more typically commercially processed and sold as canned peaches.
Peaches can be further distinguished by the color of their flesh: yellow or white.This is an important distinction when it comes to preserving the fruit. Yellow-fleshed peaches can be processed using a variety of approved home preservation and processing methods, while white-fleshed peaches should only be preserved by freezing. White-fleshed peaches have on average a pH above 4.6, the threshold that defines a food as low acid which puts it at greater risk for the presence of botulinum toxin when improperly processed.
To quote an article from the Penn State University Extension service (https://extension.psu.edu/preserving-white-peaches): “White-fleshed peaches have a natural pH above 4.6, which makes them a low-acid food; therefore, water bath or atmospheric steam canning will not destroy harmful bacteria in white peaches. Also, at this time March 2024, there is no low-acid pressure canning process available for white-flesh peaches nor a researched acidification procedure for safe boiling water canning of white peaches. Freezing is the recommended method of preservation for white peaches. This is a good time to remember, as new varieties of produce are introduced, always use tested, researched methods and recipes for preserving.”