UC Master Food Preserver Newsletter

In November of 2024, the UC Master Food Preserver Program launched a monthly newsletter that delivers recipes, how-tos, and food preservation inspiration straight to a subscriber's inbox. Subscribe to the newsletter here.
Do you have a correction, suggestion, or story to share with the newsletter team? Share corrections, suggestions, or stories here.
Past Newsletter Full Emails
2026
2025
2024
Monthly Articles To-date
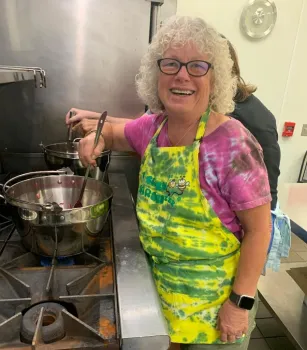
Spotlight: Sherida Phibbs, Class of 2018 MFP Volunteer (June 2025)
Sherida Phibbs, UC Master Food Preserver San Joaquin County Volunteer

Image credit: Sherida Phibbs, 2025.
"Being a Master Food Preserver isn’t just about jars and recipes — it's about resilience, community, and preserving traditions that feed both body and spirit." — Sherida Phibbs
I didn’t grow up living on a country property, but I grew up watching my mother preserve fruits and vegetables. Eventually, I began helping her, and that early experience planted the seeds for my lifelong love of home food preservation. Years later, when my husband and I were living on a country property in Lodi — with 15 fruit trees and an expansive vegetable garden — those skills came in handy. Canning season became a busy and joyful time, filled with the satisfaction of harvesting and preserving the fruits of our labor. When I retired in 2017, I finally had time to pursue the UCCE Master Gardener training, something I had wanted to do for a long time. After completing that program, it felt only natural to take the next step and enroll in the Master Food Preserver training. The two programs truly complement each other, and I found it exciting to learn the science behind the preservation methods I had already been using at home.
Our Lodi property had beautiful loamy soil that produced generous harvests: peaches, cherries, plums, pluots, pears, apricots, blueberries, asparagus, corn, onions, zucchini, beets, green beans, peas, carrots, tomatoes... and probably a few more I’ve forgotten! There was always something ready to pick and preserve. Eventually, we decided to make a lifestyle change. We sold our home and moved to Humboldt County, a place where we had often vacationed and dreamed of living. Our new residence had a much smaller yard, which meant fewer gardening chores, but also limited the produce I had available to preserve. What I didn’t expect was how different the mindset was in this isolated, rural area. In San Joaquin County, home food preservation felt like a lost art we were trying to reintroduce to our community. In Humboldt, it’s a way of life. Growing and preserving food is common, and home-canned fish is a staple. People take self-reliance seriously, because when earthquakes or extreme weather hits, roads can close, power can go out, and you may be on your own for days or weeks.In fact, the day after we moved in, a powerful storm knocked out our electricity for almost a week. I was incredibly grateful for the home-canned food I had brought with me. That experience motivated me to start pressure canning soups and stews, so we’d always have meals ready for emergencies. I also began to appreciate the importance of emergency preparedness — go bags, nonperishable foods, and shelf-stable meals were no longer just nice to have, they were essential.
After three years in Humboldt, we returned to the Central Valley. I came back with a new sense of mission. I had seen what true food self-sufficiency looked like, and I wanted to bring that knowledge and spirit back to San Joaquin County. I’m more determined than ever to recruit and train new Master Food Preservers, so we can reach more families with safe, science-based food preservation techniques. It’s easy to find bad advice online these days; social media is filled with unsafe preservation methods that get passed around without a second thought. That’s why our work as Master Food Preservers matters. We’re here to educate, empower, and help people preserve food safely, reduce waste, and stretch their grocery dollars, skills that are more valuable than ever in today’s world.
Being a Master Food Preserver isn’t just about jars and recipes. It’s about building resilience, sharing knowledge, and preserving traditions that feed both body and spirit. I’m grateful to be part of that mission.
Salt, the Only Rock We Eat! (May 2025)
Henry Shaw, UC Master Food Preserver Online Program Volunteer
Part 1: When is a tablespoon not a tablespoon?
Common salt, sodium chloride (NaCl), is the most widely used condiment worldwide. It’s also the only rock we normally eat. (“Halite” is the geological term for rock salt.) Today, you can buy a pound of salt for a dollar or so, but a few centuries ago, salt was literally worth its weight in gold (extended history down below).
In food preservation recipes, salt can play two different roles. Often, it’s simply a flavoring agent, in which case the amount of salt in a recipe can safely be adjusted to suit one’s personal preferences. For some techniques, though, the quantity of salt used in a recipe or process is critical to the safety and quality of the final product. Prime examples of when the salt content is important are recipes for lacto-fermented products like fermented pickles, sauerkraut, and kimchi. In the lacto-fermentation process, beneficial lactic-acid bacteria (primarily Lactobacillus species), convert the sugars in food to lactic acid, which lowers the pH and creates a characteristic sour flavor. The resulting acidity of the final product is important for the long-term preservation of the product and for suppressing the growth of Clostridium botulinum (the bacterium that causes botulism).
How do we encourage the growth of desirable bacteria and suppress the growth of undesirable bacteria and molds during fermentation? If you’ve read this far, then you might guess that salt is involved, and it absolutely is! Adding salt to your ferment is how we “rig the game” to help lactic-acid bacteria win the microbial race against the growth of undesirable microorganisms during fermentation. At salt concentrations between 2% – 5% by weight, lactic acid bacteria grow more quickly than other microbes and have a competitive advantage. At lower concentrations, undesirable bacteria can survive/thrive, possibly out-competing lactic-acid bacteria and spoiling your ferment. Too much salt will suppress the growth of lactic-acid bacteria, leaving your vegetables unpickled. Furthermore, salt-tolerant yeasts can grow more quickly, consuming lactic acid and making the product less acidic and more hospitable to spoilage microbes.
Unfortunately, most fermentation recipes specify the amount of salt to use in terms of volume (i.e., X tablespoons of salt per quart of brine or pounds of produce). The problem with this is that there are many different types of salt, and the size and shape of individual particles in these salts can vary dramatically. These microscopic differences in the texture of the salt change the “packing density” of the salt particles, causing the weight (mass) of salt per tablespoon to also vary dramatically. Ideally, the quantity of salt and all other recipe ingredients would be given in terms of weight, which would eliminate the uncertainty in how much salt to use. If a recipe uses volume to specify the amount of salt it should also specify the type of salt to use. If it does not, use a salt designed for canning and pickling. If a specific type of salt is specified, be sure to follow the recipe and use that type of salt.
My wife and I like to cook so we have collected many different salts in our pantry. For fun, I compared the weight of a tablespoon of the eight different salts we have on hand. I also took microphotographs of these salts to illustrate the large differences in particle size and shape in this sample of the “salt universe”. I used a 2-tablespoon measure to scoop each salt from its container and leveled the measure with the back of a knife. The weight of each salt was measured with a calibrated kitchen scale that’s accurate to ±0.02 g. The resulting weights were divided by two to get the weight per tablespoon shown in Figure 1 and tabulated in Table 1, graphed in Figure 2.
I was surprised by the magnitude of the variation in bulk densities of the salts I measured. Morton Canning & Pickling Salt was the densest, weighing in at 18.9 grams/Tbs. while Diamond Crystal Kosher Salt Flakes was the “fluffiest” and least dense, weighing in at 8.2 grams/Tbs. That’s a factor of 2.3 difference; one would need to use 2.3 tablespoons of the Diamond Crystal Flake salt to equal the mass of 1 tablespoon of the canning salt! If I were following a standard recipe that says to use 3 Tbs. of canning salt per 5 pounds of cabbage in a sauerkraut recipe (aiming at adding 2.25 – 2.50% salt) and I used 3 Tbs. of the Diamond Crystal Flake salt instead of the canning salt, the mixture would not have nearly enough salt to ferment properly and it would probably end up a rotten mess. I would have needed to add 6.9 Tbs. (almost ½ cup) of the flake salt to have added enough!
The microphotographs in Figure 1 tell the story; the canning salt consists of very uniform, ~0.5 mm rounded cubes while the two “flake” salts (Penzey’s and Diamond Crystal) have larger, highly irregular particles. The uniform and smooth-sided particles of canning salt can pack more closely. In contrast, the irregular, jagged flakes of the flake salts prevent the close packing of the individual salt particles and leads to a less-dense salt. Our usual “table salt”, the Diamond Crystal Granulated Salt, had a density about 10% less than that of the canning salt, so it would be a reasonable substitute for canning salt. Its particles are more irregularly shaped than the canning salt and they have more variation in particle size, but their rounded shapes allow them to pack at a relatively high density. The average particle size does not seem to be the primary factor determining the bulk density of salt; the shape of the particles is more important. Flaky, irregular particles pack more loosely leading to lower bulk densities.
Figure 1. Macro- and microphotographs of various commercially available salts. The white scale bar in the microphotographs is 3 mm. long. The weight of salt in a tablespoon of salt is given below each salt type and in Table 1.
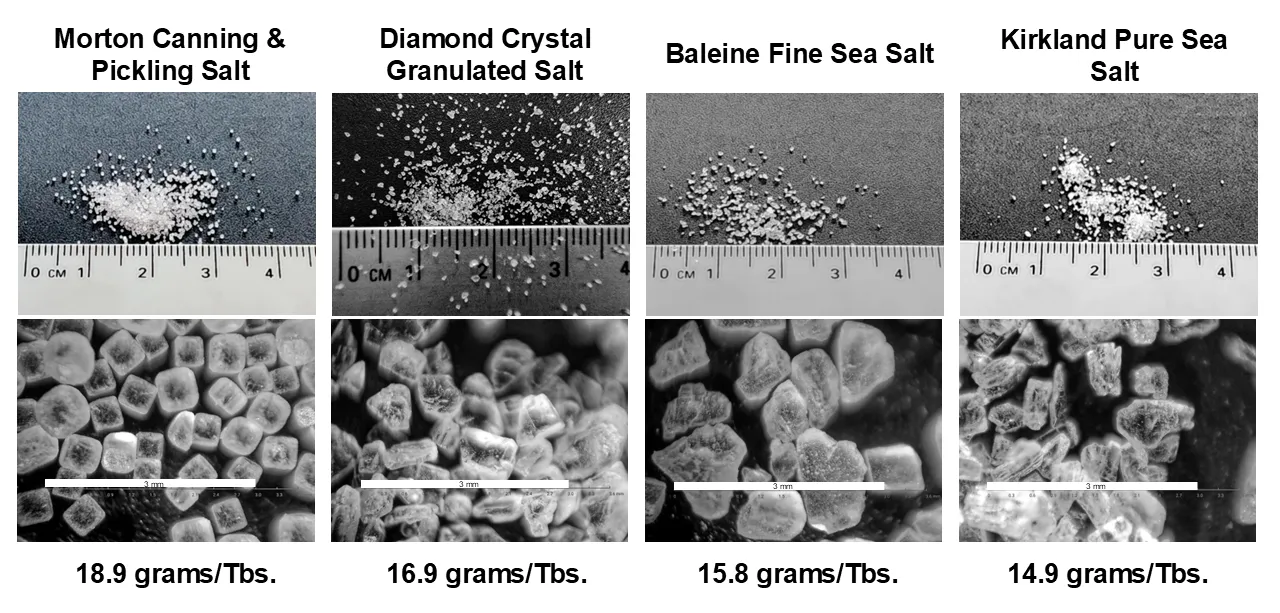
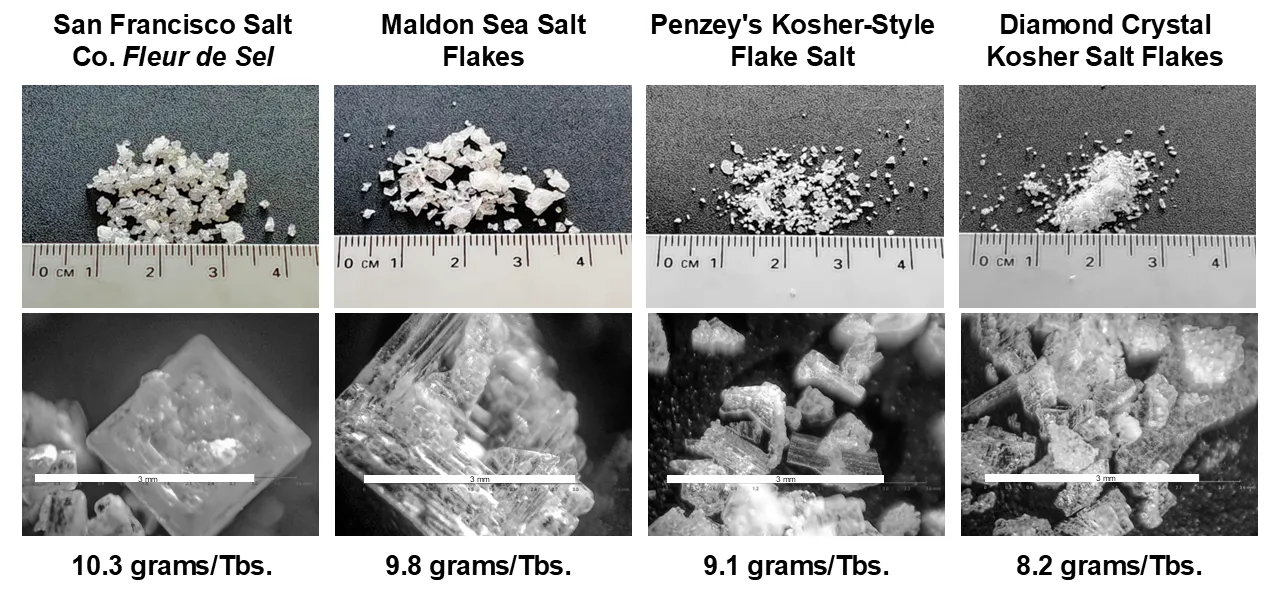
Table 1. Characteristics of various commercial salts
| Salt Name | Typical particle size | grams/Tbs. | Tbs./ounce | Tbs. of salt needed to equal the weight of 1 Tbs. of Morton canning salt |
| Morton Canning & Pickling Salt | ~0.5 mm | 18.9 | 1.5 | 1 |
| Diamond Crystal Granulated Salt (uniodized) | 0.3 - 1.5 mm | 16.9 | 1.7 | 1.1 |
| Baleine Fine Sea Salt | 0.5 - 1.5 mm | 15.8 | 1.8 | 1.2 |
| Kirkland Pure Sea Salt | 0.3 - 0.6 mm | 14.9 | 1.9 | 1.3 |
| San Francisco Salt Co. Fleur de Sel | 0.5 - 5.0 mm | 10.3 | 2.8 | 1.8 |
| Maldon Sea Salt Flakes | 1.0 - 7.0 mm | 9.8 | 2.9 | 1.9 |
| Penzey's Kosher Style Flake Salt | 0.5 - 1.5 mm | 9.1 | 3.1 | 2.1 |
| Diamond Crystal Kosher Salt Flakes | 0.5 - 1.5 mm | 8.2 | 3.5 | 2.3 |
Figure 2. Bar graph showing the bulk density (grams of salt per tablespoon) of the salts listed in Table 1.
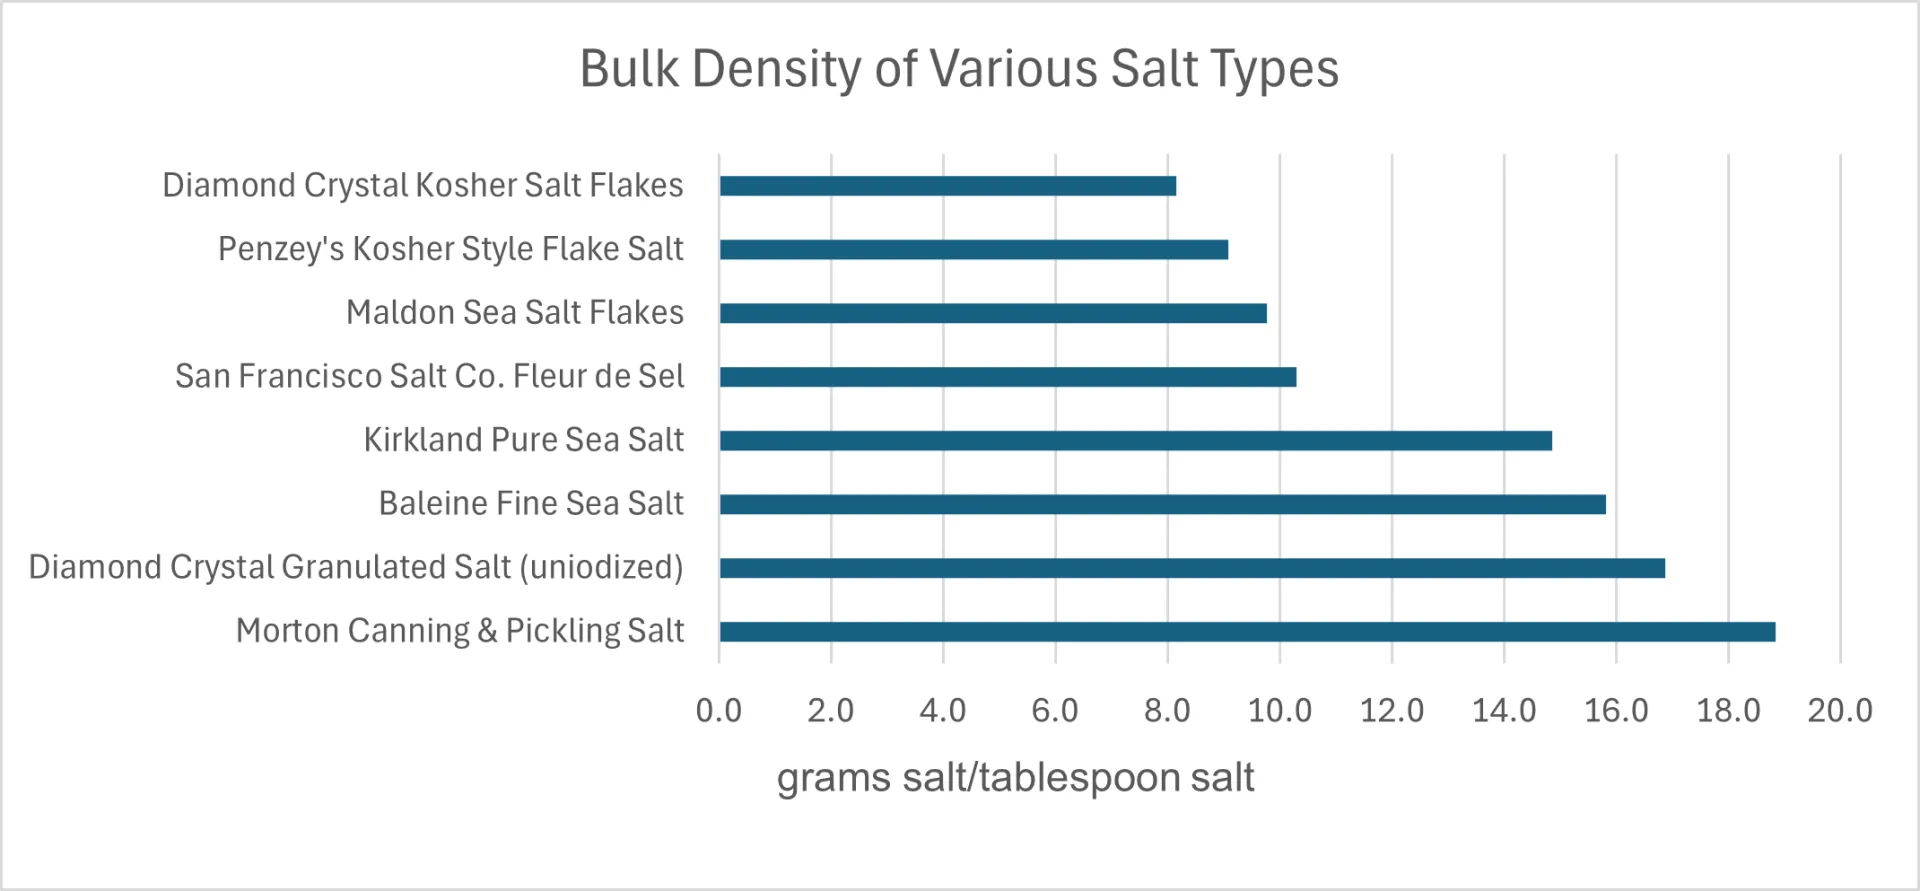
Image credits: Henry Shaw, 2025.
Our salts include two “specialty” items that one would not normally think of using in a ferment: the Maldon Salt and the Fleur de Sel. Both are “finishing” salts, intended to be sprinkled on foods just before they are served or as a top-garnish on baked goods or chocolates. They are both characterized by very large, thin particles, with the Maldon particles having a characteristic “hopper growth” shape (think of a hollow, stepped, Aztec pyramid). As one might expect from the shape of the particles, both these salts came in at the lower end of the range of bulk densities.
Stay tuned for Part 2 of this series of articles on salt, in which I’ll discuss the chemistry of various salts as it related to food preservation… Can I use iodized salt in fermentation? What are “anti-caking agents” and why do I care? What’s the difference between sea salt and regular salt? Why is “Himalayan pink salt” pink and can I use that in preserving?
[Disclaimer: The mention of specific products in this article does not imply endorsement or opposition of these products by the University of California. Product names are only given for informational purposes.]
Extended history...
Some salt is a necessary part of our diet to maintain our electrolyte balance, nerve function, and muscle function. Perhaps more relevant to this article, salt has been used for centuries in food preservation and was highly valued for that purpose. Salt deposits are rarely seen exposed at the surface of the Earth; they rapidly dissolve in rainwater and get washed away. Communities located far from the ocean typically had no local source of salt and relied on trade via long caravans or river routes like the famous Trans-Saharan salt trade or China's salt roads. These inland societies traded valuable goods like furs, grain, or gold (sometimes on one-for-one basis by weight), in exchange for salt. Today, we produce hundreds of millions of tons of salt globally per year by evaporation of seawater and other natural brines, and hard-rock or solution mining of large, underground halite deposits.
We need to hear from you! (May 2025)
Travis Alexander, UC Master Food Preserver Online Program Coordinator
In our funding agreement with the California Department of Food and Agriculture, we committed to conducting periodic evaluations (6-month, 12-month, 18-month) of our monthly newsletter. We would greatly appreciate it if each of you could take the time to fill out the 6-month evaluation using the link below. As an extra incentive, one lucky respondent will be chosen at random on May 30 to receive a food preservation booklet collection (up to a $50 value). Thank you in advance for your time.
Cornmeal Olive Oil Cake with Strawberry Jam Swirl (May 2025)
Melisa Spence, UC Master Food Preserver Online Program Volunteer
When I heard that we were highlighting strawberries this month, my mind immediately went to this cornmeal olive oil cake with a strawberry jam swirl from pastry chef Teresa Finney*. Finney suggests using any jam you like or have on hand, and I used a rose geranium-strawberry jam that I had open in my fridge.
Image credit: Teresa Finney, 2025.
I halved Finney's cake recipe for our two-person household, baking in a 6” round cake pan. To make the cake vegan (we aren't vegan, but appreciate the versatility of vegan baking ingredients), I used flax for the egg, and soy milk plus lemon for the buttermilk. Other milks won't necessarily curdle like soy milk, but you can use them. I used cane syrup in place of honey — you could also try another liquid sweetener. Camilla Wynne** suggests experimenting with substituting jam or marmalade for liquid sweetener, so you could try that for a stronger jam effect (both incorporated into batter and swirled) — I haven't tried it with this recipe but think it could be fun.
Cornmeal Olive Oil Cake with Strawberry Jam Swirl
(adapted from Chef Teresa Finney)
Flax egg:
1 Tbsp flax meal
3 Tbsp water
Buttermilk substitute:
1.5 tsp lemon juice or apple cider vinegar
87g soy milk
Remainder cake ingredients:
120g all-purpose flour
28g cornmeal
½ tsp salt
1/4 tsp baking soda
1/4 tsp baking powder
95g olive oil
90g granulated sugar
23g cane syrup
1 tsp vanilla extract
80g strawberry jam
Steps:
Make flax egg: Stir together flax meal and water. Let it sit for 10 or 15 minutes and stir again. (King Arthur recommends 30 minutes, but I typically don't wait that long.)
- Make buttermilk substitute: Combine lemon juice or vinegar and soy milk. Let it stand for 10 to 15 minutes.
- Spray a 6-inch cake pan with at least 2-inch sides with cooking spray and line the bottom with parchment paper. Preheat oven to 350°F.
- In a medium bowl, add the flour, cornmeal, salt, baking powder and baking soda. Whisk to combine.
In a large mixing bowl, add the olive oil, granulated sugar, buttermilk substitute, cane syrup, vanilla extract, and flax egg. Whisk to combine.
- Using a spatula, gently fold in the dry ingredients until they are just incorporated.
Pour half of the cake batter into the prepared cake pan. Spoon about half of the jam on the batter and use a toothpick or butter knife to swirl jam into the batter. Add the remaining batter followed by the remainder of jam and repeat.
- Bake the cake for about 45 minutes, checking for doneness around the 40-minute mark. When done, a toothpick or butter knife inserted into the center of the cake will come out mostly clean, sides of cake will be pulling away from the pan, top of cake will feel set, and your kitchen will smell fragrant with strawberry jam.
- Cool cake in the pan for 15 minutes before transferring to a cooling rack until you are ready to serve.
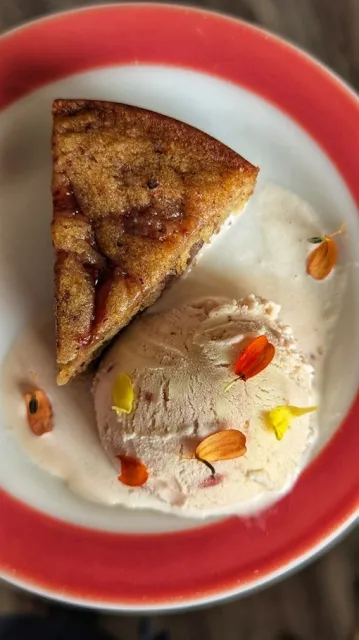
Image credit: Melisa Spence, 2025.
* Teresa Finney is an Atlanta-based pastry chef and writer with roots in The Bay Area, CA.
** Camilla Wynne is a Toronto-based writer, recipe developer, and cooking teacher specializing in preserving and pastry.
Please note: The opinions expressed in this article are the author’s own and do not represent those of the University of California.
Spotlight: Penny Pearson, Class of 2025 MFP Trainee (May 2025)
Penny Pearson, UC Master Food Preserver Online Program Trainee
County of residence: Placer

Image credit: Penny Pearson, 2025.
Some of my earliest—and most vivid—memories are tied to jars. Not just any jars, but the gleaming, jewel-toned jars that lined the walls of my grandparents' root cellar on their Nebraska ranch (Figure 1). Walking into that dark cellar was always an adventure, equal parts wonder and terror. I'd grope through the darkness, searching for the single pull string that activated a dim incandescent bulb. When that light finally flickered on, it revealed a treasure trove: rows of sparkling reds, greens, and golds — tomatoes, green beans, peaches, pears, soups, and squash — all preserved by hand, all prepared with love. Canning wasn't a hobby for my grandmother; it was just life on the ranch.
That tradition carried on with my mother, who made the best concord grape jelly I’ve ever tasted — Smucker’s® didn’t stand a chance. Living in Alaska, we often faced challenges finding fresh produce, but she always made it work. I still remember when the grapes arrived in a heavy cardboard shoebox. It was in Alaska that I was first introduced to pressure canning — especially for fish and game. Preserving food wasn’t just a necessity; it was a skill, a mindset, and in many ways, a family legacy.
I've wanted to become a Master Food Preserver for years, but because there wasn’t a program in Placer County, I put that dream on hold. Imagine my delight when I discovered the new online program — finally, the stars aligned! I signed up the moment applications opened. It felt like I was coming full circle.
There’s something deeply satisfying about knowing exactly what’s in your food — how it was prepared, and that it was made with care. As a teacher by profession, I also love that this program equips us to share our knowledge with others. Not only does it demystify the "how," but it also explains the "why” — why we follow certain processes, why we use specific equipment, and why science matters. I’ve discovered a few bad habits of my own along the way, and the program has helped me correct them with evidence-based practices.
This isn’t just about jars on a shelf — it’s about safety, tradition, science, and sharing. And I’m honored to be part of a community that preserves more than just food — we’re preserving knowledge, care, and connection.
Figure 1 Family root cellar in Nebraska (Image credit: Penny Pearson, 2025).
Spotlight: Bobbie Green, Class of 2024 MFP Volunteer (April 2025)
Bobbie Green, UC Master Food Preserver Online Program Volunteer
County of residence: Stanislaus
My name is Bobbie Green. I’m a fairly new Master Food Preserver, having completed the training in 2024. I'd been looking for an opportunity to get involved with the MFP program for several years, since first learning about its existence while living in Oregon for a few years. After retiring, I found that we just didn’t have a program in Stanislaus County, where I currently live.
Nonetheless, after retiring from teaching elementary school for thirty years, I started preserving a plethora of food using a variety of techniques: canning, drying, pickling, and freezing. I perused the internet, looked through many books, and used methods passed down from past generations. Slowly I filled my pantry shelves with pickles and peaches, jams and jellies, and vegetables from the garden, mostly pickled. I used my seal-a-meal, continuously sealing filled bags with dried tomatoes and fruits.
Finally, I heard that an online program was opening that specifically catered to counties that did not offer a MFP program. I jumped at the chance and filled out the paperwork immediately. I have to admit, I thought I might have a bit of a jump start, and that it wouldn’t be difficult for me given all the practice I put myself through over the past few years. I mean, I thought I already knew a lot about the topic but knew I had some holes to fill.
I’m going to admit, now, that I was way off base! It turned out that there is so much more to learn about (safely) preserving food than I even thought possible. My belief that I knew a lot because my mom did so much food preservation when I was growing up was slowly replaced with the realization that I was just doing what I was told as a child with no thought as to why I was doing it. By the time I was old enough to give thought to our purpose, our lifestyle had changed as she had started working out of the home and no longer preserved the food from our garden. By then, we didn’t even have much of a garden anymore!
Once we started the training, as I progressed through the videos and lectures, I went through my kitchen and pantry. Instead of worrying about always using nontoxic cleaners, I worried more about preparing my kitchen with thorough sterilization. Some of my products ended up in the compost bin as I realized my less safe methods could be a danger to my family. I now have so much more knowledge and skill, but most importantly, I have the resources to ensure that I am practicing safe preservation methods as I prepare food for my family and friends as well as teach others about the preservation of food.
In closing, I want to give a shout out to the leaders of the Master Food Preserver program here in California. It’s obvious that they have put in an enormous amount of time and thought into laying the program out using many teaching methods. There is a balance of videos, interactive lectures and hands-on experiences along with easily accessible resources to enable all of us to continue our learning journey and share with our communities.
The Evolution of Home Canning: From Napoleon's Prize to Modern Innovation (April 2025)
Paige Weisskirch, UC Master Food Preserver Online Program Volunteer

Home canning has an incredible story. What started as a way to feed hungry soldiers — facing the critical challenge of preventing food spoilage during long campaigns — has evolved into a practical skill and a beloved hobby for millions. The fascinating journey of canning innovations has consistently made the process safer and more accessible, a perfect example of human ingenuity solving one of our oldest problems.
The Birth of Food Preservation
Modern canning began because of a military necessity. In 1795, Napoleon Bonaparte offered a hefty 12,000-franc reward (est. $300,000 today) for someone to develop a reliable food preservation method for his troops. After years of experimentation, a French confectioner named Nicolas Appert claimed the prize in 1809 with a method that seems remarkably familiar today — sealing food in glass jars and heating them. What makes Appert's achievement remarkable is that he had absolutely no idea why his method worked. He thought air caused spoilage, so he simply aimed to keep it out. Decades later, Louis Pasteur proved that microorganisms were the real culprits behind food spoilage. Appert's process worked perfectly despite his lack of understanding of the underlying science.
Shortly after Appert's breakthrough, an Englishman named Peter Durand introduced tin canisters — the origin of the word "canning." These were sturdier than glass, making preserved foods easier to ship without breaking. By 1812, Americans were adopting the technology, with Robert Ayars and Thomas Kensett establishing the first U.S. canneries.
Early Innovations in Home Canning
In 1858, John Mason solved the frustration of inadequate food containers for home use with his threaded glass jar with a rubber seal design. Today's iconic clear Mason jars with their distinctive two-piece lids remain remarkably similar to his original design, a testament to the enduring quality of Mason's innovation.
Amanda Theodosia Jones developed the "Jones Process" in 1872. Her method was revolutionary because it preserved food without turning it into mush. Unlike earlier methods that thoroughly cooked everything before canning, her vacuum technique kept food at just 120°F, maintaining significantly more flavor and texture.
Alexander Kerr later simplified home canning with his two-piece lid system in 1915. That satisfying "ping" when a jar seals properly is the result of Kerr's practical innovation.
Science Meets Safety
Food safety became increasingly important as home canning became popular in the late 19th and early 20th centuries. The USDA's 1917 determination that pressure canning was essential for low-acid foods was a crucial advancement. However, when science revealed the danger of botulism caused by improperly canned vegetables and meats, many family food preservation traditions had to be updated.
During WWII, home canning exploded in popularity. Many older canners recall stories about everyone with a backyard garden putting up food as part of the war effort. Victory Gardens and home canning became practical expressions of patriotism during a time of national crisis.
Modern Developments
Today's canners have advantages that previous generations would have appreciated. The USDA published its comprehensive Guide to Home Canning in 1988, consolidating decades of research into one accessible resource. Modern equipment, such as electric canners with automated controls and steam canners, has made the process more approachable for beginners.
The COVID pandemic sparked the most recent surge in interest in canning as people sought food security and meaningful home activities. There's something profoundly satisfying about seeing home-preserved foods lined up on pantry shelves, knowing exactly what's in them and where the ingredients originated. This connection to our food sources represents something essential and timeless in human experience.
Next time you twist open a jar of homemade preserves, consider the centuries of innovation that made that satisfying "pop" possible. From Napoleon's army to your kitchen table—what a remarkable journey!
Fun Historical Note
Amanda Jones claimed she received her canning inspiration during séances. According to her 1910 autobiography, some of her advisors had already passed away when they "helped" her develop her preservation process.
Mold: Cut Off or Toss? (April 2025)
Monica Benavides, UC Master Food Preserver Online Program Volunteer
So you found mold on your preserved food. Is it safe to cut or scrape off? Should you toss the whole thing? What is a home food preserver to do?
Here’s your research-based guide to help you make the safe choice.
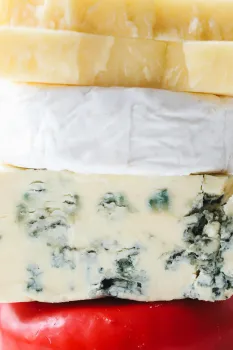
Mold is a part of that special kingdom called fungi. When it comes to food preservation, mold isn’t necessarily all bad. In fact, some cheeses such as Brie and blue cheese are made with mold. However, when you see mold growth that wasn’t a part of the manufacturing process on your food, it’s due to microbial spoilage. This mold is not only undesirable, potentially causing allergic reactions and respiratory problems[TA1] [HS2] , it can even be dangerous by producing mycotoxins (toxic substances produced by some fungi). These poisonous substances are not visible to the naked eye, have no distinctive taste or odor, and can cause you to become seriously ill.
I grew up thinking that a little mold could just be scraped or cut off. I thought that if the rest of the food looked good, that it would be fine to eat. That’s not necessarily the case though. Use the table below, which summarizes the recommendations from the resources listed at the end of this article, to determine when it’s safe to cut off or remove a small piece of mold, and when you should dispose of the entire product.
| Preserved Product | What To Do | Why? |
| High- & Low-Acid Canned Goods* - Fuzzy growth on surface of the food, musty odor, slimy food. | Discard. | Mold is a sign of spoilage. This could be due to a broken seal, grossly under processed food, or improper storage. In the cause of jams and jellies, too little sugar can lead to the formation of mold. Mold can cause a reduction of acidity in pickles, fruit, and tomatoes, potentially leading to the growth of botulism-causing bacteria. |
Pickles – Soft and slippery. | If caused by microbial spoilage, then discard. | This could have been caused by a number of reasons:
|
Sauerkraut – mold during fermentation. | If a small amount of mold develops, it can safely be skimmed off. However, if a large amount of mold grows, then it can affect not only the flavor, but the safety of the kraut and should be discarded. | Mold may form on the surface if the sauerkraut is fermenting in too warm of an environment and not covered well. |
| Cold Storage Goods | Discard all moldy food except for hard cheese and firm fruits and veggies. In the case of hard cheese and firm fruits and vegetables, you can cut off the moldy area, removing at least 1 inch below the mold. Be sure not to cut through the mold and cross contaminate. | Mold growth is exacerbated by warmth and high humidity. However, mold can slowly grow in cold temperatures as well. Food exposed to oxygen and mold spores can develop this microbial spoilage even in cold temperatures. However, mold cannot easily penetrate dense hard cheese and firm fruits and vegetables (such as carrots and cabbage with low moisture content). |
| Moldy Dried Foods | Discard | Excess water content can cause mold growth on dried foods. Water activity higher than 0.7 can lead to the growth of mold. Either dry foods longer or store dried foods in the freezer. |
*Applesauce is a prime candidate for mold due to its thick consistency. Be sure to heat applesauce to at least 180°F before filling into sanitized jars. This will ensure proper heat penetration during the canning process.
We know that it takes time, care and a lot of energy to carefully preserve our food. No one wants to find mold on their preserved foods, but it happens to the best of us. Being informed about the best way to handle a moldy situation will help us make the safest choice of what to do. Regardless of the preserved food, a good fail-safe policy is: when in doubt, throw it out.
If you would like to learn more about mold, ways to prevent it and what to do if you find moldy food, then you may want to read this article by the USDA: https://www.fsis.usda.gov/food-safety/safe-food-handling-and-preparation/food-safety-basics/molds-food-are-they-dangerous
Resources:
Food Safety and Inspection Service, U.S. Department of Agriculture (2013, August 22). Molds on Food: Are They Dangerous? https://www.fsis.usda.gov/food-safety/safe-food-handling-and-preparation/food-safety-basics/molds-food-are-they-dangerous
Powers-Hammond, L. & McCurdy, S. (2018). Fundamentals of consumer food safety and preservation: Master handbook (California ed.) Washington State University Extension and University of California Agriculture & Natural Resources
Spotlight: Kirsten Hansen, Class of 2024 MFP Volunteer (March 2025)
Kirsten Hansen, UC Master Food Preserver Online Program Volunteer
County of residence: Out of State

My name is Kirsten Hansen. I joined the inaugural class of the University of California Master Food Preserver (UC MFP) Online Delivery program in December 2023, graduated in the summer of 2024, and have been volunteering since then. I wanted to participate in a UC MFP program for a long time, but never lived in a county that offered it. So when I learned about the Master Food Preserver Online program, I jumped at the opportunity!
I’ve been water bath canning since I was very young. My parents had a large garden, and we canned lots of tomato sauce every year, plus some jam. We also froze a lot of produce. Once I got a little older, I joined 4-H and began making more jams and pickles to show in our annual 4-H fair. I still can a lot of tomatoes; I hauled home 20 pounds of tomatoes from the farmers market on my bicycle last summer and processed 40 pounds in a weekend! I kept canning while living in numerous suboptimal rental apartments, and now have an atmospheric steam canner and dehydrator, in addition to my hot water canning set up. I hope to add a pressure canner and chest freezer once I have a little more space!
and limited storage space. I do my boiling water canning in a large stock pot and most of my canning equipment fits in a 1’x1’ cube organizer. I’m passionate about demonstrating that you don’t need a lot of money, space, or special equipment to preserve food safely and deliciously.
The most valuable thing I’ve learned during my time as a UC Master Food Preserver is the why of food preservation. It’s reassuring to understand the mechanics of foodborne illnesses so that I can undertake the proper safety methods when preserving, including using research-based best practices and recipes from reputable sources. I find the science behind food preservation fascinating and it’s satisfying to have answers to why things sometimes go wrong, like jam failing to gel. I also have a lot more confidence in not just my own food preservation but being able to teach others.
Food preservation really is for everyone, and the UC MFP Online Delivery program is available to help the public preserve food safely now and relish it later.
Water Activity and its Role in Food Preservation (March 2025)
Henry Shaw, UC Master Food Preserver Online Program Volunteer
“Water activity” or “the activity of water” (typically abbreviated as “aw”) is a critical parameter in food science that influences microbial growth and chemical reactions (including enzymatic processes) in food products. Unlike moisture content, which measures the total amount of water in a product, water activity quantifies the availability of water for microbial and chemical processes.
Formally, the activity of water in a food sample is defined as the ratio of the vapor pressure of water in that sample to the vapor pressure of distilled water under identical conditions (U.S. Food & Drug Administration, 1984). It can take on values ranging from 0 (completely dry) to 1.0 (pure water). This formal definition can seem like a lot of hard-to-understand scientific gibberish, but there’s a concept that most of us are familiar with that can help us understand the definition. The water activity of a food sample is simply the relative humidity (RH) in the air in a sealed jar that contains the food in question after that food has had time to equilibrate with the air. Relative humidity is usually reported as a percentage, but if we express the percentage as a decimal fraction (i.e., divide the percent relative humidity by 100) we get the water activity: aw = RHjar/100.
At 100% relative humidity (aw = 1) it’s raining; the air contains as much water vapor as it can hold at that temperature. At lower atmospheric relative humidities, “wet” things (i.e., those with an aw greater than RH/100) will dry out. If we seal a jar with a food product and let it equilibrate, the food will determine the relative humidity in the air in that jar by either evaporating water from the product or absorbing water vapor from the original air in the headspace. The final relative humidity in the headspace, divided by 100, is the activity of water in that product.
Microbial growth is highly dependent on water activity and the goal in food preservation is to lower the aw to a value at which pathogens and food-spoilage organisms cannot thrive. Most bacteria require a water activity above 0.91 to grow. Most yeasts can only survive at water activities above 0.88, and molds can survive at even lower water activities, with a limit of about aw ~ 0.65. By reducing the water activity in a product, we can inhibit the growth of these spoilage organisms and pathogens, thereby extending the product’s shelf life and enhancing food safety. For reference, the horizontal dashed lines in Figure 1 show the water activity levels below which various types of food spoilage organisms can no longer grow.
In addition to affecting microbiological activity, the activity of water influences chemical reactions such as lipid (fat) oxidation and Maillard browning. These reactions can lead to undesirable changes in flavor, color, and nutritional quality. By lowering water activity, we can slow these reactions and maintain product quality and prolong storage life.
Food preservation methods like dehydration, freezing, and the addition of humectants (things that “bind” with water and reduce its availability, e.g., salt or sugar) are commonly used to reduce water activity. Dehydration is an effective means for reducing the activity of water. This process physically removes water to lower the aw. Dried fruits, jerky, and powdered milk are preserved in this way and typically have water activities less than 0.75, which is below the threshold needed for most microbial growth (see Fig. 1). Note that when we “condition” dehydrated foods prior to long-term storage (i.e., let them sit in a closed jar for a week or so, shaking the jar daily), what we are doing is letting the dried pieces of food equilibrate so that the aw becomes the same in each piece. If we have different types of food in that jar (e.g., a mixture of dehydrated vegetables for use in later soup making), the activity of water in each piece will be the same after conditioning, but the water content of each type of vegetable may well be different due to the differing chemical compositions of the different vegetables.
Freezing immobilizes water molecules (and slows both the metabolic activity of bacteria and the rate of chemical reactions responsible for food degradation). Humectants bind free water to reduce its chemical availability. For instance, as shown in Figure 1, a 13 wt. % solution of salt (NaCl) has a water activity of ~0.91, which is low enough to suppress the growth of most “ordinary” bacteria. In contrast, one needs a 55 wt. % solution of sugar to reach the same aw. On a weight basis, therefore, salt is much more effective at reducing aw in a water solution than sugar.
All these techniques lower the activity of water in preserved foods to prevent spoilage and ensure that food remains safe for consumption after storage.
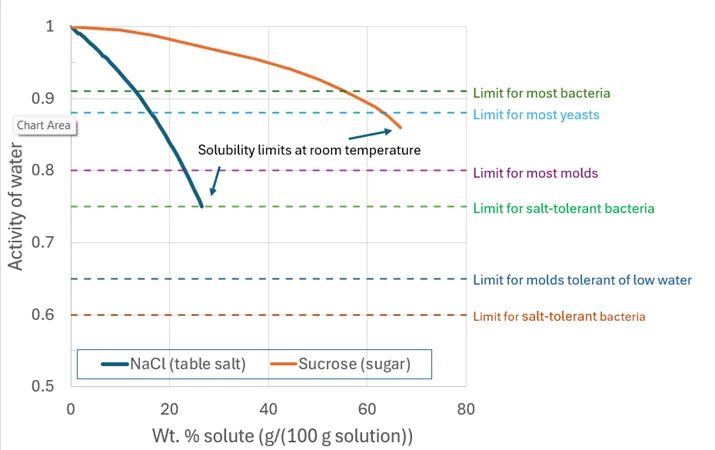
Figure 1. The activity of water in salt and sugar solutions as a function of solute concentration. The two curves show how increasing salt or sugar concentrations lower the activity of water in the solution. Both curves stop at the solubility limit of the solute at room temperature. Note that the weight percent of the solution on the horizontal axis is the mass (weight) of the sugar or salt divided by mass of the water plus the mass of the sugar or salt in the solution. Dashed horizontal lines indicate the growth limits of various food-degradation organisms; at an aw lower than a given line, an organism will not grow. (Data from Gekas et al., 1998; FDA, 2012; Bressan and Mathlouthi, 1993; Fundamentals of Consumer Food Safety and Preservation, 2018)
References:
Bressan, C. and M. Mathlouthi, 1993, Thermodynamic activity of water and sucrose and the stability of crystalline sugar. AVH Association 1st Symposium, Reims, France.
Food and Drug Administration, 2012, Bad Bug Book, Foodborne Pathogenic Microorganisms and Natural Toxins. Second Edition. Appendix 3. Factors that Affect Microbial Growth in Food, p 261.
Gekas, V., C. Gonazlez, A Sereno, A Chiralt, and P. Foto, 1998, Mass transfer properties of osmotic solutions. 1 Water activity and osmotic pressures. Intl. J. of Food Properties, I(2) 95-112.
U.S. Food and Drug Administration, 1984, Water Activity (aw) in Foods. Inspection Technical Guides No. 39, https://www.fda.gov/inspections-compliance-enforcement-and-criminal-investigations/inspection-technical-guides/water-activity-aw-foods.
Washington State University and University of California, 2018, Fundamentals of Consumer Food Safety and Preservation, Master Handbook, p 1-10.