UC Master Food Preserver Newsletter

In November of 2024, the UC Master Food Preserver Program launched a monthly newsletter that delivers recipes, how-tos, and food preservation inspiration straight to a subscriber's inbox. Subscribe to the newsletter here.
Do you have a correction, suggestion, or story to share with the newsletter team? Share corrections, suggestions, or stories here.
Past Newsletter Full Emails
2026
2025
2024
Monthly Articles To-date
Spotlight: Michele Jones, Class of 2025 MFP Volunteer (August 2025)
Michele Jones UC Master Food Preserver Online Program Volunteer
County of residence: Placer

Image credit: Maria Giovanni, 2025
Hi, my name is Michele Jones, and I am proud to be a recent graduate of the UC Master Food Preserver Program, graduating in June 2025. I grew up watching my mother and grandmother preserve fruits and vegetables with skill and pride. Their kitchens were full of love and knowledge.
As much as I admired their ways, I knew I needed to deepen my understanding and gain confidence using today’s trusted, research-based practices. That is exactly what the MFP Program is providing for me – a strong foundation in food safety and modern preservation techniques that align with current science.
Now, I can honor my family’s legacy while confidently sharing safe, up-to-date information on food preservation with others in my community. Whether you are new to preserving or looking to refresh your skills, this Program is an inspiring journey, and you are not alone.
Ice Ice Berry: Freeze Your Fruit Like a Legend (August 2025)
Paige Weisskirch, UC Master Food Preserver Online Program Volunteer
Freezing fruit at home is one of the simplest and most effective ways to preserve your harvest, or that great farmers-market haul, so nothing goes to waste. It gives you the convenience of having high-quality, ready-to-use fruit at your fingertips, whether you're making smoothies, baking, or just grabbing a handful for a snack. Thanks to the innovations of Clarence Birdseye, freezing fruit has become an accessible and reliable way for home preservers to lock in flavor, nutrition, and value year-round.
Clarence Birdseye and the Invention of Quick Freezing
In the early 1900s, Clarence Birdseye was working in the frigid region of Labrador, Canada, where he saw Indigenous Inuit communities preserving freshly caught fish by exposing it to the bitterly cold Arctic air (sometimes as cold as -45°F). This method froze the fish almost instantly, locking in its flavor and texture. When thawed, the fish remained fresh and appetizing, unlike the mushy, watery results commonly achieved with the freezing methods commercially used at the time.
Birdseye realized that the key difference was speed. Fast freezing formed smaller ice crystals that didn’t rupture food cells. Driven by this insight, he returned to the U.S. and began designing mechanical freezing equipment. In 1924, he patented a process that used two refrigerated metal plates to freeze packaged food rapidly. By 1929, Birdseye had sold his patents to what would become General Foods, launching the Birds Eye brand and igniting the commercial frozen food industry.
Frozen Food in the American Home
Birdseye’s innovations made frozen food available in grocery stores by the early 1930s, but it wasn’t until after World War II that American homes began to catch up. Although early adopters purchased standalone chest or upright freezers, the more transformative innovation for everyday households was the development of the combination refrigerator/freezer appliance.
These combination appliances began appearing in U.S. kitchens in the late 1940s and early 1950s, integrating cold food storage and freezing in a single device. By the mid-1950s, more than 80% of American homes had a refrigerator, and a growing percentage included freezers. The convenience of having a freezer section built into the same appliance as the refrigerator made it easier than ever to store frozen vegetables, meats, and yes, berries.
As frozen foods became a staple of American life, so too did home freezing. With Birdseye’s quick-freezing principles built into the very design of modern appliances, freezing fresh fruit became both accessible and practical.
Freezing Berries the Smart Way: Start with Tray Freezing
Berries are a perfect candidate for freezing, but due to their high water content, they need to be frozen correctly to prevent them from turning mushy. The most versatile method is tray freezing, which keeps berries separate and allows for easy portioning later.
Follow these simple steps:
- Select fully ripe, firm berries. Remove leaves, stems, and any bruised or underripe fruit.
- Wash gently in cold water and drain thoroughly. (Tip: Use a salad spinner lined with paper towels – be gentle.)
- Allow the berries to dry thoroughly for an hour on the counter or uncovered in the refrigerator for several hours. (The less surface moisture, the better)
- Spread the berries in a single layer on a rimmed baking sheet and place in your freezer (in the coldest spot, ideally near the back).
- Once frozen solid (usually several hours), quickly transfer the berries into freezer-safe containers or bags. Squeeze out excess air before sealing or use a vacuum sealer.
Learn More About Freezing Options
If you plan to use your berries in desserts or cooked recipes, you may want to consider other methods, such as a syrup or sugar pack. You can learn more about these methods in the UC Master Food Preservers Guide: UC MFP: Fruit, Serve It, Preserve It.
Storage Tips for Success
- Keep your freezer at 0°F (-18°C) or lower.
- Use moisture- and vapor-resistant freezer containers or bags.
- Label foods clearly with the date frozen and contents.
- For best quality, use frozen berries within 8–12 months.
Thawing Tips
Thaw berries in the refrigerator for a slow, safe defrost. If you’re using them in baked goods or smoothies, you might not need to thaw them at all. For immediate use, berries can be thawed under cold running water or in the microwave if they’ll be cooked right away.
A Frozen Legacy
Clarence Birdseye’s innovation brought the convenience of frozen foods to every household. Today, every home cook benefits from his work. Freezing berries with modern home appliances and reliable techniques not only reduce food waste but also allows you to enjoy the taste of summer any time of year.
Making and Using Dehydrated Tomato Skins (August 2025)
Monica Gross, UC Master Food Preserver Online Program Volunteer
There are a surprising number of uses for tomato skin! This article will explain how to make a powder out of tomato skins and what to do with that powder (Fig.1). Prior to canning tomatoes, it’s necessary to remove the tomato skin. This is done by placing a few tomatoes at a time in boiling water for about one minute until their skins split. (For thick-skinned tomatoes, it helps to cut a small “x” in the blossom end of each tomato first.) After an ice water dip, the skin will slip right off. This series of articles will enlighten you on some surprising uses for those tomato skins. This month’s article will explain how to make tomato powder out of the skin and future articles will explore other uses for the lowly skin!

Figure 1. Tomato powder (Image credit: Monica Gross, 2025).
Tomato skins can be dehydrated and ground into tomato powder. The use of a dehydrator (Fig. 2) is recommended because ovens generally do not have a low enough temperature setting and the skins are easily burned at the higher oven temperatures. Place the skins on parchment paper, outer-skin side down, in a dehydrator. Arrange the skins to lay without folding over on themselves as much as possible. The skin should not touch one another. Set the temperature to 135oF and dry for 6 - 12 hours. Check at the 5th hour and remove any that are completely dried. NO moisture should remain. The skin should snap or shatter when bent. Store the dry skins temporarily in a covered container. Continue drying the skins that are not crisp. Check hourly and remove the skin when they have completed the dehydration process.
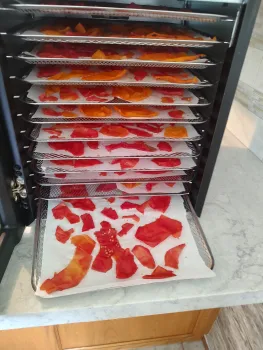
Figure 2. Dehydrator filled with tomato skin (Image credit: Monica Gross, 2025).
Next, pulverize the skins in a food processor, blender, or spice grinder to form tomato powder. Store the powder in a closed container in a cool dark place. If properly prepared and stored the powder can last for a year or more. You can simply use the powder as a seasoning or flavor enhancer in soups, stews, and baked goods. Alternatively, you can reconstitute it to make various tomato products (Fig. 3) as detailed in the table below.
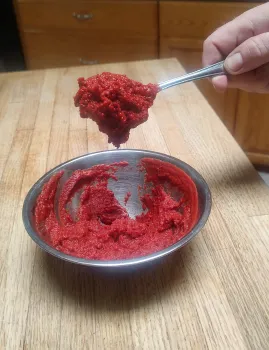
Figure 3. Bowl of fresh tomato paste (Image credit: Monica Gross, 2025).
Tomato Product | Tomato Powder | Water | Product |
Tomato sauce | 1/3 Cup | 1 Cup | 8 oz Tomato sauce |
Tomato paste | 6 Tablespoons | ½ Cup | 6 oz Tomato paste |
Tomato juice | ½ Cup | 4 Cup | 32 oz Tomato juice |
For more information on dehydrating tomatoes and tomato skins, see:
The Overlooked Step That Protects Your Dehydrated Foods (July 2025)
Joy Agcongay, UC Master Food Preserver Online Program Volunteer
The Overlooked Step That Protects Your Dehydrated Foods: The Critical Step of Conditioning in Food Dehydration
Why Conditioning Matters
Conditioning refers to the process of evenly redistributing any remaining moisture across a batch of dehydrated food after drying. It’s an essential step in the dehydration process — often overlooked, but critical for food safety and long-term storage.
Dehydration is one of the oldest and most cost-effective food preservation methods. By removing moisture, enzymatic activity slows, and the growth of spoilage organisms is prevented. However, drying isn’t complete when food comes out of the dehydrator. Residual moisture may remain in some pieces, and without conditioning, this can compromise the safety and quality of long-term storage.
The Trouble with Trapped Moisture
Even foods that appear thoroughly dried can hide pockets of moisture. This is especially common in thicker slices or foods which are cut unevenly. During dehydration, outer surfaces dry faster than interiors, leading to inconsistent moisture content within the batch.
If this uneven moisture isn't addressed, some areas may retain enough water to support spoilage or mold growth. Conditioning allows batches of dehydrated foods to equilibrate the moisture levels (the activity of water) across each piece of dehydrated product and can provide an indication that the batch of product has been insufficiently dehydrated. If conditioning shows that the product is not sufficiently dehydrated, it’s easily fixed!
How to Condition Dried Foods
To condition dehydrated foods safely and effectively:
- Cool completely after drying to avoid condensation.
- Place in airtight containers, like glass jars or food-safe plastic, for 7-10 days.
- Fill containers no more than two-thirds full to allow for air circulation and movement.
- Shake containers daily to help redistribute content and equalize moisture.
- Inspect the container for condensation or stickiness during the conditioning period.
- Reprocess in the dehydrator if any excess moisture is observed.
Why shaking matters: Toss the pieces. It also prevents clumping — if you notice pieces stick together, or there’s moisture condensed on the container walls, That signals excess moisture and the need for additional drying. Put your product back in the dehydrator and reprocess for a few hours.
Where and How to Store Your Dried Foods
Once the conditioning process is complete and no signs of excess moisture remain:
- Transfer food to airtight containers and store in a cool, dark place.
- Consider using food-safe desiccant packets to absorb any remaining humidity.
- For longer-term storage, mylar bags or vacuum-sealed pouches can offer extra protection from light and air.
- Always label containers with the product name and date.
When stored properly, dehydrated foods can maintain quality for up to one year. However, shelf life can vary significantly depending on storage conditions. A cool, stable temperature (around 60°F) extends storage time. In contrast, food stored in warm or fluctuating environments, such as sheds, garages, or near appliances, may lose quality more quickly. Conditioning is the final step that protects your dehydrated foods from spoilage and supports reliable, long-term storage.
Resources
Conditioning Dried Foods (PDF)
Frozen Sour Grapes: A Cool Flashback with a Tart Twist (July 2025)
Jadrian Johnson, UC Master Food Preserver Online Program Volunteer

Image credit: Jadrian Johnson, 2025
If your childhood tasted like Atomic Warheads and early-generation Sour Patch Kids, you already know the joy of a good sour pucker. This recipe for frozen sour grapes brings that same zingy magic, only this time, it’s wrapped in a fresh, frosty snack that’s as fun to make as it is to eat.
At its core, the recipe is disarmingly simple: fresh grapes, lemon juice, and a sour-sugar coating made from pantry staples.
Roll your grapes (green for a snappier sour pop, red for a sweeter contrast) through the lemon juice, then into the sour sugar mix. Spread them out on a tray and freeze until firm. That’s it.
The key to the best results? Use plump, ripe, fresh grapes, the kind that feel like little water balloons about to burst. Older grapes tend to shrivel in the cold, so start with fruit that’s still crisp and full of juice.
And here's where the sour magic happens: you’ll mix 3/4 cup of sugar with 7 1/2 teaspoons of food-grade citric acid (and really mix it well). You want that tartness evenly dispersed throughout the sugar, not lurking in one spot like a landmine.
I love how accessible and economical this recipe is. Grapes are easy to find and often affordable, and everything else you probably already have in the cupboard. There’s no need for canning equipment, pH testing, or heat; just a freezer and a bit of childlike play.
Speaking of play, this is a recipe that begs for little helpers. Kids can get their hands (and probably noses) into every step of the process, and they’ll feel a sense of ownership when they pop that first frosty sour grape in their mouth. Adults, be warned; you may find yourself elbowing the kids out of the way for seconds.
Freezing, after all, is one of the most reliable and beginner friendly methods of preservation we have. By quickly lowering the temperature, we’re halting microbial activity and enzymatic changes that would otherwise lead to spoilage. There’s no special equipment needed, just a freezer and a little bit of space. For anyone new to food preservation, it’s an empowering place to start: low risk, low cost, and (in this case) high reward.
Photos from my own batch are included, but trust me, this one’s better experienced than read about.
Go on. Freeze a little fun.
How to Make Frozen Sour Grapes
A delightfully tart and chilly treat
You’ll need:
- 4 cups fresh green or red grapes, plucked from stems and rinsed
- Juice of 2 lemons
- 3/4 cup granulated sugar
- 7 1/2 teaspoons food-grade citric acid
Steps:
- Prep your sour sugar: In a small bowl, combine the sugar and citric acid. Stir thoroughly to ensure an even mix.
- Rinse grapes: Make sure your grapes are clean and plump. Do not wash with detergents.
- Toss grapes in lemon juice: In a large bowl, drizzle the grapes with fresh lemon juice. Stir gently to coat.
- Roll in sour sugar: Working in batches, roll the lemony grapes in the sour sugar until fully coated. If your sour sugar becomes too damp, with a texture of wet sand, mix another batch using the same ratios (about 2 ½ teaspoons citric acid to ¼ cup sugar). Wet sugar will have trouble adhering fully to the grapes.
- Freeze: Spread grapes in a single layer on a parchment-lined baking sheet. Freeze until firm, about 4 hours.
- Store: Transfer grapes to a freezer-safe airtight container such as a freezer bag or jar.
- Enjoy: Serve straight from the freezer. Store leftovers in a freezer-safe, sealed container for up to 6 months.
Tips:
- Green grapes give a sharper sour punch; red grapes offer a sweet-tart balance.
- Let kids help with rolling and mixing. It’s sticky, sensory fun.
- Try other citrus juices or flavored sugars for custom versions.
- Adjust the tartness by reducing or increasing the citric acid, between 1 and 3 teaspoons per ¼ cup sugar.
Preserving the Revolution: Food Traditions That Fed a New Country (July 2025)
Paige Weisskirch, UC Master Food Preserver Online Program Volunteer

Image credit: capecodprof from Pixabay, 2013
This month, many Americans celebrated Independence Day with home-canned jams, pickled vegetables, and smoked meats, foods that connect us to a long tradition of preservation. What many don't realize is that food preservation played a quiet but crucial role in the fight for American independence more than 240 years ago. Lacking refrigeration or modern food safety science, colonists and soldiers relied on practical, resourceful methods to keep food edible. These preservation techniques helped sustain households, kept the Continental Army fed, and laid the foundation for today's science-based standards.
In the 18th century, preservation wasn't a pastime; it was a matter of survival. Colonists used drying, salting, pickling, smoking, fermenting, sugaring, potting, and cool storage to extend the shelf life of their food. Without an understanding of microbes, they relied on sensory cues, tradition, and community knowledge to judge whether food was safe to eat. Mistakes, unfortunately, were common; for instance, preserved foods contaminated by botulinum toxin have no discernible “off” odor or visually identifiable signs.
One lesser-known colonial staple that some of us might be repulsed by today, was souse, also known as head cheese. Made by boiling a pig's head and preserving the meat and gelatin in vinegar, souse was a protein-rich food that made use of parts that would otherwise be discarded. Another common method was potting, which involved cooking meat and sealing it in a crock with a layer of fat or butter to block oxygen. These foods were stored in cool areas like cellars or springhouses and were expected to last through harsh winters. Potted beef, potted hare, and preserved fish were common items in colonial pantries. We continue that tradition by modern “confit” preservations recipes that require frozen storage for safety.
Vegetables were preserved by vinegar pickling or fermentation. Cabbage was turned into sauerkraut and stored in crocks, providing essential vitamin C during the winter months. Fruits were preserved with sugar into syrups, conserves, or fruit leathers. Drying was widespread: apples and peaches were sliced and sun-dried on screens, and meats were turned into jerky or smoked sausages. Beans and herbs were tied into bundles and hung in kitchens.
For soldiers in the Continental Army, preserved food was essential for their survival. The official ration called for meat, flour or bread, legumes, and beverages like cider or spruce beer. However, spoilage, transport delays, and harsh weather meant these rations were often late or never arrived. Soldiers relied on salted meat, hardtack, dried legumes, and any foraged or pilfered food they could find. In winter encampments like Valley Forge, many soldiers went for days without sufficient food.
The consequences of failed preservation could be deadly. Without an understanding of bacterial contamination, colonists sometimes consumed spoiled food that looked and smelled fine. Foodborne illnesses like enteritis caused by Clostridium perfringenst, botulism, and staphylococcal food poisoning were likely widespread, though none of these bacteria-caused illnesses were understood at the time. Improper salting, inadequate smoking, or failed seals on potted foods also created conditions ripe for microbial growth.
In military camps, large batches of food were often prepared in advance and kept warm for extended periods, ideal conditions for bacterial multiplication. Perishable items like dairy or meat, when left in the "danger zone" (between 40°F and 140°F), can develop high bacterial counts in just a few hours. Although colonists couldn't have known these temperature thresholds, the pattern of reported gastrointestinal outbreaks aligns with what we now understand about foodborne pathogens.
The harsh lessons of colonial food preservation gradually led to new technologies and practices. Canning was developed in France in the early 1800s during the Napoleaonic wars and reached American homes after John Mason's 1858 invention of the screw-top Mason jar. By the 20th century, scientific research had revealed the role of microbes, pH (acidity), oxygen, and temperature in food spoilage and safety. With these discoveries came the creation of reliable, research-based preservation methods.
Today, organizations like the USDA and UC Master Food Preservers provide home preservers with information on safe practices. Modern techniques, such as pressure canning, water bath canning, atmospheric steam canning, and controlled fermentation, are based on microbial science research. Recipes are tested for the importance of acidity, heat penetration, and storage safety. We no longer need to rely on guesswork or tradition to keep you, your family, and your friends safe.
The preservation methods used by early Americans reflected their resilience, ingenuity, and deep connection to seasonal food. While many of us are fortunate and no longer need to preserve food to survive winter, many of us do so for sustainability, emergency preparedness, flavor, and tradition. At UC Master Food Preservers, we look to the past for inspiration, but always rely on the present for safe, tested methods.
Whether you're canning tomatoes or drying peaches this summer, know that you are part of a long legacy of preservation, one that now stands on a solid foundation of science and public education. Whether passed around a picnic table in July or pulled from the pantry in January, preserved foods remain a powerful expression of both independence and community.
Spotlight: Maria Giovanni, Class of 2024 MFP Volunteer (July 2025)
Maria Giovanni, UC Master Food Preserver Online Program Volunteer
County of residence: Previously Butte, now lives out of state (CO)

Image credit: Maria Giovanni, 2025
Do you ever think about the “why” and “how” of food? I joined the UC MFP Online program from a different perspective than most of our amazing volunteers. Like many MFPs, I learned to can food when I was young and was an active 4-H member, which turned into my almost 50-year career in food science. Leaving my rural hometown for the “big city” of Davis, CA, I was fortunate to learn from amazing professors who provided a strong foundation in food science, which includes food preservation. I have worked for Cooperative Extension as a county Advisor in both Colorado and California and have also assisted Specialists with their research.
I wanted to start a Master Food Preserver (MFP) program in my home community, but we just didn’t have enough time, county financial support, or wiling volunteer staffing to begin an in-person program. The Online MFP Program has been a great resource to counties in California and beyond that don’t have an active in-person MFP program. Many of these parts of California are in rural areas that have an abundance of produce, both commercially and from home gardens, so the online program fills an important gap. The collaboration and friendship I have experienced as an online MFP are wonderful. I am glad to contribute from my education and experience working for a wide variety of food companies and in community education.
The Online Delivery Program has allowed UCCE to expand both within and beyond California, so if you are interested in joining our efforts, please contact us. I have recently moved to Colorado but retained my association with the Online Delivery program of the UC Master Food preservers. With the challenges of preserving food at high altitude, I look forward to continuing with the on-line program, teaching people safe food preservation methods so they have more food for their families while decreasing food waste.
Can You Reuse Commercial Product Jars for Canning? (June 2025)
Henry Shaw, UC Master Food Preserver Online Program Volunteer
It’s sometimes possible, but it’s not recommended.
Can one reuse mayonnaise and other similar commercial product jars for home canning? Some people have done so with some success. But although it’s technically possible, it’s not advisable.
Commercial product jars are not designed to be repurposed for home canning. The glass may not have the tempering needed to withstand the temperatures and processing times used in home canning and the jar could break during processing. Furthermore, the mouths and rims of commercial jars are often slightly different in size from those of home canning jars, so although canning lids may seem to fit, seal failures can occur.
How about those pasta-sauce jars that say “Atlas” and “Mason” on them (usually Classico® brand sauce)? These are not actually home canning jars, and the manufacturer has specifically stated that that they should not be used for home canning. The Hazel-Atlas Company did make home canning jars from 1902 to 1964, but the company went out of business in 1964 and no longer exists. True Hazel-Atlas jars are simply labeled “Atlas” but are always marked somewhere with an “HA” symbol, with the A tucked under the H (see image). The “Atlas Mason” stamped on the sides of pasta-sauce jars is just a marketing device. As is the case with other commercial product jars, one risks breakage and seal failure if they are reused for canning.
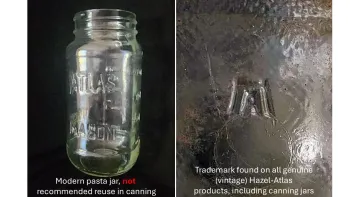
Image credit: Henry Shaw, 2025.
Because of the risk of breakage (and thus loss of food) and seal failures, reusing commercial product jars is not recommended. Should you decide to try using them, use them only for boiling water/steam canning; do not use them for pressure canning. Commercial product jars can, of course, be safely reused for storage of dry foods or (with appropriate air locks) as fermentation vessels.
For more information on canning jars, visit the National Center for Home Food at: https://nchfp.uga.edu/how/can/general-information/recommended-jars-and-lids/#gsc.tab=0
Disclaimer: This article has been adapted from an earlier article by the UCCE Master Food Preservers of El Dorado County. See: https://ucanr.edu/blog/coastal-gardener/article/can-i-reuse-jars-lids-canning .
Strawberry Jam to Jumpstart Summer Preserving (June 2025)
Ariel Patton, UC Master Food Preserver Online Program Volunteer
I often kick-off my summer by preserving strawberry jam, as the bright, ruby-red fruit overflows tiny green baskets throughout markets in the late spring and early summer. In California, strawberries are abundantly available and easy to clean. Best of all, they make a knockout jam that can take any peanut butter and jelly sandwich or yogurt to the next level.
Below is a tried-and-true recipe using only strawberries and sugar. Finding a couple hours to preserve can be difficult, so I often make my batch of jam across two days: one evening for washing, chopping, and mixing the fruit and sugar, letting it macerate covered in the refrigerator overnight. The next day is for cooking the fruit-sugar mixture down and canning it. The recipe is from the “So Easy to Preserve” publication of the University of Georgia Cooperative Extension. If you do make this recipe, please let us know how it goes via the following link: Newsletter Feedback

Image credit: Ariel Patton, 2025.
Strawberry Jam
Yield: about 8 half-pint jars
Ingredients:
2 quarts crushed strawberries
6 cups sugar
Instructions:
Sterilize canning jars (Boil jars, completely submerged, for 10 minutes for elevations below 1000 feet. Add one minute for every 1000 feet increase in elevation above 1000 feet).
Combine berries and sugar.
Bring slowly to boiling, stirring occasionally until sugar dissolves. Cook rapidly until thick, about 40 minutes. As mixture thickens, stir frequently to prevent sticking. Boil until the temperature is 220°F or 8°F above the boiling point of water at your elevation. For a firmer product, boil longer, for a softer product, boil less. If you don’t have a thermometer, you can use the refrigerator/freezer test.
Pour hot jam into hot jars, leaving ¼-inch headspace.
Wipe jar rims and adjust lids.
Process for 5 minutes in a Boiling Water Bath or Atmospheric Steam Canner.
If you’re looking for more ways to use strawberries this summer, the UC Master Food Preserver Online Program will be hosting a couple of online strawberry classes that you can find on our Events Page.
Freeze Drying at Home (June 2025)
Tim Long, UC Master Food Preserver Online Program Volunteer
Commercial freeze-dried foods have been around for quite a while.
Astronaut Ice cream for example:
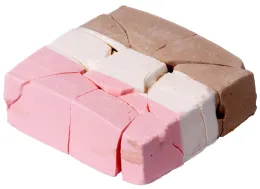
Image credit: Public Domain, 2025.
For those who may be hikers or back packers, as I was while working with Boy Scouts, the commercial freeze-dried meals shown in the image below might be familiar. They are very light weight and tasty.
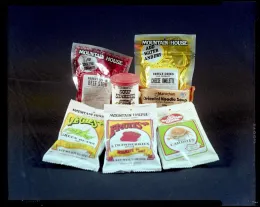
Image credit: Public Domain, 2025.
HarvestRight, a company in Salt Lake City, Utah, introduced a home use freeze dryer in 2018 which allows us home preservers to make our own freeze-dried foods.
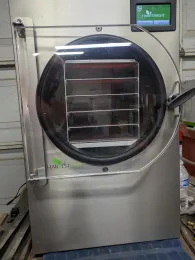
Image credit: Tim Long, 2025.
In early 2023, a second company, Prep4Life, introduced a slightly different freeze dryer for home use known as THE CUBE. A more recent entry in the home freeze dryer market is Blue Alpine, introduced around 2023 or 2024. There is now yet another newcomer manufacturer available known as StayFresh Dryers.
Okay, so what! How does freeze drying work?
The process involves two basic steps
- Step one: Freeze the product to be preserved.
- Step two: Reduce the surrounding air pressure and add a little heat to sublimate the water ice.
In step one, trays of food are placed in the freeze dryer's chamber. The machine freezes the food to a temperature between -30° and -50°F (-34° and -45°C). Next, in step two, a vacuum pump pulls the air out of the chamber to form a vacuum, and the trays are slightly heated. As the frozen water in the food warms, it sublimates (the ice transforms directly from solid to water vapor) and is removed from the product. This process automatically removes up to 98 percent of the water in the food.
So, do I have to tell the machine how to do its job?
All you have to do is make sure to properly prepare the food, make sure the freeze dryer trays are clean/sanitized, place the trays in the machine and follow the directions on the digital panel on the front of the machine. The internal programming takes care of the process i.e., time, temperature, and drying. There’s no guess work.
What happens to microorganisms in the freeze-drying process?
Nothing! The microorganisms stay viable, but dormant, even under the extreme conditions of freeze drying. So please understand that when home freeze drying raw foods the microorganisms in/on those raw foods will remain viable, then potentially reactivate upon rehydration. Food items that are traditionally cooked before eating must also be cooked before eating as a freeze-dried food. Examples are raw meats, raw seafood, raw eggs, and foods containing these raw ingredients.
How do I store my freeze-dried food?
- Place freeze dried food in an airtight container. Otherwise, it will begin to reabsorb moisture from the air and spoil. Suitable packaging includes:
- Mylar bags
- Vacuum sealed plastic bags
- Airtight jars
For a 25-year shelf life, Mylar bags are the easiest and least expensive option. Add an oxygen absorber to make sure oxygen isn’t in your bag, which would degrade your food over time. Then, simply seal the bag with an impulse sealer or even just a hot iron or flatiron.

Image credit: Tim Long, 2025.
- Vacuum sealed plastic bags are another good option for all foods except meat or other high-protein foods.
Simple airtight jars like the one shown below work well for snacks such as fruits, vegetables, yogurt, or even cheesecake and ice cream. These can easily store in a pantry for a few months without adding an oxygen absorber. Just remember to seal the jar tight after you grab your goodies. (The jar shown is a canning jar sealed with a portable jar vacuum sealer.)

Image credit: Tim Long, 2025.
Freeze-dried foods have a number of advantages over conventionally dehydrated foods, as described in the below table.
Freeze Drying | Conventional Dehydration |
| Foods remain similar size or, in some cases (e.g., candies), expand | Foods shrink and develop a leathery feel and appearance |
| Rehydrated foods return to close to original texture and appearance | Rehydrated foods typically don’t return to their original texture or appearance |
| Properly stored freeze-dried foods can have up to a 25-year shelf life | Dehydrated foods have a shelf life of 4 months to 1 year |
| Nearly any food can be freeze dried (see below) | Fewer foods can be successfully dehydrated and rehydrated |
| Foods rehydrate relatively quickly | Foods rehydrate slowly |
Although a freeze-drying unit and a dehydrator both remove moisture from food so that microorganisms cannot grow and enzyme action is slowed down, a dehydrator uses low heat and a fan to remove 80-90 percent of the moisture content from food. In contrast, freeze drying removes up to 98 percent of the water in the food, resulting in a much lower water activity.
What types of food can I freeze dry?
Nearly any food item can be freeze dried:
- fruits,
- vegetables,
- herbs,
- meats (cooked and raw),
- eggs,
- dairy,
- meals,
- casseroles,
- desserts.
So why isn’t freeze drying more popular for home food preservation?
The main impediment to wider adoption of freeze drying at home is the cost; a home freeze dryer still costs a few thousand dollars. In contrast, one can buy a serviceable conventional food dehydrator for a few tens of dollars (though one can spend more). Food dehydrators designed for home use are slowly coming down in price, though, as more manufacturers enter the market. Other impediments to wider adoption of home freeze dryers are their operating and maintenance costs, which are significantly higher than for conventional dehydrators.
Utah State University Extension’s “Preserve the Harvest” recommends that vegetables be blanched prior to freeze drying to prevent discoloration. Food high in fat content, high in sugar content, and baked goods such as breads, cakes, muffins, etc.... do not freeze dry well and should be avoided. Sugar causes food to expand.
Some reference sites used in the preparation of this article are listed below.
- Preserving by Home Freeze Drying, Iowa State University Extension
- Guide to Freeze Drying – The Miracle of Food Preservation, HarvestRight
- Let’s Preserve: Freeze Drying, Penn State Extension
- Freeze Drying, Utah State University
- What Sets The Cube Apart From Other Brands?, Prep4Life
Disclaimer: Reference to any commercial product, process, or service, or the use of any trade, firm, or corporate name is for general informational purposes only and does not constitute an endorsement, recommendation, or certification of any kind. People using such products assume responsibility for their use and should make their own assessment of the information and whether it is suitable for their intended use in accordance with current directions of the manufacturer.