UC Master Food Preserver Newsletter

In November of 2024, the UC Master Food Preserver Program launched a monthly newsletter that delivers recipes, how-tos, and food preservation inspiration straight to a subscriber's inbox. Subscribe to the newsletter here.
Do you have a correction, suggestion, or story to share with the newsletter team? Share corrections, suggestions, or stories here.
Past Newsletter Full Emails
2026
2025
2024
Monthly Articles To-date
Spotlight: Cole Imperi, Class of 2025 MFP Volunteer (February 2026)
Cole Imperi, UC Master Food Preserver Online Program Volunteer
County of residence: Los Angeles
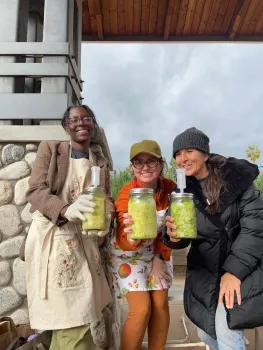
Cole Imperi and fellow trainees (Used with permission).
The first time I canned anything was the second summer after I bought my first house a few blocks from the Ohio River in Northern Kentucky. I had set up a big backyard garden comprised entirely of heirloom tomatoes, and discovered what happens at the end of a prolific growing season—pounds and pounds of tomatoes that need to be brought inside and dealt with before the first frost.
My husband and I learned to can out of necessity, and we started with tomato jam. If I remember correctly, we made 48 half pints that first season.
The second thing I ever canned was pickled peaches. My neighbor that lived caddywhompus to us had two peach trees. Exasperated, he showed up at my back fence and dropped two big black garbage bags full of peaches into my backyard and said DO SOMETHING WITH THESE. They became pickled peaches.
But I didn’t come to the Master Food Preserver (MFP) program because of canning, I came because of grief. But not in the way you might think!
In my career, I’m a thanatologist. Thanatology is the study of death, dying, grief, and loss. In all my years doing this work, I’ve noticed that grievers (and those who love them) tend to congregate around places where transformation happens. Gardens and kitchens are places of transformation. Gardeners turn soil and seeds into harvests, and cooks turn ingredients and spices into meals. The products of gardens and kitchens become tangible reminders that people love us, and that we love them. Casseroles dropped off on doorsteps, or a flat of tomatoes left by a neighbor at your back door, or a half pint of fig preserves left on your desk at work… just because. Food is often a container for things that are hard to say with words alone. And grievers? They use grief to turn their losses into healing, into discovering their ‘new normal’, into whatever comes next.
In early December of 2025, my husband and I packed up two big boxes to send to each of our parents who live across the country. Each box contained 7 different things I’d canned since finishing the Master Food Preserver training program in June of 2025. We were really packing up boxes of food that said, “I miss you” and “I miss sharing meals with you.”
The other draw for me is community. I’ve been a volunteer and an educator the bulk of my adult life. And part of why I value those things so much is absolutely informed by my work as a thanatologist—when loss shows up, you really see who you can count on, who shows up, and who doesn’t. For someone who’s a transplant to Los Angeles, it’s important to me to give back to a community that has embraced and welcomed me and helped me find a sense of ‘home’ here, too.
There’s also a part of food preservation that hits home for a lot of people, but in a legacy sort of way. When my fellow Master Food Preservers offer classes to the public, one of the most common questions we get are from attendees who say something like: “My Grandma used to can, can I use her recipes?” For a lot of people, canning and food preservation in general touch on memories, on growing up, on the relationship we still have to our loved ones, even if they’ve passed on. (And by the way, the answer to that common question is “probably not”. You can still can tomatoes (or whatever it was that Grandma did), it’s just that we know a lot more about food safety these days, so the recipe might be tweaked, but it will also probably taste better. Safe, tested recipes mean they are tested not only for safety, but also for flavor and texture.) A lot of people are discovering or reconnecting to their roots when they sign up to take one of our food preservation classes.
The MFP program was exceptionally rigorous, and it completely transformed my relationship to my kitchen. I’m a better cook just in general because of the program, and it made me a better gardener too. It’s rewarding to be able to contribute to my community in this way. I’d highly recommend this program to anyone who has even a tiny interest—we need more people from more backgrounds and experiences to join our crew. While I came to the program by way of thanatology, maybe you’ll find your way here because of your own unique background and experiences.
Does Your Food Preservation Recipe Need an Altitude Adjustment? (January 2026)
Maria Giovanni, UC Master Food Preserver Online Program Volunteer
California has a diverse landscape, with altitudes ranging from 280 feet below sea level (Death Valley) to 14,500 feet (Mt. Whitney). The location of your kitchen is an important consideration in home food preservation. The first step is to determine your altitude, which you can do here. You may think you know your altitude but we encourage you to double check. You can also use this website if you are helping others with food preservation.

The boiling point of water as a function of elevation above sea level. (Plot by Henry Shaw, used with permission).
Why does altitude matter? Just like attitude, having an understanding of the “why” supports good practice. As we move from the coast to higher altitudes inland, the pressure exerted by air decreases, which means (in practical terms) that water boils at a lower temperature. At sea level, water boils at 212°F, whereas in Truckee (5820 feet), water boils at 200°F. A general rule of thumb is that water’s boiling point drops by 1°F for every 500 feet of elevation gain (see figure). The impact is that food takes longer to cook at higher altitudes, especially anything cooked in water, such as rice and pasta.
When canning for food preservation, it takes longer for the product in the center of a jar to reach the temperature needed to destroy microorganisms than it does for the edges of the jar. Similarly, larger jars take longer to reach the necessary internal temperature than smaller jars (thus, quart jars have a longer processing time than pints). At higher altitudes, water boils at a lower temperature than at sea level, so the processing time or processing pressure must be increased to ensure the destruction of spoilage organisms and pathogens.
[For you science buffs, at higher altitudes, less atmospheric pressure pushes down on liquid (and everything else), so less energy (heat) is needed to cause water molecules to move from the liquid to the vapor state. With less external pressure, the vapor pressure of the water matches the atmospheric pressure at a lower temperature, so it boils faster and cooler. In addition, the atmosphere is typically drier as altitude rises above 2,500 feet, so moisture evaporates more quickly. NOTE: If you use a steam canner at high altitude, as I do, be sure you start with the maximum amount of water in the canner because the water can evaporate faster.]
To compensate for the lower temperature in a boiling-water-bath canner or atmospheric steam canner at higher elevations, it’s necessary to increase the processing time. A good recipe will always specify the adjustments that should be made. If no adjustments are specified in the recipe, use the guidelines in Table 1.
Table 1. Adjustments for altitude in boiling-water and atmospheric steam canners1
Altitude Above Sea Level (feet) | Increase Processing Time by: |
1,001 – 3,000’ | 5 minutes |
3,001 – 6,000’ | 10 minutes |
6,001 – 8,000’ | 15 minutes |
8,001 – 10,000’ | 20 minutes |
A pressure canner gives us another “knob” besides processing time that we can use to modify the processing conditions—we can change the pressure inside the canner by using a heavier weight on a weighted-gauge canner or by running a dial-gauge canner at a higher pressure. Both methods increase the pressure in the canner, allowing the temperature to reach 240°F, the temperature needed to destroy Clostridium botulinum spores in a reasonable amount of time. If your recipe does not include altitude adjustments, use the adjustments in Table 2.
Table 2. Adjustments for altitude in pressure canning1
Pressure canner type | Altitude above sea level (feet) | Process at: |
Weighted-gauge | Below 1000’ | 10 pounds |
Above 1000’ | 15 pounds | |
Dial-gauge | Below 1000’ | 11 pounds |
2,001 – 4,000’ | 12 pounds | |
4,001 – 6,000’ | 13 pounds |
Remember: you must know your altitude and make the required adjustments specified in the recipe, which should be a tested recipe from a reliable source, such as a University Cooperative Extension, the National Center for Home Food Preservation (https://nchfp.uga.edu/ ), or the Ball Blue Book. If a recipe does not include altitude adjustments, this might indicate that the recipe is untested and potentially unsafe to use.
For more information about the impact of altitude on food preparation, see High Altitude Cooking.
Reference
1Fundamentals of Consumer Food Safety and Preservation: Master Handbook, California edition, 2018, WA State Univ. Extension and UC ANR.
Spotlight: Robin Martin, Class of 2025 MFP Volunteer (January 2026)
Robin Martin, UC Master Food Preserver Online Program Volunteer
County of residence: Sacramento

Robin Martin (Used with permission).
I grew up 10 miles west of the Twin Towers in a third-floor apartment. My mom (a transplant from LA) was (and still is!) an excellent cook; she prepared fresh vegetables in season and frozen ones out of season. We got some good New Jersey corn, peaches, and tomatoes in the summer. We had a weird kind of prejudice against vegetables in cans, though I’m not sure why.
It wasn’t until I moved to California in 1995 that I knew anyone who canned fruit or vegetables, and they were primarily farm families. In California, fresh fruit, and lots of it, became a staple in my family’s diet. We make smoothies at home, so we’ve been freezing berries, figs, peaches, and tomatoes at their peak of perfection for years without even thinking that we were “preservers.” I’ve always loved cooking healthy food, and froze leftovers, stock, cakes, and cookies for quick access, but not all of them came out of the freezer well, and I wasn’t sure why.
When I interviewed for my current position at UC ANR, I admitted sheepishly that I’d never preserved anything, to which Sue Mosbacher (the Program Director) declared, “Have you ever frozen anything? Then you’re a food preserver!” It was true!
Fast forward three years and I’d developed a real fondness for the people in the UC Master Food Preserver (MFP) program and a true appreciation for the value of its deliverables, so I decided I wanted to spend some more time (lots more time) engaging with the Master Food Preservers.
As part of the training class in 2025, I did my first steam canning, boiling-water canning, pressure canning, and dehydrating, and I learned why some foods freeze better than others. I loved the in-person labs; they were so fun! My favorite is canning jam and jelly with a steam canner. In fact, just after graduating from the program, I embarked on a jam-making binge that didn’t end until I had over 30 jars of jam prepared, labeled, and ready to give out as party-favors at a bridal shower. (They were a hit! The theme was “bubbles and berries”!)
Most of the volunteering I’ve been doing as an MFP has been behind the scenes, most recently with the newsletter, Save the Season, for which I’m a designer and a writer. I am looking forward to participating more in classes in 2026, as a Q&A monitor at first and then possibly taking the lead for teaching a class segment before my first full year is up. I hope to see you in a class!
We Want to Hear from You! - Deadline Extended (January 2026)
Travis Alexander, UC Master Food Preserver Online Program Coordinator
Have you been enjoying Save the Season newsletter? Do you have ideas on how we can make it even better?
Let us know by filling out this survey by February 12, 2026 January 10, 2025. We will select three respondents at random to receive a prize.
- This data is critical to fulfilling the objectives of the Specialty Crop Block Grant currently funding our program in full and will only be reported to the California Department of Food & Agriculture.
We Want to Hear from You! (December 2025)
Travis Alexander, UC Master Food Preserver Online Program Coordinator
Have you been enjoying Save the Season newsletter?
Do you have ideas on how we can make it even better?
Let us know by filling out this survey by January 10, 2025. We will select one respondent at random to receive a prize.
- This data is critical to fulfilling the objectives of the Specialty Crop Block Grant currently funding our program in full and will only be reported to the California Department of Food & Agriculture.
The Joy of Grape Jelly (December 2025)
Ariel Patton, UC Master Food Preserver Online Program Volunteer
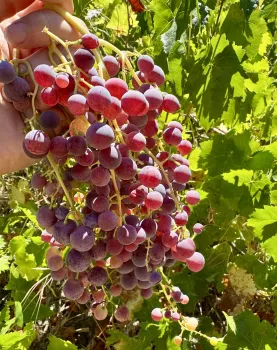
Hand picked cluster of grapes (Ariel Patton, used with permission).
The thousandth grape drops into the bowl. As the wilting days of summer soften into crisp fall mornings, I pick bunches and bunches of grapes from my garden. I dutifully wash and separate the fruit from the stems, one grape at a time.
I love this annual ritual of making grape jelly. Decades ago, my mom taught kids how to preserve fruits and vegetables through the local 4-H youth group. A half dozen kids would come over and spend summer afternoons chopping loads of peaches and stirring hot, spattering pans of plum preserves. Last year, I became a Master Food Preserver through the University of California Cooperative Extension to teach others how to freeze, can, dehydrate, and ferment California’s finest produce.
Once several pounds of grapes are in a pan, I cook down the fruit. Over the high heat, each grape pops and releases its juice and flavor.
There is a misconception about making jelly: that the best fruits for preserving are overripe or bruised, those weeping berries or gouged pears. This is not true. What is true is that there is a shelf life to everything; some things simply cannot wait. As the fruit gets more mature, there are more sugars, sure. But the pectin and acid, responsible for the lovely, wobbly texture that jelly is named for, declines as the grape turns from puckering green to ripe purple. To preserve produce at its peak demands urgency. Not quite the urgent intensity of a dog’s eyes minutes before dinner, but certainly more than a nagging email.
After the grapes are cooked, liquid resembling mulled wine is left, without the spices or alcohol. Every grape is exhausted of its contents, and it’s now time to strain the mixture to separate the grape skins from the deep purple, flavor-and-pectin-rich liquid that will become the jelly. As the liquid cools overnight in the fridge, tartrate crystals form on the surface. I pass the liquid once more through cheesecloth to remove these tiny snowflakes, the precursor to the mysteriously named Cream of Tartar you find in the baking aisle.
On day two, I carefully pour the strained liquid into a shallow preserving pan along with scoops of warmed sugar and freshly squeezed lemon juice and crank the heat to high. All fruits naturally have some level of pectin. It is a long-stranded carbohydrate; imagine a mane of silky hair. When combined with sugar, acid, and heat, these strands of pectin get tangled up, trapping microscopic pockets of water to create a gel.
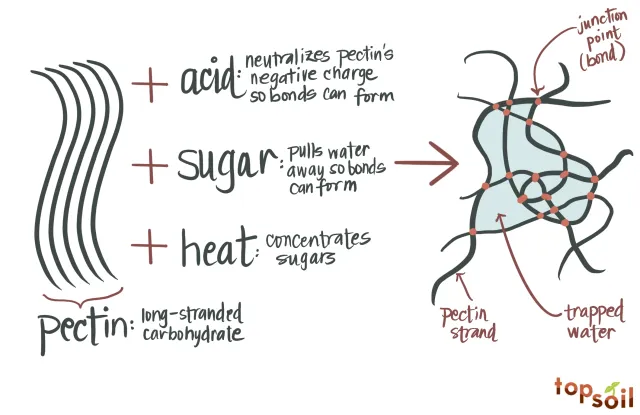
Hand-drawn illustration of the chemistry behind pectin gelling (Ariel Patton, used with permission).
I stir and I wait. There are many ways to know if the “gel point” has been reached, the moment the molecules align to form a delectably firm grape jelly. I’ve gotten better at seeing the specific glossiness on the surface, watching as the bubbles ascend more slowly through the boiling liquid, sensing how the spoon traces a deeper pattern in the bottom of the pan. My cheat code is using an instant-read thermometer – once it reads 220°F (exactly eight degrees above boiling at sea-level, my elevation), the cooked jelly is ready.
After many years of using mason jars only as trendy early-aughts decor, I welcomed the gentle rhythm of food preservation during the pandemic. Canning was a way to measure out time, to bottle it up, to tick it off, to mark its passing. In my pantry, the bright jars of apricot preserves, next to chunky peach chutney, followed by smooth pear jam were clear and inarguable evidence that months and seasons were indeed rolling by.
I pour the still-boiling jelly into hot, clean mason jars. I wipe the rim of each jar and tighten the two-piece lids. This also requires attention to get right – tightened enough to seal, but not so tight that it prevents hot air from escaping. One by one, I nestle all the jars into a pot of boiling water to disarm any remaining bacteria. When ten minutes are up, I fish out each jar from the boiling water and place them on the counter to cool.
While there is a thrill in being a one-woman assembly line, making grape jelly is the opposite of how I typically spend my days. It’s inefficient. It’s inconvenient. It’s manual and tedious. As much as I personally enjoy this process, I emphatically do not believe we would have a better food system if everyone had to do this every time they wanted a PB&J. If anything, this annual ritual makes me marvel at the complexity hidden in every bite of food.
Pop! Pop! Pop!
Is there anything more satisfying than hearing the jars on my counter seal, as the tiny breath of hot air within each jar cools and creates a partial vacuum? I’ll save you the two-day journey to find out: the answer is no. Through the alchemy of preservation, what was previously five pounds of grapes threatening to decompose is now six jars of jelly that will last at least a year in my pantry.
To preserve is to grasp the ephemeral and save the very best at its peak for another day. To be able to lick summer off a spoon, past when the leaves have turned and fallen, when our tiny patch of Earth is tilted its very furthest from the sun.
Spotlight: Monica Gross, Class of 2025 MFP Volunteer (December 2025)
Monica Gross, UC Master Food Preserver Online Program Volunteer
County of residence: Los Angeles

Monica Gross (Used with permission).
Hi! My name is Monica Gross and I am a 2025 graduate of the UC Master Food Preserver (MFP) Online Delivery Program. I heard about the MFP Program when I first became a Master Gardener in 2013. At that time, there was no MFP program in the county where I lived, so I put the idea of entering an MFP Program on the back burner. The Online Delivery Program became available in 2025, so I applied, was accepted, graduated, and I have now joined the ranks of the Master Food Preservers.
I live in densely populated Los Angeles County, but I am fortunate to have a half-acre parcel that has 11 original, mature Valencia oranges trees dating from the early 20th century. In addition to the orange orchard, we have Fuerte avocado, grapefruit, lemon, peach, plum, pear, apple, and cherry trees. The property has plenty of room, so we have developed a large vegetable garden since I retired in 2012. My favorite crops to grow are tomatoes, asparagus, blackberries, beans, artichoke, cucumber, and sometimes giant pumpkins. My extended family recently competed in a familial Atlantic Giant pumpkin-growing contest—my local and distant relatives in Northern California and Oregon competed to see who could grow the largest pumpkin! That summer the entire family spent our vacations traveling to spy on the competing pumpkins throughout the state! The relative farthest north won the contest.
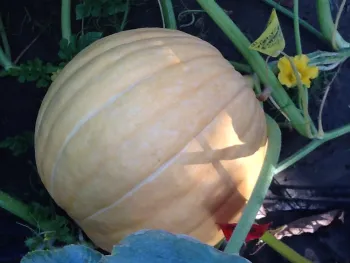
Small Altantic Giant pumpkin (Monia Gross, used with permission).
Becoming an MFP was a natural extension of being an avid gardener. I had some experience in food preservation prior to joining the program—I had canned tomatoes in a water-bath canner and had made various jams, but I had no experience with canning low-acid foods until joining the MFP Program. I look forward to increasing my skills in this area.
If you are interested in food preservation, I highly recommend becoming an MFP! You’ll find a kindred community of like-minded individuals who value preserving the bounties of the garden!
Pumpkin is more than home décor! (December 2025)
Robin Martin, UC Master Food Preserver Online Program Volunteer
Although the best pumpkins for cooking are the smaller, sweeter varieties of pumpkin, pretty much any pumpkin can have its life extended after its role as an autumnal decoration is concluded. Prepare and freeze* pumpkin purée for soups, cakes, butters, pies, and even lattes and cocktails! It’s so easy, you wouldn’t believe it! What makes a pumpkin undesirable for cooking is if the pulp is excessively stringy. In addition, anything that is moldy should obviously be composted rather than preserved in any form.
To prepare a pumpkin for eating or preserving, it’s important to wash the exterior of the pumpkin to remove any dirt and to reduce the bacterial load on the surface. Even though you won’t eat the peel, surface contaminants can travel into the flesh of the pumpkin on the knife when you cut into it. After washing the pumpkin, cut it in half from the top to the bottom, then scoop out the seeds and pulp. Reserve this – we’ll review how to cook delicious pumpkin seeds later!
At this point, there are two primary ways to cook the pumpkin flesh in advance of freezing:
Boiled: To boil the pumpkin, peel it and cut it into 2-inch chunks. Cook in boiling water until a fork easily penetrates the pieces.
Baked: To roast the pumpkin (my preference), place the halves of pumpkin cut-side down on a baking pan and bake at 350ºFfor about 90 minutes, or until you can stick a fork through the skin and into the flesh easily.

Pumpkin halves in the oven being probed for readiness (Robin Martin, used with permission).
Once the pumpkin is at the desired tenderness, drain and cool it on the counter for no longer than two hours. Remove the roasted pumpkin flesh from the rind. Use a masher or food processor (my preference) to purée the pumpkin. Pack the pumpkin purée as-is into food-safe freezer containers (plastic bags – my preference - or rigid containers) and freeze for up to one year for best quality. Alternately, strain the purée to remove much of the liquid and then pack and freeze. Or make any of the recipes below!
Basic Pumpkin Seeds
Pumpkin seeds are a delicious out-of-hand snack or gorgeous addition to salads and vegetable side dishes. First, extract the seeds from the flesh and carefully wash them to remove any remaining pumpkin tissue. The seeds can then be dried in a dehydrator at 115º to 120ºF for one to two hours, or in an oven on warm for three to four hours, stirring frequently. After drying, seeds can be roasted. To roast pumpkin seeds, toss the dried pumpkin seeds with oil (approximately 1 teaspoon per cup of seeds) and season with your favorite spice blend. Roast in a preheated oven at 250ºF for ten to fifteen minutes. (Process adapted from https://hgic.clemson.edu/factsheet/pumpkin-basics/).
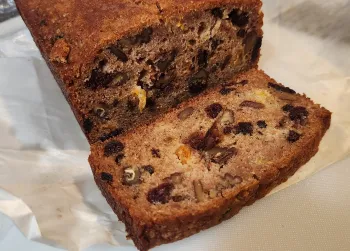
Pumpkin Bread

Pumpkin bread (Robin Martin, used with permission).
Ingredients
2 cups flour (all-purpose or one-to-one gluten free flour for a gluten-free option)
½ tsp salt
1 tsp baking soda
½ tsp baking powder
1 tsp ground cloves
1 tsp ground cinnamon
1 tsp ground nutmeg
½ cup softened butter
1 cup white granulated sugar
½ cup brown sugar
¼ cup apple sauce
2 large eggs
15 oz pumpkin purée, liquid strained out through a cheesecloth
Instructions
Preheat oven to 325ºF.Set rack in the middle of the oven. Grease two 8” x 4” loaf pans with butter and dust with flour.
Combine the dry ingredients - flour, salt, baking soda, baking powder, cloves, cinnamon, and nutmeg in a bowl.
In an electric mixer bowl, beat the butter and sugar on medium speed until blended, add the eggs one at a time, beating well. Beat until light and fluffy. Add the pumpkin and the apple sauce. Don’t worry if it looks curdled.
Add the dry ingredients and mix at low speed until combined.
Divide the batter into the two pans. Bake for 65-75 minutes or until a toothpick inserted in the center comes out clean. Let the loaves cool in the pans for about 10 minutes then turn onto a wire rack to cool completely.
When completely cool, slice one loaf and put it in a labeled freezer baggie and freeze. You can toast and enjoy it later at a moment’s notice. Outside the freezer, the other loaf will be good for a few days.
Freezer Pumpkin Butter
Ingredients
2 pints pumpkin purée
¾ cup apple juice
2 tsp ground ginger
½ tsp ground cloves
1½ cups white sugar
2 tsp ground cinnamon
1 tsp ground nutmeg
Note: you can adjust the spice quantities to suit your own taste.
Instructions
Combine pumpkin, apple juice, spices, and sugar in a large saucepan. Stir well. Bring the mixture to a boil. Reduce the heat and simmer for 30 minutes or to desired thickness. Stir frequently. Transfer to sterile half-pint freezer containers. Leave half-inch headspace and store in the freezer for up to 1 year.
Yield: about 5 half-pint freezer containers.
Recipe source: https://ucanr.edu/sites/default/files/2019-10/312416.pdf
Easiest Pumpkin Shrub for a Party
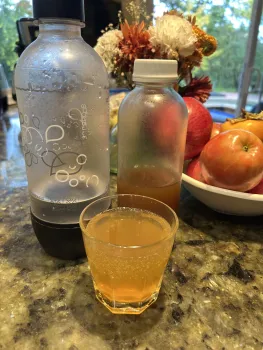
Pumpkin shrub in a glass (Robin Martin, used with permission).
A shrub is a sweetened, vinegar-based fruit (or vegetable) flavored mixer for both alcoholic and non-alcoholic drinks. This one is delicious with maple bourbon or just some seltzer.
Ingredients
Flesh from a 3 lbs. roasted pumpkin or squash
1½ cups white sugar
1½ cups apple cider vinegar
¼ cup fresh ginger, grated
1 Tbsp ground cinnamon
Instructions
Add the pumpkin flesh to a glass or plastic container. Add the sugar, vinegar, ginger, and cinnamon. Stir to combine. Place in refrigerator overnight or for up to 24 hours.
Put the pumpkin mixture through a food mill or sieve, squeezing the liquid into a bowl. Discard the solids and pour the liquid into a jar or bottle.
Shrubs should be stored in the refrigerator, where they will keep for up to a year. Always check your shrub before consuming it, and if there are any signs of mold, or if the shrub starts to look bubbly, cloudy, or slimy, throw it away. When in doubt, throw it out.
Recipe adapted from https://www.seriouseats.com/pumpkin-shrub-fall-drinking-vinegar-for-mixing-cocktails
*Freezing is the only recommended method for preserving pumpkin purées, butters, and preserves. It’s important to recognize that home canning (for shelf-stable) pumpkin purée is not recommended because it, and other winter squashes, are low-acid foods that must be processed in a pressure canner to ensure safety. Purées can be too “thick” and viscous to allow effective heat transfer by fluid convection in the jars; hence heat may not penetrate evenly and completely during processing. Without even heating during the pressure-canning process, spores of the Clostridium botulinum bacterium may survive, putting anyone who eats the food at risk of botulism, a deadly food-borne illness. For instructions on home canning, see https://ucanr.edu/site/uc-master-food-preserver-program-orange-county/pumpkins
Additional resources:
nchfp.uga.edu/blog/plenty-of-pumpkin-possibilities
nchfp.uga.edu/how/freeze/vegetable/freezing-pumpkin/
The Genius of Fruitcake: A 2,000-Year-Old Food Preservation Hack (December 2025)

Paige Weisskirch, UC Master Food Preserver Online Program Volunteer
Dried fruit bread (Photo caption: Paige Weisskirch, used with permission).
Every November, I open my pantry and face the same situation: half-empty bags of dried apricots from the previous year’s baking; figs I dehydrated with good intentions; some crystallized ginger that seemed essential at the time; and at least three bags of raisins I can't quite remember purchasing. They sit there, taking up valuable real estate, slowly hardening into little fruit pebbles.
This is exactly why I fell in love with fruitcake, or at least the idea of it. Not the neon-red-cherry-studded doorstop version that inspired Johnny Carson to joke about one fruitcake being passed around the world forever. Fruitcake has a reputation problem it doesn't entirely deserve. It's been the punchline at holiday parties for decades, but it's also survived for literally thousands of years. That alone deserves some respect.
War Rations to Wedding Cakes
One of the first known fruitcakes, called satura, originated in Ancient Rome. Roman soldiers carried this dense mix of barley mash, raisins, pomegranate seeds, and honeyed wine on military campaigns. Portable, calorie-dense, nearly indestructible.
The Crusades opened trade routes, flooding European markets with exotic dried fruits and spices. Each region developed its own version. Italy gave us panforte and panettone. Germany perfected stollen, that buttery, sugar-dusted Christmas staple. Britain went all-in on fruitcake for the holidays, along with plum puddings so beloved they inspired Christmas carols.
When sugar from the Americas hit European markets in the 1600s, fruitcakes got sweeter and more decadent. Candied fruits transformed them into luxury items reserved for weddings and major celebrations.
The Victorian Era Goes All In
Victorian England turned fruitcake into an obsession. Dense, boozy, and baked weeks or months before Christmas, these cakes became the centerpiece of holiday tables. Fruitcake became the choice for royal weddings. Queen Victoria and Prince Albert served one at their 1840 wedding. In 2016, a slice from that cake sold at auction for around $1,500. A 176-year-old piece of cake.
Why It Lasts Forever (Almost)
Fruitcake's legendary shelf life is a result of science, not magic. Dried fruits and nuts have low moisture content, so bacteria don't have much to work with. High sugar concentration binds with water, making it unavailable for mold and bacteria to grow while retaining enough moisture to keep the cake soft. Alcohol (usually rum, brandy, or bourbon) denatures bacterial proteins, essentially sanitizing the cake from the inside out.
Traditional bakers often "season" their fruitcakes by wrapping them in liquor-soaked cloth and adding small amounts of alcohol periodically over months. The flavors mellow and deepen, like aging wine. According to the USDA, a store-bought fruitcake can last six months in the fridge or a year in the freezer.
The legends are real. In 2017, researchers found a 106-year-old fruitcake from Robert Falcon Scott's 1912 Antarctic expedition. It was still in "excellent condition."
From Punchline to Nostalgia
Early 20th-century America embraced fruitcake, thanks to mail-order catalogs and the newly established U.S. Parcel Post Service (1913). It became shorthand for Christmas, and for comedians, an easy target.
Still, plenty of people loved it. Truman Capote's 1956 short story A Christmas Memory captures the joy of fruitcake-making: a boy and his older cousin gathering pecans, pouring whiskey into the batter, declaring "Oh my, it's fruitcake weather!" It's sweet and nostalgic, and it makes me want to bake one - almost.
Fruitcake is a time capsule, a joke, a tradition, and occasionally a delicious surprise. You're following in the footsteps of centuries of bakers who understood that the best fruit desserts are the ones that make use of what you've got. Whether you're making a traditional booze-soaked version or this lighter dried fruit bread, you're part of a baking tradition that goes back thousands of years. And unlike Johnny Carson's immortal fruitcake, this one will actually get eaten.
A Lighter Take: Dried Fruit Bread (Cake?)
If you like the idea of fruitcake but find traditional versions too heavy or too sweet or too boozy, try this recipe. This version honors fruitcake's original purpose but skips the candied fruit for the natural sweetness of dried fruit. And I really love this recipe because it's the perfect solution for all those random containers of dried fruit that accumulate in the pantry. That quarter-cup of dried cherries left over from scones, the dates you bought for one recipe, those apricots that are starting to get too chewy, toss them all in. The recipe is forgiving and actually benefits from a mix of whatever dried fruit you have on hand.
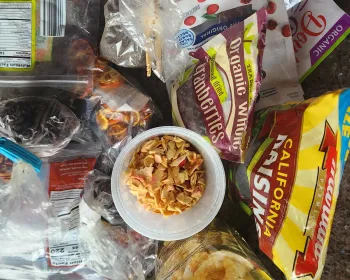
Assorted packages of dried fruit (Photo caption: Paige Weisskirch, used with permission).
Recipe adapted from James Beard’s Persimmon Bread via David Lebovitz
Makes 2 loaves
Ingredients:
Dry Ingredients:
3½ cups (440g) all-purpose flour, sifted
1½ tsp salt
2 tsp baking soda
½ tsp ground nutmeg
1 tsp ground cardamom
Mix-ins:
1 cup (approx 4oz or 120g) pecans, toasted and chopped
2 cups (approx 11oz or 300g) dried fruit, chopped (apricots, raisins, dates, figs, craisins or whatever you have)**
Wet Ingredients:
2 to 2½ cups (400-500g) sugar*
2 cups (475mL) fruit purée (applesauce, persimmon, plum, or pear)
¾ cup (170g) melted butter or (180mL) neutral vegetable oil *
2 large eggs, beaten
2/3 (160ml) cup bourbon, brandy, or rum or ½ cup (120ml) of strong brewed black tea (Earl Grey works well)
1 Tbsp orange zest
1 tsp vanilla extract
*Note: For a moister loaf, use 2½ cups sugar and vegetable oil instead of butter.
**Note: The metric weight for dried fruit can vary depending on how densely it's chopped and which fruits you use. The weight provided is approximate.
Instructions:
Prep (15 minutes before baking):
Position oven rack in the lower-center position and preheat oven to 350°F.
Butter two 9”x5” loaf pans. Line bottoms with parchment paper or flour the pans and tap out excess.
Make the batter:
3. In a large mixing bowl, sift together flour, salt, baking soda, spices. Whisk to combine.
4. Create a well in the center of the dry ingredients.
5. Add sugar, fruit puree, melted butter (or oil), eggs, bourbon (or tea), orange zest, and vanilla to the well. Stir gently to combine.
6. Fold in pecans and dried fruit. Mix just until no dry flour remains visible - don't overmix.
Bake:
7. Divide batter evenly between the two prepared pans (each should be about 3/4 full).
8. Bake for 65 - 75 minutes, or until a toothpick inserted in the center comes out clean (internal temperature should reach 195-200°F).
9. Check at the 45-minute mark. If tops are browning too quickly, tent loosely with aluminum foil.
Cool and serve:
10. Remove from oven and let loaves cool in pans for 10 minutes.
11. Turn out onto a wire rack and cool completely before slicing.
Storage & Serving Tips:
Better with time: The flavor deepens after 1-2 days. Store wrapped in plastic wrap at cool room temperature for up to 3 days or refrigerate for up to a week.
Freezer-friendly: Wrap tightly in plastic, then foil. Freezes for up to 3 months.
Flexible formula: Swap fruit purées or dried fruits based on what you have on hand, this recipe is forgiving.
Understanding pH and Why it's Important in Food Preservation (November 2025)
Earl Weak, UC Master Food Preserver Online Program Volunteer
In simple terms, pH is a measure of how acidic or alkaline (basic) a solution is.
- A pH below 7 indicates an acid solution
- A pH above 7 indicates an alkaline (basic) solution
- pH 7 is considered neutral
In the context of food preservation, pH is especially important because acid environments help control the growth of bacteria and other microorganisms that cause spoilage or illness.
The Chemistry of pH
A bit of chemistry is needed to explain what pH means. Hydrochloric acid (HCl) is a strong acid and is produced in our stomachs. When HCl dissolves in water, the molecule breaks apart, forming hydrogen ions (H⁺)—hydrogen atoms that have lost one electron and chloride ions (Cl-)—chlorine atoms that have gained an extra electron. The concentration of hydrogen ions in a solution determines its pH. A higher concentration of H⁺ means a lower pH (more acidic) and vice versa. In contrast, sodium hydroxide (NaOH) is a strong base, or alkaline substance that’s a primary ingredient in drain cleaners. That molecule also breaks apart when dissolved in water, forming sodium ion (Na+) and a hydroxyl ion (OH-). When an acid and a base react—like HCl and NaOH—they neutralize each other, forming water (H₂O) and a dissolved salt (NaCl):
HCl + NaOH → H2O + NaCl
A History of Measuring Acidity: From Colors to Instruments
Before modern analytical tools existed, people used color indicators (pH sensitive pigments) to measure acidity.
- Litmus paper, which uses pigments extracted from lichens, turns pink in acid and blue in neutral or basic solutions (see Fig. 1).1
- The natural pigment in red cabbage also changes color with pH—red in acidic solutions, purple near neutral, and blue, green or even yellow in basic (see Fig. 2).
Figure 1. Blue litmus paper turned pink after being dipped in an acidic solution (Photo caption: Earl Weak, used with permission).
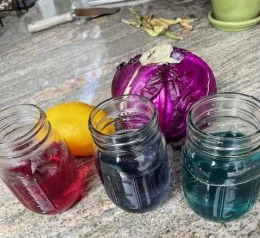
Figure 2. Extracted pigments from red cabbage under acidic, near neutral, and alkaline conditions. Photo caption: Earl Weak, used with permission).
The modern concept of pH was introduced in 1909 by Danish chemist Søren Peter Lauritz Sørensen, who was studying protein solubility in beer. He recognized that the solubility of these proteins depended on the concentration of hydrogen ions in the solution. He introduced the term “pH” as an abbreviation for the “power (Potenz in the original German) of hydrogen” to help his results. Around the same time, American bacteriologist Alice Catherine Evans, working with William Mansfield Clark and colleagues, helped develop improved methods to measure pH—replacing older titration techniques. In the 1930s, Arnold Orville Beckman invented the first electronic pH meter, providing a fast and accurate way to measure acidity3. Today, calibrated pH meters are standard equipment in laboratories and food-processing facilities. A modern, digital, battery-operated, “pen-type” pH meter is shown in Figure 3.
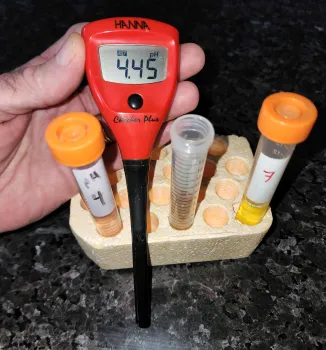
Figure 3. Digital pen-type pH meter flanked by vials of calibration solutions (Photo caption: Henry Shaw, used with permission).
What Does “pH” Mean?
For dilute solutions, the pH can be approximated by the negative logarithm of the hydrogen ion concentration2:
pH = -log10[H+].
For example, if the hydrogen ion concentration of a solution is 10⁻³M (0.001 moles per liter), we know that log10(0.001) = -3, so the solution’s pH is +3.
- Lower pH → higher hydrogen ion concentration → more acidic
- Higher pH → lower hydrogen ion concentration → more basic
In most natural systems, pH values range from about 0 (very acidic) to 14 (very basic). The pHs of common foods lie in a much more restricted range.
Bacteria and pH
Different bacteria grow best at different pH levels (see Fig. 4):
- Acidophiles thrive in acidic conditions. Examples include Lactobacillus species used in making cheese, yogurt, and sauerkraut.
Neutrophiles prefer near-neutral conditions (around pH 7). This group includes many common pathogens such as Clostridium botulinum, Salmonella, and E. coli.
Alkaliphiles grow in basic environments, such as Vibrio cholerae, which causes cholera and grows well at pH 8–11.
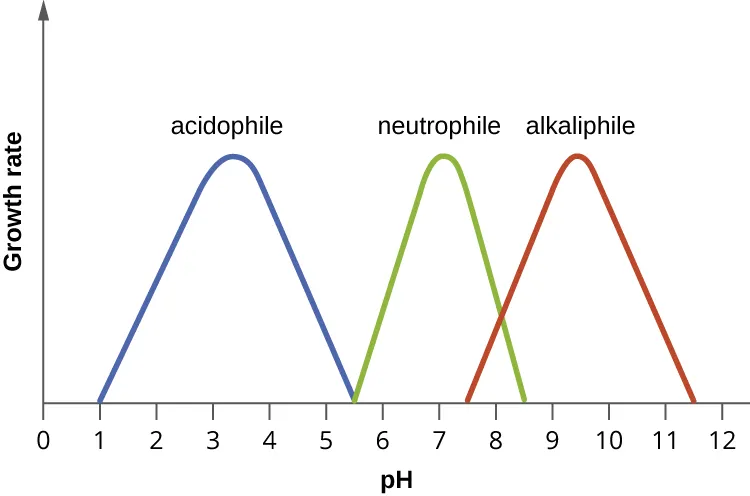
Figure 4. Approximate pH ranges for the growth of the different classes of bacteria (Image credit: W. Keenleyside, Microbiology: Canadian Edition figure 9.35 CC BY 4.0).
Why pH Matters in Food Preservation
Because most harmful bacteria cannot grow in highly acidic conditions, controlling pH is a key food safety strategy. Foods with a pH of 4.6 or lower, such as many fruits, are considered “high-acid” and can be safely processed in a boiling-water canner. Foods with a higher pH must be pressure canned at temperatures above 240°F to destroy Clostridium botulinum spores and other pathogens.
In Summary
pH is a measure of the hydrogen ion concentration in a solution. Unintuitively the lower the pH value, the higher the acidity. Because bacteria have specific pH ranges for growth, understanding and controlling pH is essential to safe and successful food preservation.
References:
1 https://en.wikipedia.org/wiki/Litmus
2 https://en.wikipedia.org/wiki/PH
3 https://www.acs.org/education/whatischemistry/landmarks/beckman.html
4 https://ecampusontario.pressbooks.pub/microbio/chapter/the-effects-of-ph-on-microbial-growth/