UC Master Food Preserver Newsletter

In November of 2024, the UC Master Food Preserver Program launched a monthly newsletter that delivers recipes, how-tos, and food preservation inspiration straight to a subscriber's inbox. Subscribe to the newsletter here.
Do you have a correction, suggestion, or story to share with the newsletter team? Share corrections, suggestions, or stories here.
Past Newsletter Full Emails
2026
2025
2024
Monthly Articles To-date

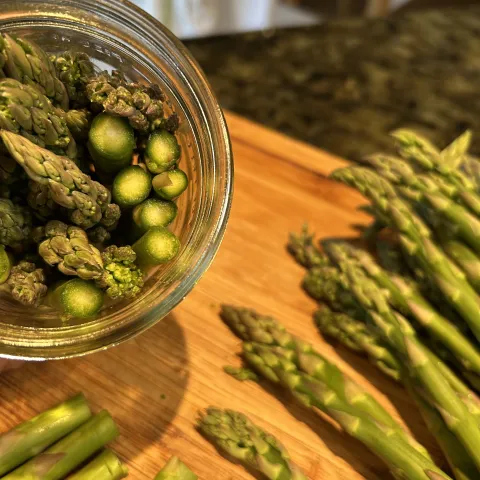
Learning Through Experience: Pickling Asparagus for the First Time (May 2026)

Botulism Is Rare Because We Do It Right (February 2026)
Paige Weisskirch, UC Master Food Preserver Online Program Volunteer
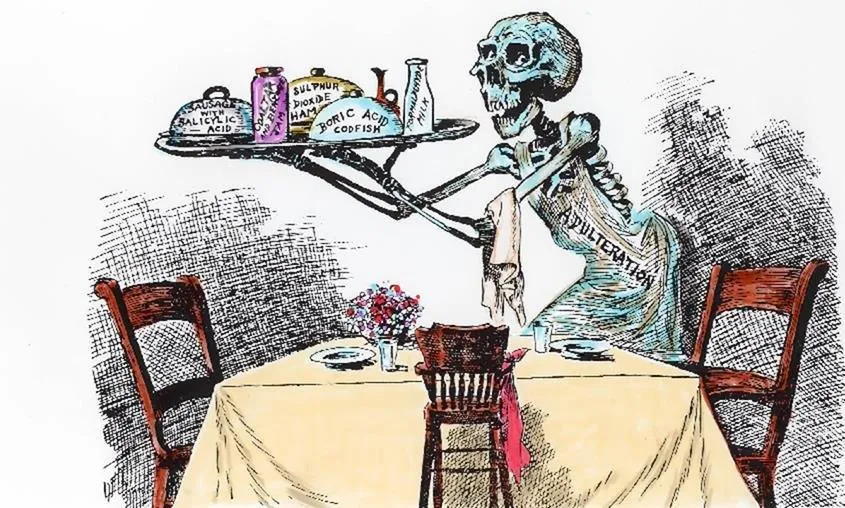
“How Death Came, Unbidden, to Mrs. Sales Dinner Party”, an illustration accompanying an article reporting on a botulism outbreak due to improperly processed olives in The Philadelphia Inquirer, Nov. 30, 1919.
Botulism Is Rare Because We Do It Right
UC Master Food Preservers get asked all the time whether botulism is really a risk. The internet is overflowing with posts championing unsafe practices, often relying on survivor bias and tradition. "My grandmother did it this way for fifty years and nobody died" and "I've been doing this for years and I'm still here" are common refrains.
The numbers can feel reassuring. U.S. surveillance summaries show that foodborne botulism is uncommon, with a median of 19 laboratory-confirmed cases per year from 2001–2017 (Lúquez et al., 2021). The key detail is why the totals are low. They are low because safe, science-based methods work. The threat is not imaginary or overstated. It is controlled by good practice.
Botulism remains a high-stakes hazard. In that same period, deaths were reported in 17 cases, a case fatality ratio of about 5 percent even with modern medical care (Lúquez et al., 2021). Public health guidance emphasizes that you cannot reliably detect the toxin by sight, smell, or taste, which is why prevention matters (Centers for Disease Control and Prevention [CDC], 2024).
What botulism is and what happens during infection
Clostridium botulinum is a bacterium that exists naturally in soil and aquatic environments worldwide (U.S. Department of Agriculture, Food Safety and Inspection Service [USDA FSIS], n.d.). Like many bacteria, it forms spores, which are dormant, protective structures that can survive harsh conditions for long periods. The spores themselves are not harmful, but when they encounter the right environment (low oxygen, low acid, adequate moisture, and suitable temperature in the case of C. botulinum), they germinate and the active bacteria produce botulinum toxin.
Botulinum toxin, also called botulinum neurotoxin, is one of the most potent poisons known (USDA FSIS, n.d.). It is the toxin, not the bacterium itself, that causes illness. Botulism is the name of the disease that results when a person ingests food containing this toxin or is exposed to the toxin via other routes.
What happens during infection
Symptoms typically appear within 12 to 36 hours after consuming contaminated food and begin with fatigue, weakness, blurred vision, dry mouth, and difficulty swallowing or speaking (Rao et al., 2021; World Health Organization [WHO], 2023). The toxin attacks the nervous system and causes descending paralysis that progresses from cranial nerve problems, such as drooping eyelids and slurred speech, to weakness in the neck and arms, and eventually to paralysis of the respiratory muscles (WHO, 2023).
The most life-threatening complication is respiratory failure. Botulinum toxin blocks the release of the neurotransmitter acetylcholine at nerve endings, preventing muscles from contracting (Rao et al., 2021). When this affects breathing muscles, mechanical ventilation becomes necessary, sometimes for weeks or months while the body slowly forms new neuromuscular connections (CDC, 2024; WHO, 2023). Intensive medical care during this time is essential to prevent complications such as pneumonia, blood clots, and infections.
Treatment of the disease centers on botulism antitoxin, which binds to toxin molecules in the bloodstream before they attach to nerve endings (Rao et al., 2021). The antitoxin can stop the progression of paralysis but cannot reverse damage already done. The most effective window for treatment is within the first 24 hours of symptom onset (Rao et al., 2021). Even with antitoxin and intensive care, some people still die from respiratory failure or secondary complications such as pneumonia or sepsis (CDC, 2024; WHO, 2023). The case fatality rate has improved from 40–50 percent historically to about 5 percent today, but that still represents real lives lost to a preventable illness (Lúquez et al., 2021; WHO, 2023). What makes botulism uniquely dangerous is that contaminated food may look, smell, and taste normal (CDC, 2024).
Why the numbers are low
Low case counts mean prevention works. Safe canning is an entire system: selecting quality food, preparing it according to tested recipes, choosing the correct jar size, using the right processing method for the food's acidity, applying the right pressure or temperature for altitude, processing for the correct time, cooling properly, checking seals, and storing jars appropriately (Missouri Extension, 2015; National Center for Home Food Preservation [NCHFP], n.d.-a; U.S. Department of Agriculture [USDA], 2015). The process heats food to destroy microorganisms, drives out air, and creates a vacuum seal that prevents recontamination (Missouri Extension, 2015; NCHFP, n.d.-a). When followed as a complete system, botulism remains rare.
The success of these safeguards can create a dangerous illusion that shortcuts are harmless, especially when personal experience is offered as "proof" a method is safe. The cases we do not hear about, jars quietly discarded because they looked or smelled off, or illnesses never connected back to a specific jar, do not make it into those reassuring anecdotes.
Why boiling water is not enough for low-acid foods
A persistent misconception is that boiling low-acid foods, such as meat or vegetables, long enough will destroy C. botulinum spores without pressure canning. The limitation is temperature. Water boils at 212°F at sea level, and at lower temperatures at higher elevations. That temperature is not high enough to destroy spores in low-acid foods within a reasonable processing time (USDA, 2015; NCHFP, n.d.-a). The NCHFP notes that the time needed to inactivate C. botulinum spores at 212°F would range from 7 to 11 hours, an impractical amount of time that would result in mushy, unpalatable food (NCHFP, n.d.-a). "Just boil it longer" is not a safety plan.
Pressure canning solves the temperature problem by raising the processing temperature. under by increasing the pressure and thereby increasing the temperature at which water boils. For low-acid foods, validated processing procedures rely on the use of pressure canning (USDA, 2015; NCHFP, n.d.-a).
Boiling does have an important role after opening the jar. The CDC recommends boiling low-acid, home-canned foods for 10 minutes at altitudes below 1,000 feet, adding 1 minute for each additional 1,000 feet (CDC, 2024), before consuming them. This destroys toxin but not the spores and does not "rescue" an improperly canned jar. If you suspect improper canning or see signs of spoilage, discard the jar without tasting (CDC, 2024).
Dry canning is not canning
"Dry canning," whether heating jars of dry goods in an oven or "pressure canning" vegetables without adding the recommended amount of liquid, does not create the conditions needed to reliably control C. botulinum spores. The entire interior of each canning jar must reach the target processing temperature and stay at that temperature long enough to destroy the spores. Heat is transferred more slowly in jars that don’t contain liquid than it is in jars with liquid. In addition, bacteria and their spores are killed more quickly by “wet heat” than “dry heat.”. The liquid specified in tested canning methods is not optional; it supports predictable heat penetration and kill rates, which are what tested processing times are based on (Ingham, 2020; NCHFP, 2020; Penn State Extension, 2024).
Recent outbreaks in multiple countries
Botulism is rare but not unknown. Recent outbreaks show the same pattern: the risk follows behavior, not geography.
In the United States, a 2024 outbreak in Fresno County, California linked to home-prepared prickly pear cactus (nopales) sickened eight people. Six required ICU care and two needed mechanical ventilation (Vohra et al., 2025). In Italy, outbreaks from commercially prepared foods resulted in hospitalizations and deaths, including a Diamante, Calabria cluster where at least 18 people were exposed after eating sandwiches from a food truck; four of them died (Euronews, 2025). In France, six people developed severe symptoms after sharing a meal that included carrot cake. The 78-year-old woman who made the cake later died, and French media linked it to a jar of home-canned carrots (Food Safety News, 2025).
These examples matter because they negate a common argument: that using a group or place as "proof" that safety guidance can be ignored. "In Europe they do not pressure can" or "The Amish do it this way" are still anecdotal evidence. They do not validate methods or change the microbiology. French public health information explicitly notes that boiling is insufficient to sterilize foods because botulinum spores resist boiling water (Santé.fr, 2023). The same science applies everywhere. The only thing that changes risk is whether the method reliably controls conditions that allow toxin to form.
Bottom line
Botulism warnings are not hype. They help prevent a rare but severe hazard. The reason more people do not get sick is that safe practices work.
Clostridium botulinum does not respond to internet trends, personal anecdotes, or confidence. It responds to conditions: temperature, acidity, time, and oxygen availability. The science of what causes botulism and what prevents it is well established. When spores find an environment with low oxygen, low acid, adequate moisture, and the right temperature, they germinate and the resulting bacteria produce toxin. When one or more of those conditions is reliably controlled, such as using boiling water canning only for high-acid products, the risk is eliminated.
Many people who follow unsafe methods learned them from trusted sources and share their food with sincere care and good intentions. The disconnect happens when personal experience is offered as evidence of safety. One person's uneventful history with a method does not make that method safe. It means the person has been fortunate. Validation comes from controlled testing that shows whether a method reliably prevents toxin formation across different conditions, foods, jar sizes, and altitudes. That is what tested recipes and processes provide, and that is what personal experience cannot replace.
The highest confidence comes from understanding the process you are following and knowing it has been validated. Science-based canning guidelines are the pathway to food that is both safe and shelf-stable, designed so home canners can preserve food with certainty rather than luck. The UC Master Food Preserver Program and University Extension offices exist to help people do exactly that, to preserve food safely through education grounded in research and tested methods. Safe canning practices protect not just the food, but the people who will eat it.
References
Centers for Disease Control and Prevention. (2024, April 25). Home-canned foods: Botulism prevention. https://www.cdc.gov/botulism/prevention/home-canned-foods.html
Centers for Disease Control and Prevention. (2024, June 12). Treatment of botulism. https://www.cdc.gov/botulism/treatment/index.html
Euronews. (2025, August 20). Death toll rises to 4 in botulism outbreak in Italy. https://www.euronews.com/health/2025/08/20/death-toll-rises-to-4-in-botulism-outbreak-in-italy
Food Safety News. (2025, August 4). Woman dies in French botulism outbreak. https://www.foodsafetynews.com/2025/08/woman-dies-in-french-botulism-outbreak/
Ingham, B. H. (2020, June 18). Unsafe canning practice: "Dry canning" vegetables. University of Wisconsin–Madison Division of Extension. https://florence.extension.wisc.edu/2020/07/07/unsafe-canning-practice-dry-canning-vegetables/
Lúquez, C., Edwards, L., Griffin, C., & Sobel, J. (2021). Foodborne botulism outbreaks in the United States, 2001–2017. Frontiers in Microbiology, 12, 713101. https://doi.org/10.3389/fmicb.2021.713101
Missouri Extension. (2015). Safe home canning basics (Publication No. GH1451). University of Missouri. https://extension.missouri.edu/publications/gh1451
National Center for Home Food Preservation. (2020, June 25). Dry canning raw vegetables is an unsafe practice. https://preservingfoodathome.com/2020/06/25/dry-canning-raw-vegetables-is-an-unsafe-practice/
National Center for Home Food Preservation. (n.d.-a). Ensuring safe canned foods. https://nchfp.uga.edu/how/can/general-information/ensuring-safe-canned-foods/
Penn State Extension. (2024, September 17). "Dry canning" is not recommended. https://extension.psu.edu/dry-canning-is-not-recommended
Rao, A. K., Sobel, J., Chatham-Stephens, K., & Luquez, C. (2021). Clinical guidelines for diagnosis and treatment of botulism, 2021. MMWR Recommendations and Reports, 70(2), 1–30. https://doi.org/10.15585/mmwr.rr7002a1
Santé.fr. (2023, October 26). Le botulisme : de quoi s'agit-il et comment s'en prémunir ? https://www.sante.fr/le-botulisme-de-quoi-sagit-il-et-comment-sen-premunir
U.S. Department of Agriculture. (2015). Complete guide to home canning (Agriculture Information Bulletin No. 539, Rev. 2015). National Institute of Food and Agriculture. https://www.nal.usda.gov/exhibits/ipd/canning/items/show/101
U.S. Department of Agriculture, Food Safety and Inspection Service. (n.d.). Clostridium botulinum and botulism. https://www.fsis.usda.gov/food-safety/foodborne-illness-and-disease/illnesses-and-pathogens/botulism
Vohra, R., Barash, J. R., Karmarkar, E. N., Koch-Kumar, S., Sanchez, N., Gore, M., Michel, K., Rangel, M., Armstrong, E., Pimentel, L., Kraushaar, V., Kimura, A., Stainken, C., Nat, A., Nat, R. S., Cherukupalli, S., Schneider, D., Vugia, D. J., Solis, T., … Al Saghbini, S. (2025). Foodborne botulism outbreak after consumption of home-prepared cactus (nopales), Fresno County, California, June 2024. MMWR Morbidity and Mortality Weekly Report, 74(24), 408–413. https://www.cdc.gov/mmwr/volumes/74/wr/mm7424a1.htm
World Health Organization. (2023, September 25). Botulism. https://www.who.int/news-room/fact-sheets/detail/botulism